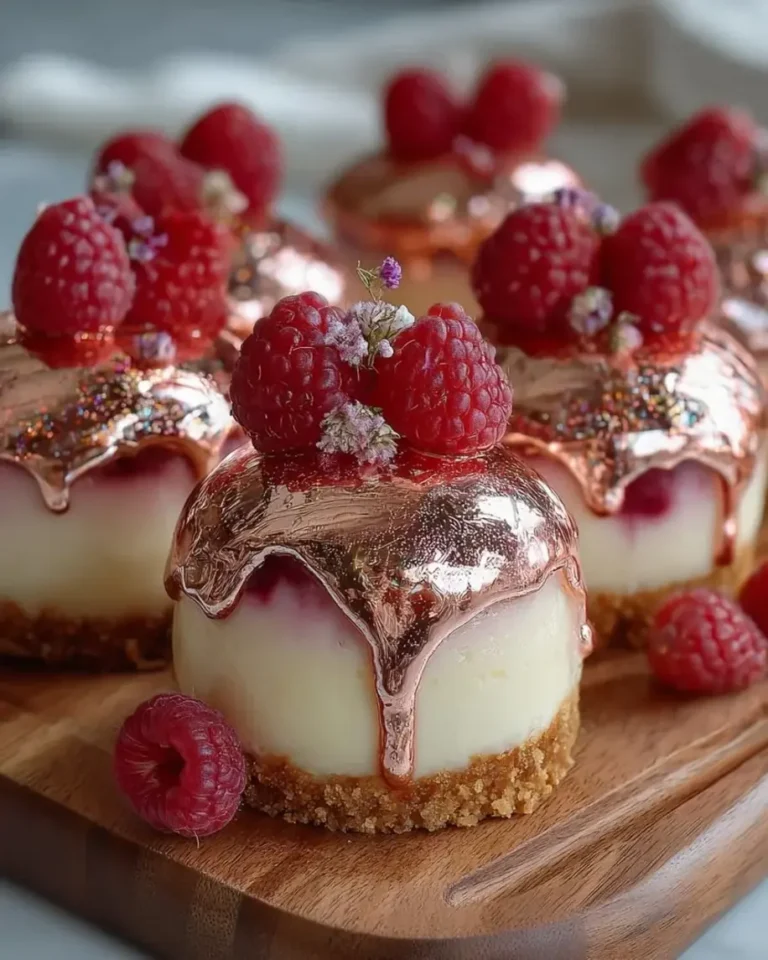
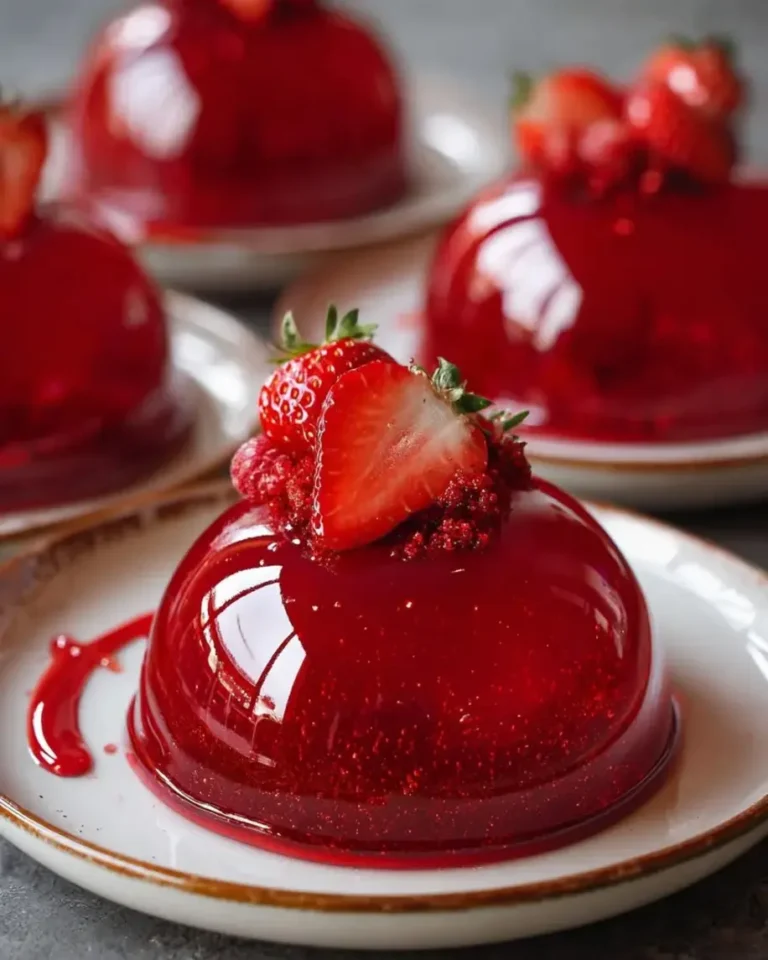
Ruby Strawberry Hibiscus Mirror Domes with Glossy Glaze
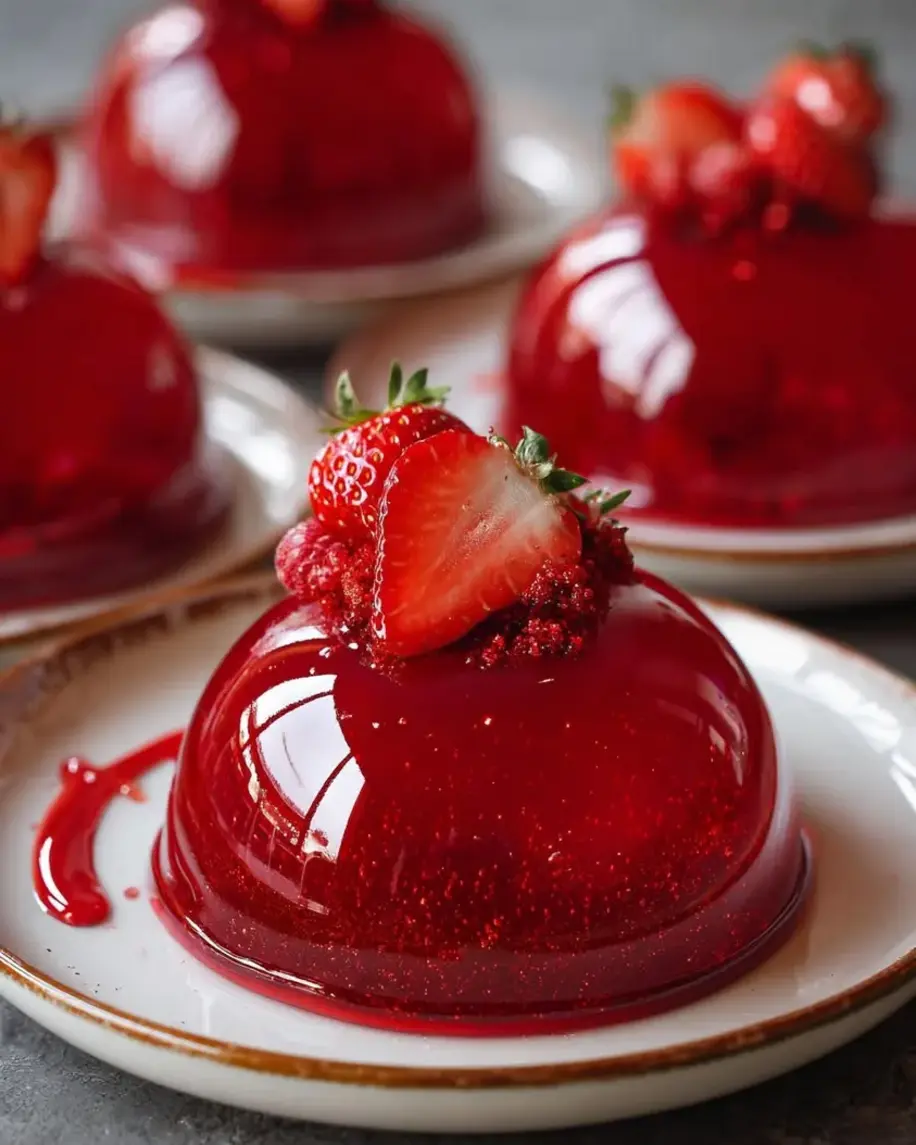
Table of Contents
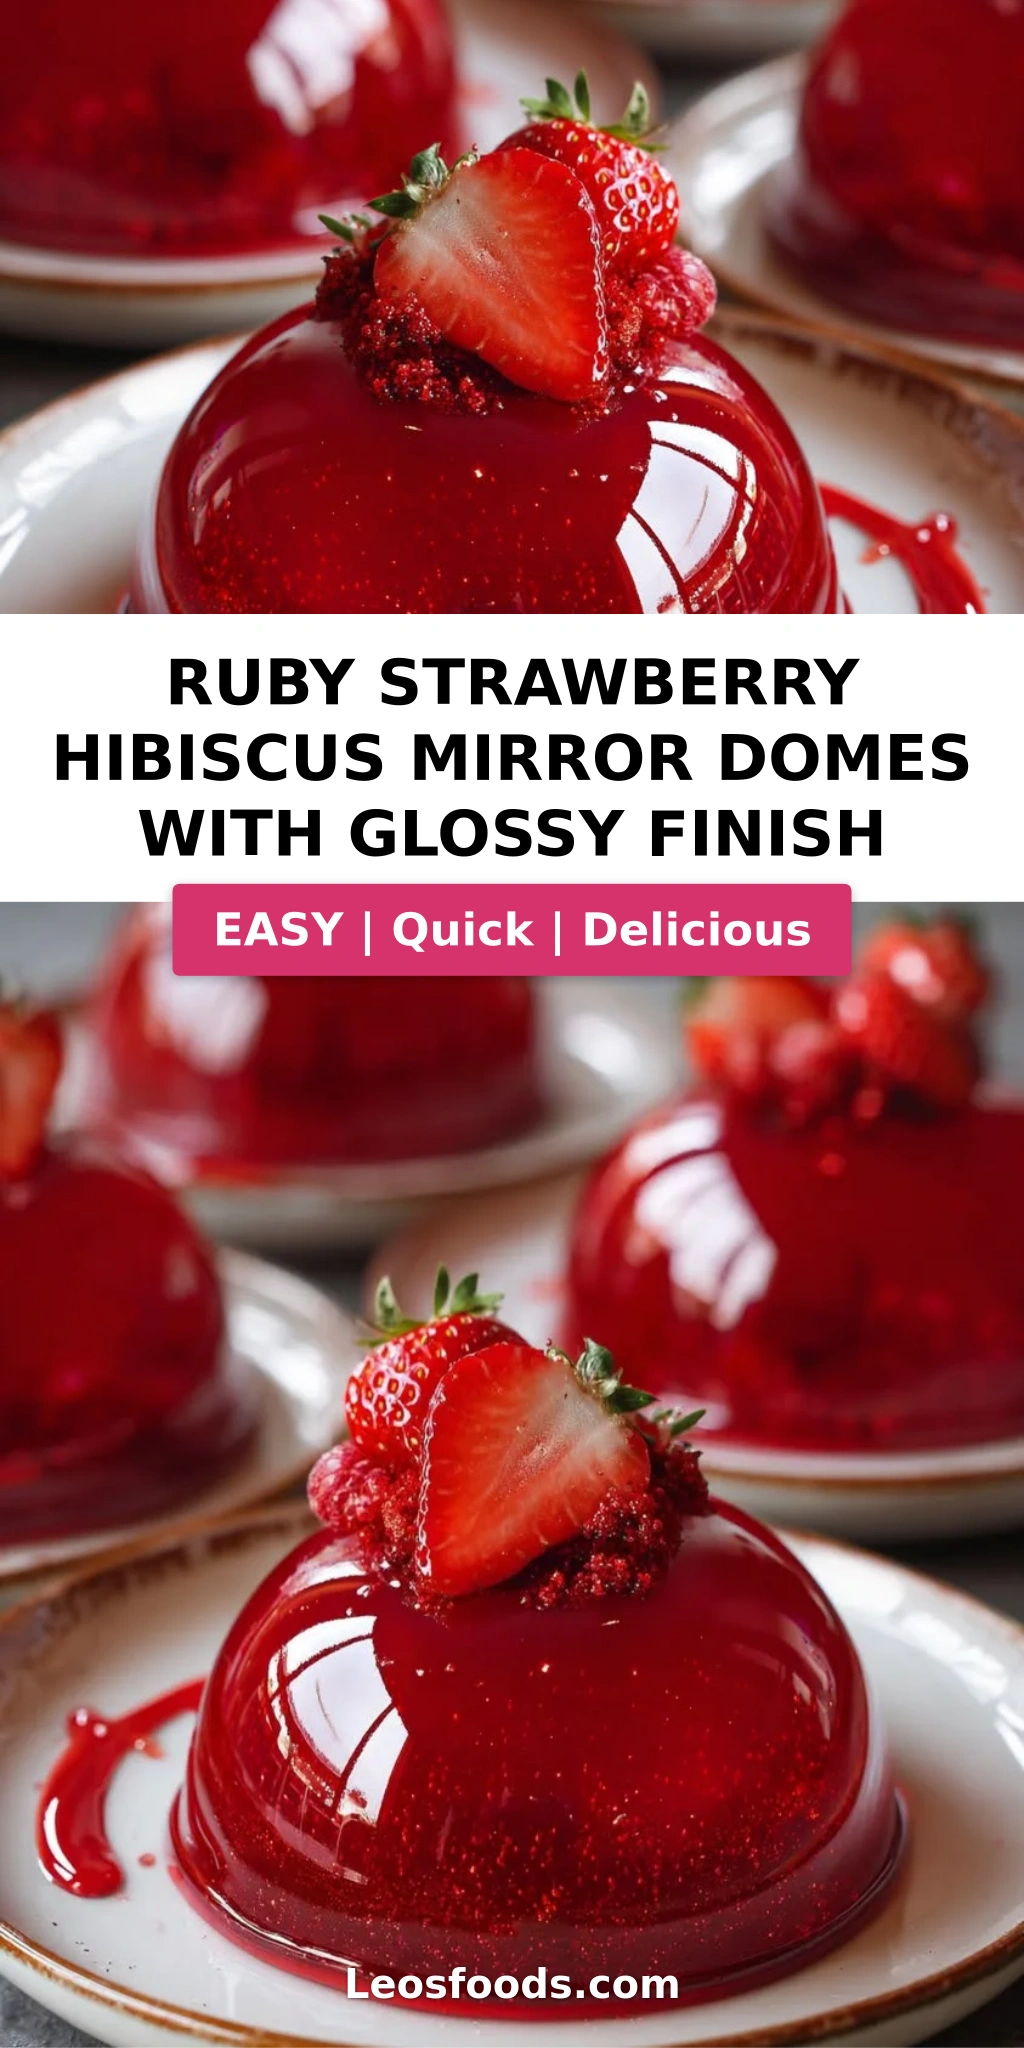
Ruby Strawberry Hibiscus Mirror Domes with Glossy Finish – A Showstopping Dessert
I still remember the first time I saw a mirror glaze dome in a Parisian pâtisserie window — a flawless ruby sphere catching the afternoon light like a jewel. I pressed my nose to the glass, utterly captivated. Twenty years later, after training in French pastry kitchens and countless experiments in my own NYC kitchen, I’ve created my version: these ruby strawberry hibiscus mirror domes with glossy finish. They combine the floral depth of hibiscus with the bright sweetness of strawberries, all wrapped in a mirror-bright glaze that feels almost unfair to eat.
The first bite cracks through the shiny shell into a silky strawberry-hibiscus mousse, then meets a cloud of vanilla mascarpone cream at the center. The hibiscus adds a subtle tartness that keeps each spoonful interesting — it’s the same dried hibiscus my mother used to steep for tea in our kitchen in Morocco, and I love seeing it star in a French-inspired dessert. The texture is impossibly smooth, thanks to precise gelatin work and a mirror glaze technique I honed during my pastry training in Paris. Every dome emerges from its mold gleaming like a polished gem.
What sets this strawberry hibiscus dessert apart is the balance: the glaze is sweet but not cloying, the mousse is rich but light, and the vanilla cream center cuts through with clean, milky notes. I’ve tested this mirror glaze dome recipe a dozen times to get the temperature and consistency just right, so you can achieve that glass-like finish at home. One common mistake home bakers make is pouring the glaze too hot — I’ll show you exactly how to nail it. Whether for a birthday, anniversary, or just because you want to impress yourself, these domes deliver drama and flavor in equal measure.
Why This Ruby Strawberry Hibiscus Mirror Domes Recipe Is the Best
The Flavor Secret. Most mirror dome recipes rely on artificial flavors for that vivid color, but I build mine from real strawberry puree and concentrated hibiscus tea. The hibiscus brings a natural crimson hue and a gentle floral-tart note that lifts the strawberry rather than competing with it. It’s the same principle I learned in Paris — let the ingredients speak, then amplify. The vanilla mascarpone center adds a luxuriously creamy counterpoint, creating a dessert that tastes as sophisticated as it looks.
Perfected Texture. The magic of a great glossy mirror cake is in the gelatin work. I bloom my gelatin in cold water for exactly 5 minutes, then dissolve it into a warm — never boiling — base. This preserves the gelatin’s setting power and ensures a silky-smooth mousse and a glaze that flows evenly without streaks. The freezing step is non-negotiable: a fully frozen dome guarantees the glaze sets instantly on contact, creating that flawless, reflective surface every time.
Foolproof & Fast. I’ve streamlined every step so that even a confident beginner can tackle this strawberry hibiscus recipe. The instructions are detailed, the timing is exact, and I’ve included visual cues for every critical stage. Each dome is built in layers: freeze the shell, add the cream center, seal with more mousse, freeze solid, then glaze. It’s a technique that sounds more complex than it is, and the result is a dessert that looks like it came from a Michelin-starred kitchen — but was made in yours.
Ruby Strawberry Hibiscus Mirror Domes Ingredients
I source my strawberries from the Union Square Greenmarket when they’re in season — the smaller, darker berries have the most intense flavor. For the hibiscus, I buy dried organic flowers from a spice shop in the East Village; they brew a deep ruby tea that’s perfect for this dessert. If you’re shopping at a standard grocery store, look for freeze-dried strawberry powder in the baking aisle and dried hibiscus in the tea or international foods section.
Ingredients List
- For the Strawberry Hibiscus Dome Shells:
- 2 cups strawberries, pureed
- 1/2 cup hibiscus tea, strongly brewed and cooled
- 1/2 cup heavy cream
- 1/3 cup granulated sugar
- 2 tsp gelatin powder
- 2 tbsp cold water
- 1 tsp lemon juice
- Pinch of salt
- For the Vanilla Cream Center:
- 1 cup mascarpone cheese
- 1/2 cup heavy whipping cream
- 3 tbsp powdered sugar
- 1 tsp vanilla extract
- For the Ruby Mirror Glaze:
- 1 cup white chocolate, finely chopped
- 1/2 cup sweetened condensed milk
- 1/4 cup water
- 1 tbsp gelatin powder
- 3 tbsp cold water
- 2 tbsp strawberry puree
- A few drops red food coloring
- 1/2 tsp edible pearl luster dust
- For Garnish (optional):
- 2 tbsp finely diced strawberries
- 1 tbsp dried hibiscus petals
- Edible silver flakes
Ingredient Spotlight
Hibiscus Tea. Dried hibiscus flowers brew a tart, cranberry-like tea that gives this dessert its signature ruby color and floral tang. Look for organic dried hibiscus in bulk bins or tea shops. To substitute, try dried cranberries steeped in hot water and strained, though the flavor will be less complex. Steep 2 tablespoons of dried flowers in 1 cup of boiling water for 10 minutes, then strain and cool.
White Chocolate. The base of the mirror glaze needs real white chocolate — not compound coating — for the best shine and flavor. I use a brand with at least 30% cocoa butter. In a pinch, you can use high-quality white chocolate chips, but avoid white melting wafers, which contain oils that dull the finish. The chocolate provides the creamy mouthfeel and the perfect canvas for the ruby color.
Edible Pearl Luster Dust. This is the secret to the glaze’s luminous, mirror-like sheen. It’s a fine, food-grade powder made from mica that reflects light. I add it directly to the warm glaze, where it dissolves without affecting texture. You can find it at cake supply stores or online. Skip it if you want a matte finish, but the gloss factor drops significantly.
Mascarpone. This Italian cream cheese gives the center a velvety richness without being too heavy. It’s available in most grocery stores near the specialty cheeses. For a substitute, blend 8 oz cream cheese with 3 tbsp heavy cream until smooth, though the flavor will be tangier and less delicate.
| Original Ingredient | Best Substitution | Flavor / Texture Impact |
|---|---|---|
| Hibiscus tea | Cranberry juice concentrate + water | Less floral, more tart; color slightly less vibrant |
| White chocolate | High-quality white chocolate chips | Same if real cocoa butter; avoid compound coating |
| Mascarpone | Cream cheese + heavy cream (blended) | Tangier, slightly less smooth |
| Pearl luster dust | Omit for matte finish | No shimmer; gloss still good but less mirror-like |
| Gelatin powder | Agar-agar (vegan, use 1 tbsp) | Firmer set, less melt-in-mouth; needs different blooming |
How to Make Ruby Strawberry Hibiscus Mirror Domes — Step-by-Step
Trust me on this: the process is more logical than it looks. You’re essentially building a frozen dessert in layers, then coating it with a glaze that sets on contact. Take your time with each step, and you’ll be rewarded with an absolutely stunning dessert.
Step 1: Bloom the Gelatin
Sprinkle 2 teaspoons of gelatin powder over 2 tablespoons of cold water in a small bowl. Let it sit for 5 minutes without stirring. The gelatin will absorb the water and form a firm, jiggly mass. This process, called blooming, ensures the gelatin dissolves evenly and sets properly. Never skip this step or add gelatin directly to hot liquid — you’ll get lumps and a weak set.
💡 Stella’s Pro Tip: Use cold — not warm or room temperature — water for blooming. Warm water will partially dissolve the gelatin and weaken its setting power, leaving you with a mousse that won’t hold its shape when unmolded.
Step 2: Make the Strawberry Hibiscus Base
In a small saucepan, combine the strawberry puree, cooled hibiscus tea, heavy cream, sugar, lemon juice, and a pinch of salt. Heat over medium-low, stirring occasionally, until the mixture is warm and the sugar is fully dissolved — about 3 to 4 minutes. Do not let it boil. Remove from heat and add the bloomed gelatin, stirring until completely dissolved. The mixture should be smooth and a deep ruby color.
⚠️ Common Mistake to Avoid: Boiling the base. High heat can break down the gelatin and cause the strawberry puree to develop a cooked, jammy flavor. Keep the heat gentle and remove the pan as soon as the sugar dissolves and the mixture is warm to the touch.
Step 3: Coat the Dome Molds
Pour a thin layer of the strawberry hibiscus mixture into each dome mold (about 1/8 inch thick). Tilt the molds gently to coat the sides evenly. Place the molds on a tray and refrigerate for 15 to 20 minutes, until the mixture is partially set but still tacky to the touch. This creates the shell that will hold the cream center.
💡 Stella’s Pro Tip: If the mixture slides down the sides before setting, your molds are too warm. Pop them in the freezer for 5 minutes first, then pour and tilt. The cold surface helps the layer adhere immediately.
Step 4: Make the Vanilla Cream Center
In a medium bowl, combine the mascarpone cheese, heavy whipping cream, powdered sugar, and vanilla extract. Using a hand mixer or whisk, whip until the mixture is light, fluffy, and holds soft peaks — about 2 to 3 minutes. Be careful not to overwhip, or the cream can separate. The center should be spoonable but stable.
⚠️ Common Mistake to Avoid: Overwhipping the mascarpone mixture. Mascarpone is delicate and can turn grainy if beaten too long. Stop as soon as the mixture holds a soft peak and looks smooth and satiny. If it looks curdled, you’ve gone too far — start again with fresh mascarpone.
Step 5: Fill the Domes
Spoon or pipe the vanilla cream into the center of each partially set shell, filling about two-thirds of the cavity. Leave a small border around the edges — about 1/4 inch — so the top layer of mousse can seal the dome completely. The cream center should be evenly distributed but not touching the edges of the mold.
💡 Stella’s Pro Tip: Use a piping bag with a wide tip to fill the centers neatly. This keeps the cream contained and prevents it from smearing on the sides of the shell, which would create gaps in the final dome.
Step 6: Seal and Freeze
Cover the cream center with the remaining strawberry hibiscus mixture, filling the molds to the top. Use a small offset spatula or the back of a spoon to smooth the surface flush with the rim of the mold. Transfer the tray to the freezer and freeze for at least 4 hours, or until the domes are completely solid to the touch. Overnight is ideal.
⚠️ Common Mistake to Avoid: Unmolding too early. If the domes aren’t frozen solid through the center, they will collapse when you try to unmold them. Press gently on the bottom of a mold — if it feels soft or gives, give it another hour. Fully frozen domes release cleanly and hold their shape.
Step 7: Make the Mirror Glaze
Bloom 1 tablespoon of gelatin in 3 tablespoons of cold water for 5 minutes. In a small saucepan, heat the sweetened condensed milk and 1/4 cup water until steaming — do not boil. Remove from heat and stir in the bloomed gelatin until dissolved. Pour this mixture over the finely chopped white chocolate in a heatproof bowl. Let sit for 1 minute, then stir gently until the chocolate is completely melted and smooth. Add the strawberry puree, a few drops of red food coloring, and the edible pearl luster dust, stirring until the glaze is a uniform, glossy ruby color.
💡 Stella’s Pro Tip: The ideal temperature for pouring mirror glaze is between 32°C and 35°C (90°F to 95°F). Use a digital thermometer for accuracy. If the glaze is too hot, it will melt the frozen dome and pool rather than coating evenly. If too cool, it will thicken and lose its mirror finish. I recommend letting the glaze cool at room temperature, stirring occasionally, until it reaches the right temperature range.
Step 8: Unmold and Glaze
Remove the frozen domes from the freezer and unmold them immediately. To unmold, gently flex the silicone mold from the edges — the domes should pop out cleanly. Place each dome on a wire rack set over a baking sheet to catch drips. Pour the cooled mirror glaze evenly over each dome, covering the entire surface. Let the excess glaze drip off for about 30 seconds. Once the glaze has stopped dripping, transfer the domes to serving plates.
⚠️ Common Mistake to Avoid: Glazing over a solid surface instead of a wire rack. The excess glaze needs somewhere to drip; if it pools around the base of the dome, it will create a thick, uneven edge and can ruin the clean finish. Always use a wire rack with a tray underneath.
Step 9: Garnish and Serve
While the glaze is still slightly tacky (but not wet), garnish each dome with finely diced strawberries, dried hibiscus petals, and edible silver flakes. The garnishes will adhere to the glaze and create a beautiful, jewel-like presentation. Transfer to serving plates and serve immediately, or refrigerate for up to 2 hours before serving. The domes should be served chilled but not frozen — the interior should be creamy and mousse-like, not icy.
💡 Stella’s Pro Tip: For the cleanest cut, use a sharp knife warmed under hot water and wiped dry. Slice through the dome in one smooth motion. The contrast between the glossy ruby exterior and the creamy white center is absolutely stunning.
| Step | Action | Duration | Key Visual Cue |
|---|---|---|---|
| 1 | Bloom gelatin | 5 mins | Gelatin is firm and jiggly |
| 2 | Make strawberry-hibiscus base | 4 mins | Sugar dissolved, mixture warm, not boiling |
| 3 | Coat dome molds | 15–20 mins chill | Layer is tacky, not runny |
| 4 | Whip vanilla cream center | 2–3 mins | Soft peaks, smooth and fluffy |
| 5 | Fill domes with cream | 5 mins | Cream centered, 1/4-inch border clear |
| 6 | Seal and freeze | 4+ hrs | Domes are solid, no give when pressed |
| 7 | Make mirror glaze | 10 mins + cooling | Glaze is smooth, glossy, 90–95°F |
| 8 | Unmold and glaze | 5 mins | Glaze coats evenly, excess drips cleanly |
| 9 | Garnish and serve | 5 mins | Garnishes adhere, dome is glossy and intact |
Serving & Presentation
These ruby strawberry hibiscus mirror domes are designed to be the centerpiece of your table. I love serving them on simple white plates to let the glossy ruby color take center stage. For an extra touch, drizzle a little extra mirror glaze around the plate and drag a knife through it to create a sweeping arc — it adds a professional, artistic flair that looks like it came from a high-end pastry kitchen.
The garnish is where you can really personalize each dome. I scatter finely diced strawberries, crumbled dried hibiscus petals, and a few edible silver flakes on top — the silver catches the light and mirrors the gloss of the glaze. If you want to go all out, add a tiny dollop of whipped cream or a quenelle of vanilla ice cream on the side. The cold, creamy contrast enhances the mousse-like interior of the dome.
When I serve these at dinner parties in my NYC apartment, I always get a gasp when the first slice reveals the pristine white center against the ruby exterior. It’s a moment that never gets old. Pair the domes with a sparkling hibiscus lemonade or a dry sparkling wine — the bubbles cut through the richness and echo the floral notes of the dessert.
| Pairing Type | Suggestions | Why It Works |
|---|---|---|
| Side Dish | Fresh berry salad, light angel food cake | Bright fruit and airy texture balance the rich mousse |
| Sauce / Dip | Extra mirror glaze, whipped cream, berry coulis | Adds moisture and a second layer of flavor |
| Beverage | Sparkling hibiscus lemonade, dry Prosecco, mint tea | Bubbles and floral notes mirror the hibiscus in the dome |
| Garnish | Diced strawberries, dried hibiscus petals, edible silver flakes | Adds texture, color contrast, and a jewel-like finish |
Make-Ahead, Storage & Reheating
One of the best things about this dessert is how well it works for make-ahead entertaining. In my busy NYC schedule, I often prep the domes completely through step 6 (freezing) up to two weeks in advance. The mirror glaze can be made and stored separately, then warmed slightly before glazing on serving day. This makes these domes a dream for holiday dinners or dinner parties — you do the hard work ahead of time and simply glaze and garnish before serving.
| Method | Container | Duration | Reheating Tip |
|---|---|---|---|
| Refrigerator | Airtight container, single layer | Up to 2 days | Serve chilled straight from fridge; no reheating needed |
| Freezer | Silicone molds or wrapped individually | Up to 2 weeks | Glaze directly from frozen; no thawing needed |
| Make-Ahead | Freeze domes, store glaze separately | Glaze up to 5 days ahead | Rewarm glaze gently to 90°F before pouring |
If you’ve already glazed the domes and have leftovers, store them in an airtight container in the refrigerator for up to 2 days. The glaze may lose a bit of its mirror shine over time, but the flavor will still be wonderful. To refresh the gloss, you can carefully add a second thin layer of fresh mirror glaze just before serving. I don’t recommend freezing already-glazed domes, as the glaze can crack and lose its finish.
Variations & Easy Swaps
Once you’ve mastered the basic technique, the possibilities are endless. Here are three variations I’ve tested in my kitchen that work beautifully with the same mirror glaze method.
| Variation | Key Change | Best For | Difficulty Impact |
|---|---|---|---|
| Raspberry Rose | Replace hibiscus with rose water + raspberry puree | Valentine’s Day, romantic dinners | Same |
| Matcha Coconut | Replace strawberry with matcha, use coconut cream | Earthy flavor lovers, dairy-free option | Slightly harder (matcha can clump) |
| Chocolate Orange | Add cocoa powder to dome shell, orange zest to cream | Chocolate lovers, holiday gatherings | Same |
Raspberry Rose Variation
This is my favorite romantic twist. Swap the hibiscus tea for 1/4 cup raspberry puree plus 1 teaspoon rose water. The rose adds a delicate floral note that pairs beautifully with the raspberry’s tartness. I learned this pairing from a pastry chef in Paris who used rose syrup in her macarons. The mirror glaze stays ruby red, and I like to garnish with fresh raspberries and a few crystallized rose petals. It’s equally stunning and just as easy as the original.
Dairy-Free Version
For a dairy-free version, substitute the heavy cream and mascarpone with full-fat coconut cream. Use a high-quality coconut cream that’s thick and smooth — chill the can overnight and scoop only the solid white part. The vanilla center will be slightly less rich but still creamy and delicious. For the mirror glaze, use a dairy-free white chocolate made with coconut milk. The texture will be a touch softer, so freeze the domes for an extra hour before glazing.
Chocolate Orange Twist
Add 2 tablespoons of unsweetened cocoa powder to the strawberry hibiscus base in step 2, whisking until fully dissolved. The chocolate deepens the color to a dark ruby and adds a rich, mocha-like undertone. For the cream center, add 1 tablespoon of finely grated orange zest to the mascarpone mixture. The orange cuts through the chocolate beautifully and echoes the citrus notes in the hibiscus. This version is always a hit at holiday parties in my NYC building.
What is the best way to achieve a glossy finish on mirror glaze for strawberry hibiscus domes?
The key to a flawless glossy finish is temperature control and straining. First, make sure your mirror glaze is between 90°F and 95°F (32°C to 35°C) before pouring — too hot and it will melt the frozen dome, too cool and it will thicken and lose its shine. Second, strain the glaze through a fine-mesh sieve after mixing to remove any undissolved gelatin or chocolate bits. Third, add edible pearl luster dust, which reflects light and creates that mirror-like sheen. Finally, pour the glaze over a fully frozen dome on a wire rack so the excess drips away cleanly, leaving a smooth, even coat.
Can I substitute fresh strawberries for freeze-dried strawberry powder in the mirror dome recipe?
Absolutely — fresh strawberries work beautifully in this recipe. Use 2 cups of fresh strawberry puree (blend about 1 pound of fresh strawberries and strain out the seeds if you prefer a smooth texture). The fresh puree will add more moisture than freeze-dried powder, so you may need to reduce the liquid elsewhere slightly — cut the hibiscus tea by 2 tablespoons to compensate. The flavor will be brighter and more natural with fresh berries. In my NYC kitchen, I use fresh strawberries from the farmers market in summer and frozen strawberries (thawed and pureed) in winter, and both deliver excellent results.
How long do ruby strawberry hibiscus mirror domes need to set in the refrigerator before serving?
After glazing, the domes need about 10 to 15 minutes at room temperature (or in the refrigerator) for the glaze to fully set and become firm to the touch. However, for the best texture, I recommend refrigerating the glazed domes for 30 minutes to 1 hour before serving. This allows the interior to soften slightly from frozen to a creamy, mousse-like consistency without becoming too warm. If you’re serving them straight from the freezer after glazing, let them sit at room temperature for 20 minutes. The ideal serving temperature is chilled but not icy — the center should be soft and spoonable.
What is the purpose of hibiscus in this dessert, and can it be replaced with another ingredient?
Hibiscus serves three purposes in this dessert: it provides a natural, vibrant ruby-red color; it adds a tart, floral flavor that balances the sweetness of the strawberries and white chocolate; and it contributes a subtle earthy depth that makes the dessert feel more sophisticated. If you don’t have dried hibiscus, you can substitute with cranberry juice concentrate (diluted with water to match the strength) for a similar tartness and color, or with raspberry puree for a fruitier profile. Rose water (start with 1/2 teaspoon) can add a floral note, but you’ll need a separate source of red color, such as beet powder or food coloring.
Can I make these mirror domes without a silicone dome mold?
Yes, you can still make a version of this dessert without specialty molds. Use small glass or ceramic bowls (like ramekins) lined with plastic wrap — press the plastic tightly against the inside of the bowl, then fill and freeze as directed. The shape will be a hemisphere rather than a perfect dome, and the surface may have slight wrinkles from the plastic, but the flavor and texture will be the same. Alternatively, you can use a standard muffin tin with silicone liners, though the sides will be more vertical. For the most professional result, I do recommend investing in a set of silicone hemisphere molds — they’re affordable and reusable, and the clean release makes a huge difference in the final appearance.
Why did my mirror glaze crack or not set properly?
Cracked or improperly set mirror glaze usually happens for one of three reasons. First, the dome wasn’t frozen solid enough — if the interior is still soft, the thermal shock of the warm glaze can cause the dome to shift and crack the glaze as it sets. Freeze your domes for at least 4 hours, ideally overnight. Second, the glaze was too hot when poured — temperatures above 100°F can melt the dome surface and create an uneven, cracked finish. Always use a thermometer and aim for 90–95°F. Third, the glaze was too cool and thick, so it didn’t flow evenly and set in thick patches that crack as they contract. If your glaze cracks, you can sometimes save it by gently warming the surface with a kitchen torch and smoothing it, then re-chilling.
Can I use agar-agar instead of gelatin to make this dessert vegetarian-friendly?
Yes, you can substitute agar-agar for gelatin, but the texture and setting behavior will be different. Use 1 tablespoon of agar-agar powder for every 2 teaspoons of gelatin called for in the recipe. Unlike gelatin, agar-agar needs to be brought to a boil to activate — so instead of blooming in cold water, whisk the agar-agar into the liquid base and bring it to a full boil for 1 to 2 minutes, stirring constantly. The set will be firmer and less melt-in-mouth than gelatin, and the texture may be slightly more brittle. For the mirror glaze, agar-agar can be tricky because it sets at a higher temperature, so work quickly when pouring. I’ve tested this substitution and it works, but I recommend practicing with a single dome first.
How do I store leftover mirror glaze, and can I reuse it?
Yes, you can absolutely store and reuse leftover mirror glaze! Pour any unused glaze into an airtight container and refrigerate for up to 5 days. When you’re ready to use it again, gently reheat the glaze in a heatproof bowl set over a pot of simmering water (double boiler method) or in the microwave at 50% power in 15-second bursts, stirring between each. Bring it to 90–95°F and stir until smooth — you may need to add a teaspoon of warm water if it has thickened. The glaze can be reused 2 to 3 times before the texture degrades. Do not refreeze glaze that has already been poured over domes, as it will lose its shine. I often make a double batch of glaze and keep half in the fridge for quick glazing later in the week.
Can I freeze the glazed domes for later use?
I don’t recommend freezing domes after they’ve been glazed, because the mirror glaze can crack, weep, or lose its glossy finish during freezing and thawing. The moisture in the freezer and the expansion/contraction of the dome as it freezes and thaws can compromise the glaze’s appearance. Instead, freeze the unglazed domes (through step 6) for up to 2 weeks, then glaze them fresh on the day you plan to serve. This way you get the convenience of make-ahead prep with the perfect, glossy finish every time. If you absolutely must freeze a glazed dome, place it in a single layer in an airtight container and thaw it in the refrigerator overnight — expect some loss of shine.
What other flavor combinations work well with this mirror glaze technique?
This mirror glaze technique is incredibly versatile and works with countless flavor combinations. My top three tested variations are: mango-passion fruit (replace strawberry puree with mango puree and add 2 tbsp passion fruit pulp), matcha-white chocolate (use 2 tsp matcha powder dissolved in warm water instead of strawberry, and add white chocolate to the mousse), and blackberry-lavender (use blackberry puree and 1 tsp dried lavender steeped in the cream). The key is to maintain the same liquid-to-gelatin ratio — about 2 cups of flavored liquid for the dome shell. I encourage you to experiment with your favorite fruits and floral flavors once you’ve mastered the basic technique!
Share Your Version!
I can’t wait to see your ruby strawberry hibiscus mirror domes! There’s something so special about watching that glossy glaze cascade over a perfectly frozen dome — it’s a moment of pure kitchen magic. If you make this recipe, please leave a star rating and a comment below to let me know how it turned out. Your feedback helps me refine the recipe and inspires others in our community to try it too.
Snap a photo of your creation and share it on Instagram or Pinterest — tag @leosfoods so I can see your beautiful work and feature it in my stories! I especially love seeing how you personalize the garnishes and plating. And if you have questions about any step, don’t hesitate to ask in the comments — I read every single one and answer personally. Now go create something stunning!
From my NYC kitchen to yours — I hope this recipe brings as much warmth to your table as it does to mine. — Stella 🧡
Love This Recipe? Save It to Pinterest!
If you enjoyed this Ruby Strawberry Hibiscus Mirror Domes with Glossy Finish recipe, don’t let it get lost in your browser tabs! 😄 Pin it now so you can find it again anytime — and explore hundreds more tried-and-tested recipes waiting for you on my Pinterest boards.
👉 Follow Stella on Pinterest @stellarecipeblog
📌 Pin this recipe · 🔁 Re-pin your favorites · 💬 Tag me when you make it — I love seeing your creations!
Ruby Strawberry Hibiscus Mirror Domes with Glossy Finish
Ruby Strawberry Hibiscus Mirror Domes with Glossy Finish
- Yield: 6 1x
Ingredients
- For the Strawberry Hibiscus Dome Shells:
- 2 cups strawberries, pureed
- 1/2 cup hibiscus tea, strongly brewed and cooled
- 1/2 cup heavy cream
- 1/3 cup granulated sugar
- 2 tsp gelatin powder
- 2 tbsp cold water
- 1 tsp lemon juice
- Pinch of salt
- For the Vanilla Cream Center:
- 1 cup mascarpone cheese
- 1/2 cup heavy whipping cream
- 3 tbsp powdered sugar
- 1 tsp vanilla extract
- For the Ruby Mirror Glaze:
- 1 cup white chocolate, finely chopped
- 1/2 cup sweetened condensed milk
- 1/4 cup water
- 1 tbsp gelatin powder
- 3 tbsp cold water
- 2 tbsp strawberry puree
- A few drops red food coloring
- 1/2 tsp edible pearl luster dust
- For Garnish (optional):
- 2 tbsp finely diced strawberries
- 1 tbsp dried hibiscus petals
- Edible silver flakes
Instructions
- Bloom gelatin in cold water for 5 minutes.
- Heat strawberry puree, hibiscus tea, heavy cream, sugar, lemon juice, and salt until warm and smooth. Remove from heat and stir in bloomed gelatin until fully dissolved.
- Pour a thin layer of the strawberry hibiscus mixture into dome molds, coating the sides evenly. Chill until partially set.
- Whip mascarpone, heavy cream, powdered sugar, and vanilla extract until light and fluffy.
- Fill the center of each dome with the vanilla cream, leaving a small border around the edges.
- Cover with the remaining strawberry hibiscus mixture and freeze for at least 4 hours until fully firm.
- For the mirror glaze, bloom gelatin in cold water for 5 minutes.
- Heat sweetened condensed milk and water until steaming. Remove from heat and stir in gelatin until dissolved.
- Pour over white chocolate and mix until smooth. Add strawberry puree, red food coloring, and pearl luster dust until a glossy ruby color is achieved.
- Allow glaze to cool until slightly thickened but still pourable.
- Unmold frozen domes and place on a wire rack. Pour the ruby mirror glaze evenly over each dome.
- Let excess glaze drip off and allow the finish to set.
- Transfer to serving plates and garnish with diced strawberries, dried hibiscus petals, and edible silver flakes.
- Serve chilled.
Nutrition
- Calories: 405
- Sugar: 31g
- Fat: 27g
- Carbohydrates: 37g
- Protein: 5g
Tried This Recipe? Leave a Comment!
Did you make this recipe? I’d love to hear how it turned out! Please leave a comment and a rating below. Your feedback helps other home cooks and supports cheerychop.com!
For more delicious inspiration, follow me on Pinterest!