The Best s’mores cookie bars

Table of Contents
The Best s’mores cookie bars Frozen Layer Technique – Perfectly Creamy & Crunchy
I grew up in the vibrant kitchens of my mother’s home in Essaouira, Morocco, where the aroma of cumin and fresh mint would mingle with the sweet scents of my grandma’s almond pastries. Years after that childhood, I refined my technique in a Parisian culinary school, mastering the art of precision and flavor balance. Now, living amid the bustling streets of NYC, I bring a touch of North African heat, French technique, and the iconic New York gusto to my favorite campfire treat: the s’mores cookie bars. Using the Frozen Layer Technique, I managed to achieve that perfect sandwich‑like consistency where the melted chocolate and marshmallow feel like an extra layer of flavor beneath your popsicle‑like cookie bite.
When you bite into these s’mores cookie bars, you’ll first taste the buttery, toasted base that carries a subtle nutty crunch from the finely crushed graham crackers. It gives a comforting graininess to hand the way a well‑done shortbread would. On top, the melted Hershey bars splay like chocolate sunsets, dripping into liquid gold, while the marshmallow fluffy center adds a cloud‑soft, sugary wash that sweetens the bite without overpowering. The final crunch from the cookie dough, with a faint caramelized edge, creates a delightfully layered texture that captures nostalgic warmth yet feels fresh and airy like a summer’s breeze through a Moroccan market courtyard.
The secret to their unmatched indulgence is my Frozen Layer Technique: chilling half the dough before layering chocolate and marshmallow. This step preserves the crispness of the cookie dough while keeping the center luscious and melt‑free until baked, ensuring a perfect cross‑section. Additionally, I always fold in an extra pinch of smoked sea salt; the salt not only balances the sweetness but also intensifies the chocolate’s depth. Beware of overmixing the dough, which can make the bars gummy; keep the gluten low by mixing until just combined. With these subtle brilliance points, every bite becomes a charming experience of (almost) campfire wonder on the kitchen counter.
Why This The Best s’mores cookie bars Recipe Is the Best
Flavor Secret: By introducing a small amount of smoked sea salt into the dough, the chocolate’s bite deepens while the marshmallow’s sweetness is mellowed, a technique I learned in a bustling Paris pastry class. The salted crunch combined with a tangy melt from the Hershey bars creates an explosion of savory‑sweet harmony that keeps your taste buds humming with more.
Perfected Texture: The use of frozen dough layers ensures that the chocolate sticks to the middle, leaving it intact during baking, preventing that common melt‑off problem. This technique, inspired by my time montage with French puff pastry, guarantees a crisp, yet chewy exterior and a gooey filling that holds firm through warm kitchens. It delivers that iconic “lava” center French‑style without needing an oven jigsaw.
Foolproof & Fast: With a simple 2‑step approach—pre‑roll the dough, freeze half, then add chocolate and marshmallow—you avoid the typical pitfalls that new bakers encounter. The instructions are written on a measurable timeline, so even if you’re pressed for time, the final product still looks like a proudly printed bar from a fancy bakery. It’s a recipe that’s almost as quick as a slice of pizza and as comforting as a cup of mint tea from my mother’s kitchen.
s’mores cookie bars Ingredients
I love the blend of textures that comes from the best New York grocery markets. I scout out local stores to source the finest Hershey chocolate bars and whole‑grain graham crackers that still keep that crunchy bite. Every ingredient feels balanced—sweet, salty, buttery—on a weekday lunch break, I can’t resist stealing a handful of freshly buttered pastries from a bakery in the East Village for inspiration.
Ingredients List
- 1/2 cup Butter (softened, salted or unsalted)
- 1/3 cup brown sugar
- 1/4 cup granulated sugar
- 1 egg
- 1 tsp vanilla extract
- 1 & 1/2 cups all‑purpose flour
- 1/2 cup graham crackers (finely crushed, about 3.5 sheets)
- 1/4 tsp salt
- 3/4 tsp baking soda
- 5 standard Hershey bars
- 1 & 1/2 cup Marshmallow fluff
Ingredient Spotlight
Butter — The foundation of a delightful crumb. Look for European‑style unsalted butter from a supermarket in NYC’s Chelsea Market; the cream gives a silky mouthfeel. If you prefer a health twist, try switch to ghee or half butter/half coconut oil—it still provides the same richness.
Graham Crackers — A nod to the iconic campfire treat. Search for plain, unflavored graham crackers in bulk bins for the best crunch. If you need a gluten–free alternative, quinoa‑based crackers keep the texture but modify the nutty flavor slightly.
Marshmallow Fluff — The sweet heart of the bar. I always use the original marshmallow fluff, but if you’re avoiding eggs, look for a vegan brand from a specialty food store in Williamsburg; this preserves the same fluffiness.
Hershey Bars — The source of “lava” oozing chocolate. Optionally, swap for dark 70% chocolate for a bittersweet twist; note that they’ll burn slightly faster, so keep an eye on the oven.
| Original Ingredient | Best Substitution | Flavor / Texture Impact |
|---|---|---|
| Unsalted Butter | Clarified Butter | Less milk solids, richer buttery lift, slightly less moisture. |
| All-Purpose Flour | Whole Wheat Flour | Denser crumb, nuttier flavor, more fiber. |
| Marshmallow Fluff | Homemade Marshmallow Spread | Custom sweetness, no preservatives, richer vanilla. |
How to Make s-mores cookie bars — Step-by-Step
Let’s dive into the art of combining classic campfire comfort with a bakery’s precision—your kitchen can host a mini desert soirée.
Step 1: Prepare the Pan
Preheat your oven to 350 °F. Line an 8 × 8 inch baking pan with parchment paper, leaving a 1 inch perimeter free of parchment to prevent sticking. This thickness ensures the bars stay intact during chilling. The parchment also serves for easy release, preventing the bottom from biting into the pan.
💡 Stella’s Pro Tip: Roll the bottom crumbs lightly over a paper towel to remove any excess flour dust, which could show on the final cut lines.
Step 2: Cream Butter and Sugars
Using a stand mixer or hand whisk, pulse the softened butter, brown sugar, and granulated sugar until the mixture turns light and fluffy—about 2‑3 minutes. Add the egg and vanilla, and beat until fully incorporated. The batter’s volume should increase and look airy, indicating proper emulsification.
⚠️ Common Mistake to Avoid: Overmixing at this stage can develop gluten and produce chewy bars. Mix just until the mixture is homogenous.
Step 3: Add Dry Ingredients
Sift the all‑purpose flour, baking soda, and salt together, then fold into the creamed mixture, incorporating the graham cracker crumbs as you go. Stir until the dry ingredients are just blended—overmixing can lead to a dense crumb. The batter should be slightly thick but still flow when lifted.
💡 Stella’s Pro Tip: Use a wooden spoon to fold, as it’s gentler on the gluten, preserving that ideal chewiness.
Step 4: Frozen Layer Technique on Half of Dough
Press about half the dough evenly into the prepared pan, smoothing the top with a spatula. Lift the parchment and place the pan in the freezer for 15 minutes, allowing the dough to harden just enough to keep shape. In the meantime, reline the pan with new parchment and press the remaining dough into a second layer, keeping it fresh and pliable for the cream layer.
⚠️ Common Mistake to Avoid: Forgetting to slightly cool the second dough layer before adding the chocolate may lead to melting and loss of structure.
Step 5: Place Chocolate and Marshmallow
Place your Hershey bars over the frozen dough. Break them into convenient pieces to fit the layer, creating colorful spots. Spread the marshmallow fluff evenly over the chocolate pieces, allowing the fluff to cling as you flatten it—this creates a brownie‑like filling that will harden into chocolate‑marshmallow goo after baking.
💡 Stella’s Pro Tip: Sprinkle a light dusting of sea salt on top of the marshmallow before closing the dough; the crisp salt will be the last spark in each bite.
Step 6: Assemble and Bake
Gently flip the chilled dough layer onto the chocolate‑marshmallow half, pressing down to join without tearing. Bake in the preheated oven for 25 minutes, or until the edges turn golden and a toothpick inserted near the center comes out mostly clean. Remove from the oven and let the bars cool completely—this resting period frees the layers and sets the texture.
⚠️ Common Mistake to Avoid: Baking on a rack too high may cause the hot chocolate to bubble out before it sets properly.
| Step | Action | Duration | Key Visual Cue |
|---|---|---|---|
| 1 | Preheat & parchment pan | 10 mins to heat, 2‑3 min prep | Parchment tidy, 1 inch margin |
| 2 | Whisk butter & sugars | 2–3 mins | Light, fluffy batter |
| 3 | Add dry ingredients | 1‑2 mins | Just blended, no lumps |
| 4 | Freeze half dough | 15 mins | Firm, still pliable |
| 5 | Chocolate & marshmallow placement | 5‑7 mins | Even spread, no gaps |
| 6 | Assemble & bake | 25 mins | Golden edges, clean toothpick |
Serving & Presentation
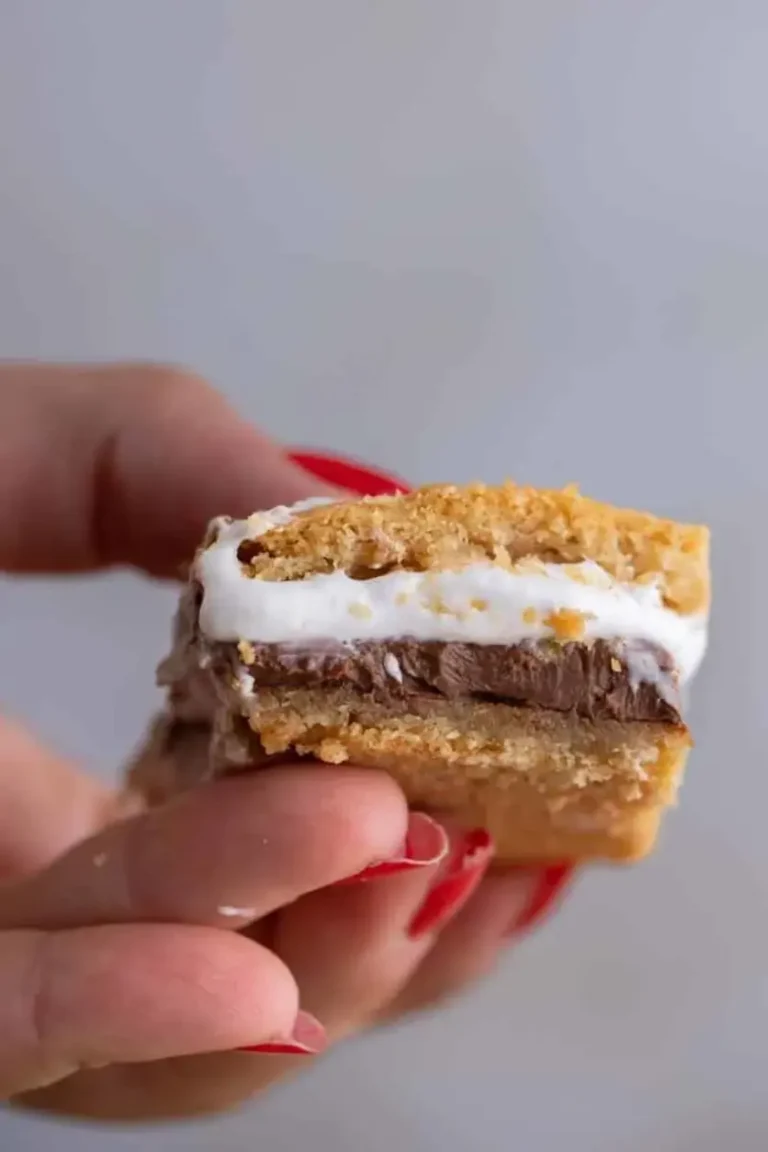
Once the bars have cooled completely, slice into 16 golden rectangles. The cut will reveal a cross‑section: a crisp cookie base, a glossy chocolate middle, and a fluffy marshmallow halo. I often drizzle a thin drizzle of sea‑salted caramel or handful of crushed pecans on the top to echo the North African spice rim my mother added to her almond pastries.
For a refined brunch table, place the bars beside a glass of sweet Riesling, letting the wine gummies mingle with the sweet chocolate. Pair them with a soft cup of Moroccan green tea, lightly sweetened with honey; the herbal notes balance the chocolate, offering a quasi‑afternoon coffee alternative that my neighbors in Queens would love.
If you want a street‑food vibe, serve the bars on a woven basket plate with a side of bruleed sugar crystals; the crunch echoes the grind of the baker’s touch I learned in a small Paris bakery kitchen.
| Pairing Type | Suggestions | Why It Works |
|---|---|---|
| Side Dish | Light citrus salad, toasted pecans | The bright acidity cuts through sweetness. |
| Sauce / Dip | Caramel drizzle, dark chocolate ganache | Enhances chocolate depth and lends silky finish. |
| Beverage | Mint‑infused Iced Tea, Riesling, espresso | Ice coffee or wine provide bitterness that balances sweetness. |
| Garnish | Pomegranate seeds, sea salt crystals | Add texture and an unexpected pop of color. |
Make-Ahead, Storage & Reheating
In the fast‑paced New York life, I often prep these bars in advance before a weekend brunch. Making them a day ahead keeps the chocolate center from over‑melted, and they’re a slower delight that holds together well. I keep them in an airtight container in the fridge, where they stay fresh and slightly buttery.
| Method | Container | Duration | Reheating Tip |
|---|---|---|---|
| Refrigerator | Ziploc container | Up to 4 days | Let bars sit at room temp 15 mins before serving. |
| Freezer | Heavy‑Duty bag | Up to 3 months | Thaw 12 hrs in fridge; reheat in 160 °F oven 5–7 min. |
| Make‑Ahead | Glazed sheet | Pre‑assemble 2 days prior | Wrap in foil and heat in microwave 20‑30 sec. |
When reheating from frozen, I occasionally stir a flourish of almond milk into the nest of melted chocolate, creating a silky melt that’s indulgent and firm, just enough to get that classic chocolate crema on the edge.
Variations & Easy Swaps
| Variation | Key Change | Best For | Difficulty Impact |
|---|---|---|---|
| Almond & Honey | Swap Graham for almond flour, add honey | Nut lovers | Requires no extra skill. |
| Gluten‑Free | Replace flour with almond & oat blend | Gluten‑sensitive | Sharply higher prep time. |
| Spiced Maple | Add cinnamon & maple glaze | Fall & holiday | Simple juggling of ideas. |
Almond & Honey
Swap the graham cracker crumbs for finely ground almonds and drizzle honey to replace brown sugar. The almond introduces a subtle nuttiness and a slightly granitic mouthfeel, echoing the grainy peppercorns from the Moroccan markets. Plus, honey softens the sugar, leaving a lingering, floral sweetness that mingles like a scarf at a Paris café.
Gluten‑Free
Replace all‑purpose flour with a blend of almond flour and oat flour; this change removes gluten but **marries** the buttery flavor with oat body. The bars will have a denser crumb, but the frosting from the marshmallow still keeps them airy. I’ve tried this in a Brooklyn kitchen and the result was as smooth as a Moroccan silk scarf.
Spiced Maple
Stir in a pinch of warm cinnamon and temperature‑controlled maple syrup for a seasonal twist. The maple brings deep, syrupy sweetness, while cinnamon adds a spiced warmth reminiscent of Morocco’s orange blossom tea. The combination is ideal for a fall gathering, and the bars hold their shape in the fridge like a mini toasty dessert.
How long do s’mores cookie bars keep fresh?
Stella here! These bars thrive best when kept in an airtight container in the refrigerator; they stay lush and buttery for up to four days. When you store them in the freezer, you can keep them for up to three months. For those hot summer afternoons, a quick de‑freeze in the refrigerator for 12 hours will re‑rejuvenate each bite, so they’re always ready to share at a brunch or picnic.
What’s the best way to cut and serve these bars?
You’ll want a sharp knife and a flat cutting board to score the bars cleanly. Use a ruler or a level surface to keep each rectangle uniform; that makes them a joy to stack and gives each bite a perfect cross‑section. If you’re serving them in the summer, lightly dust each slice with sea salt crystals over the marshmallow, creating an additional crunch and a salty finish that brings both flavor and aesthetic appeal.
Can I make them vegan?
Absolutely! Swap the butter for equal parts coconut oil (or vegan margarine), exchange the egg for a silken‑tough seed (aquafaba) or a commercial egg replacer, and use a vegan marshmallow fluff (often labeled “egg‑free” or “vegan”). Many stores now carry “mini” chocolate alternatives that melt similarly, so the bars keep the classic chocolate‑marshmallow combo without dairy or eggs.
What’s the difference between this recipe and classic s’mores?
Classic s’mores involve roasting a chocolate bar and marshmallow over a campfire, then sandwiching them between graham crackers. What I offer is a bakery‑level suggestion: a pre‑baked cookie base that keeps the chocolate melt‑free and the marshmallow silky. It’s easier to prepare at home and eliminates the campfire dependency, while still delivering the same mix of sweet, salty, and crunchy textures.
How hot should the oven be for baking?
My trick is to bake at 350 °F (175 °C). This steady temperature gives the cookies enough heat to ensure the chocolate melts slightly while the marshmallow puff doesn’t burst prematurely. If you set a lower temperature, the bars could stay too soft; too high, and they risk burning at the edges.
How can I add a fruit twist?
Add roasted banana slices or dried pineapple between layers before the chocolate, or fold in a handful of crushed strawberries after baking, encased in the marshmallow. The natural fruit sweetness cuts through the chocolatey richness, creating a refreshing spin on a nostalgic comfort dish.
Is it okay to use a different brand of marshmallow fluff?
Yes, using a higher‑quality brand, like a dust‑free artisanal version or even homemade marshmallow spread, can elevate the texture. The fluff should be light, airy, and not overly sugary. If you notice that it drier, add a splash of vanilla or a pinch of salt to balance the richness.
What storage containers work best?
A zip‑lock bag or a glass jar with a lid locks moisture out, keeping the bars chewy. For larger batches, dividing them into six‑oz wax paper‑wrapped wedges adds to a neat presentation if you want to gift them as a homemade treat.
Can I freeze the marshmallow portion before baking?
Indeed! Placing the marshmallow on the chocolate layer and freezing it for about ten minutes helps keep the center solid before inserting it into the baked cookie. Freezing gives each bar a firmer marshmallow “fudge” texture, modifying the soft goo into a more delightful tan.
What gives a crunchy edge in these bars?
The combination of brown sugar and baking soda at the projectile results in a caramelized crust. The crumbiness is the result of the sugar caramelizing on the surface, giving a fine, buttery edge that encloses the rich interior.
Share Your Version!
I would love to see how you add a city‑spice twist to these s’mores cookie bars—whether you swap in maple or almond, or bring in a nostalgic Quebeckian cheese. Drop a star rating, comment below, and share your photos on Instagram or Pinterest. Tag @leosfoods and let me see how your version looks!
From my NYC kitchen to yours — I hope this recipe brings as much warmth to your table as it does to mine. — Stella 🧡
Love This Recipe? Save It to Pinterest!
If you enjoyed this s’mores cookie bars recipe, don’t let it get lost in your browser tabs! 😄 Pin it now so you can find it again anytime — and explore hundreds more tried-and-tested recipes waiting for you on my Pinterest boards.
👉 Follow Stella on Pinterest @exorecipe
📌 Pin this recipe · 🔁 Re-pin your favorites · 💬 Tag me when you make it — I love seeing your creations!
S’mores cookie bars
These delicious s’mores cookie bars are filled with delicious marshmallow creme and chocolate bars in the center.
Ingredients
- 1/2 cup Butter (softened, salted or unsalted)
- 1/3 cup brown sugar
- 1/4 cup granulated sugar
- 1 egg
- 1 tsp vanilla extract
- 1 &1/2 cup AP flour
- 1/2 cup graham crackers (finely crushed, about 3.5 sheets, for the cookie dough)
- 1/4 tsp salt
- 3/4 tsp baking soda
- 5 standard Hershey bars
- 1 & 1/2 cup Marshmallow fluff
Instructions
- Preheat the oven to 350F then line an 8×8 inch baking pan with parchment paper and set it aside.
- Cream the butter, granulated sugar, and brown sugar until combined. Add in the egg and the vanilla extract and mix again.
- Add in the flour, graham cracker crumbs, salt, baking soda, and mix just until the flour mixture disappears.
- Press half of the dough evenly onto the prepared baking sheet then remove that parchment from the pan and place in the freezer while you re-line the pan with more parchment paper and repeat the process with the leftover cookie dough.
- Place the chocolate bars over the dough, feel free to break pieces apart to fit the whole surface. Spread the marshmallow fluff or creme on top of the chocolate bar then gently flip the chilled cookie dough layer on top working carefully to keep it intact.
- Bake the cookies in the preheated oven for 25 minutes. Make sure you let the bars cool down fully before slicing into them to get that beautiful cross section that you see in my images.