The world’s best tiramisu
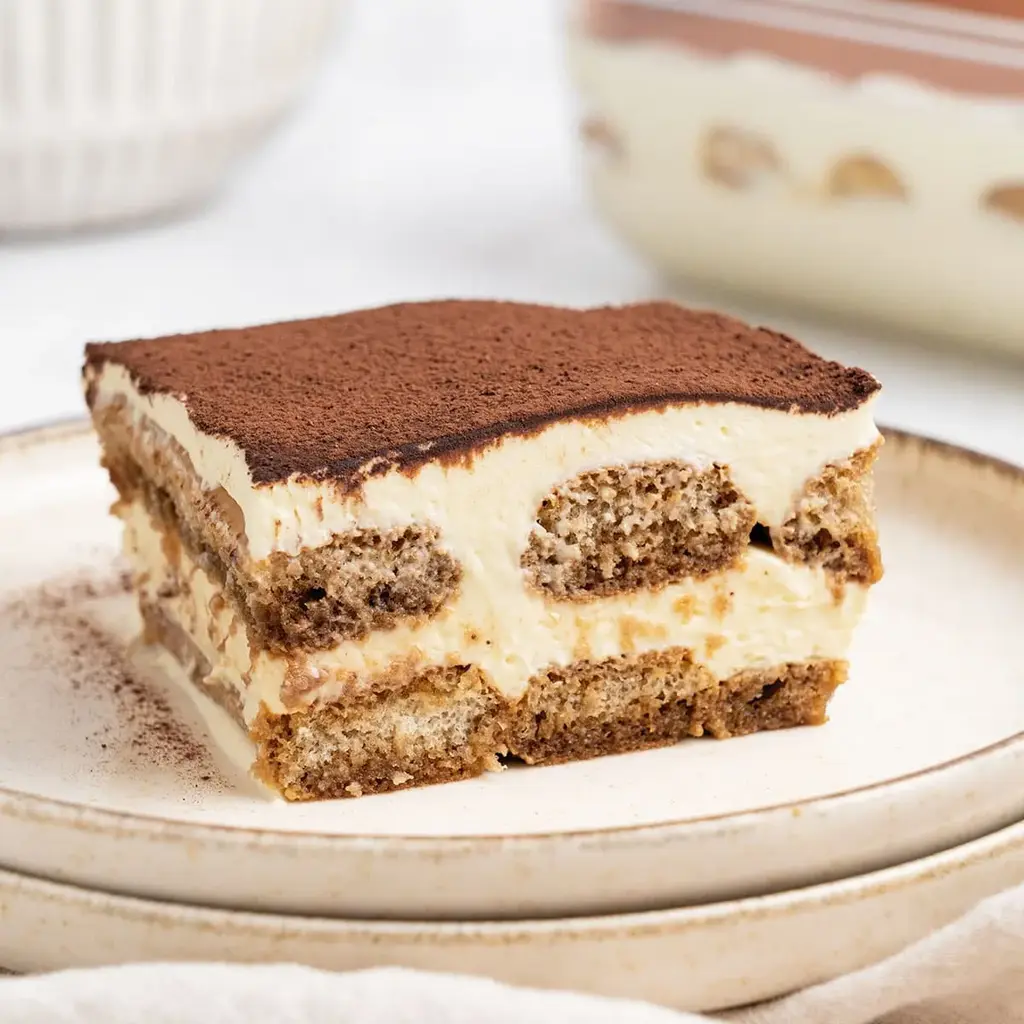
Table of Contents
My Favorite Classic Italian Tiramisu Twist: Cold Mascarpone & Heavy Cream Fusion – A Luxury Layered Delight
When I first waltzed into a Parisian patisserie after a long day in New York, the scent of fresh coffee and sweet mascarpone filled the air. I was instantly transported to my grandmother’s kitchen in Fez, where the same fragrant steam danced while I’d perched on her stone counter, learning how to turn humble ingredients into pure magic. That memory sparked this version of Tiramisu, blending the rich French technique of cold cream handling with the North African warmth of slow, careful layering—so the dessert remains silky, layered, and impossibly indulgent.
Imagine the first bite: a gentle crunch of airy ladyfingers surrendering to a velvety mascarpone-cream mixture, tempered by the slight bitterness of espresso. The espresso’s robust notes mingle with the buttery sweetness of the mascarpone, while each spoonful drizzles a faint hint of Marsala for depth, then concludes with a dusting of Dutch‑processed cocoa that feels like a midnight snowfall. The texture is an orchestra—crispy edges descending into an airy, almost cloud‑like finish that melts in your mouth before you can register its rich layers.
I’m delighted to share the pros I’ve mastered: keep the mascarpone cold so it whips with airy peaks, and fold it gently into the egg yolk mixture. A common mistake I’ve seen, even among seasoned bakers, is over‑whipping the mascarpone, causing it to separate and pull the entire cream off its cloud‑like state. Stick to these precise steps, and you’ll have a tiramisu that tastes as breathtaking on the first bite as it does on the last.
Why This My Favorite Classic Italian Tiramisu Recipe Is the Best
The secret to this tiramisu lies in the Cold Mascarpone & Heavy Cream Fusion—an approach I picked up during my pastry apprenticeship in Paris, where chefs keep creams chilled to preserve their airy structure. By whisking mascarpone with cold heavy cream, the mixture becomes lighter than traditional mascarpone alone, allowing it to be folded into the yolk without losing volume. The result? A lighter, less dense tiramisu that makes the dessert feel like a dessert‑building dream.
Texture is everything, and that’s why I employ a double‑boiler for the egg yolks: gentle heat guarantees the sugar dissolves evenly while preserving the raw yolk’s silky finish. It’s a simple trick that keeps the custard from curdling—an error that can ruin even a seasoned baker’s tiramisu.
Finally, because the process requires no oven baking, it’s flat-out beginner‑friendly. The only “cook” step is whisking and folding with precision—skills I honed while balancing my NYC schedule and still plate lions’ orders in the dead of night. So whether you’re a student or a seasoned sailor of kitchens, this recipe lets you serve a top‑tier tiramisu with confidence.
Tiramisu Ingredients
I’ve sourced every item for this tiramisu from my favorite farmers market in Queens and a specialty shop on 5th Avenue, where the mascarpone is always chilled and the ladyfingers light as breath. In my Moroccan childhood, fresh milkened biscuits were a staple, so this modern version stays true to the idea of contrast—soft, airy, indulgent.
Ingredients List
- 6 egg yolks
- ¾ cup granulated sugar (~150 g)
- 2 cups mascarpone (cold, ~500 g)
- 1½ cups heavy cream (36 % fat, cold, ~350 g)
- 20 ladyfinger cookies (finger‑length sponge)
- 1 cup strong espresso (mildly sweetened, 240 ml)
- Optional: 2 Tbsp Marsala wine (sweet, 30 ml)
- 1–2 Tbsp unsweetened Dutch‑processed cocoa (for dusting)
Ingredient Spotlight
Mascarpone is the backbone of this tiramisu, providing a rich, buttery flavor that balances the espresso’s bitterness. Look for it chilled in the dairy aisle; a slightly firmer texture yields better stability when whipped. If you’re in a pinch, a mixture of Greek yogurt and heavy cream can emulate mascarpone’s density, though the flavor will be tangier.
Heavy cream is the gentle lift that transforms any custard into a cloud. Its high fat content, when whipped cooler, creates peaks that trap air. For those who prefer a lighter version, swap half‑and‑half for heavy cream; the result will be less dense but still delicious.
Ladyfingers are key for crunch and structure. The classic French “savoiardi” are airy, but a local Queens bakery makes them slightly sweeter—great for my version. If you can’t find them, thin slices of sponge cake or even almond biscotti can substitute; just soak them slightly quicker.
Coffee grounds the dessert with its deep, roasted aroma. A strong espresso, made with organic beans, brings authenticity: feel the espresso’s subtle bitterness meeting the sweet mascarpone. Optional Marsala wine adds a campari‑like complexity—remember, only a splash is needed; too much will overpower the delicate layers.
Dutch‑processed cocoa boasts a bright, chocolatey flavor without the sharp bitterness. Dust it liberally for a dramatic final note. Coffee‑cocoa pairings I learned in Morocco with the bittersweet dates; remember the balance of sweet and bitter for a harmonious finish.
| Original Ingredient | Best Substitution | Flavor / Texture Impact |
|---|---|---|
| Mascarpone | Greek yogurt + heavy cream | Tangier, slightly thicker, less buttery |
| Heavy Cream | Half‑and‑half | Lighter, creamier, less volume |
| Ladyfingers | Sponge cake slices | Denser, less airy |
| Espresso | Strong brewed coffee | Milder flavor, lower acidity |
| Cocoa Powder | Cocoa nib dust | Coarser texture, richer chocolate bite |
How to Make My Favorite Classic Italian Tiramisu — Step-by-Step
Below is the carefully orchestrated dance that turns simple pantry staples into a dessert of cake‑like elegance.
Step 1: Whisk Egg Yolks & Sugar
Set up a gentle double boiler; the steam should heat the yolks without direct contact. Whisk 6 yolks with ¾ cup sugar until it becomes pale and the sugar fully dissolves, about 12–15 minutes. The mixture should run a finger slowly while remaining flat and creamy—a sign it’s at 185 °F (85 °C). Let it cool to ~75 °F (24 °C) before moving to the next step.
💡 Stella’s Pro Tip: Chill the cream in a glass bowl in the fridge for 10 minutes before whisking to keep it cold and encourage airy peaks.
Step 2: Whip Mascarpone & Heavy Cream
In a chilled bowl, combine 2 cups mascarpone with 1½ cups heavy cream. With an electric hand mixer, whip on medium until the mixture holds early stiff peaks—about 3 minutes. The temperature of the foam should stay below 90 °F (32 °C) to prevent splitting.
⚠️ Common Mistake to Avoid: Overwhipping the cream can make it grainy and separate from the mascarpone. Stop whipping as soon as the peaks are just firm enough to hold a slight indent.
Step 3: Fold Mascarpone Into Yolks
With a rubber spatula, meticulously fold the whipped cream into the cooled yolk mixture. Beat only until a light, homogenous custard forms. The goal is to keep the incorporated air from collapsing—do not stir aggressively.
💡 Stella’s Pro Tip: Use a pie‑shaped scoop to gently turn the mixture, taking care not to deflate it.
Step 4: Prepare the Pan
Grease an 8×8‑inch (20×20 cm) square pan (or any similar size) with butter or nonstick spray. This step ensures easy release after chilling. Place a clean kitchen towel on its surface to help absorb excess moisture from soaked ladyfingers.
⚠️ Common Mistake to Avoid: Forgetting to line the pan can lead to uneven crust on the top; use parchment or a silicone liner for consistent results.
Step 5: Soak Ladyfingers in Coffee
In a shallow dish, pour 1 cup espresso and add 2 Tbsp Marsala if desired. Quick‑dip each ladyfinger—just 1–2 seconds per side, so they remain lightly moistened without becoming soggy. Arrange 10 soaked ladyfingers in a single layer at the bottom of the pan.
💡 Stella’s Pro Tip: If you prefer an extra hint of aromatic sweetness, use a mix of espresso and cold espresso shots for a warmer base.
Step 6: First Layer of Cream
Spread half of the mascarpone custard evenly over the soaked ladyfingers with an offset spatula. This first layer sets the texture for the rest of the dessert.
⚠️ Common Mistake to Avoid: Letting the first layer sit uncovered for too long can cause the ladyfingers to dry out and crack.
Step 7: Second Layer and Final Cream
Arrange the remaining 10 soaked ladyfingers on top of the cream. Spread the remaining custard over the whole surface. Smooth the top with the spatula to create an even flat finish.
💡 Stella’s Pro Tip: For a shiny finish, lightly dust the top with a sheet of parchment before chilling; it’ll lift off to reveal a glossy crumb.
Step 8: Chill and Set
Cover the assembled tiramisu with plastic wrap, ensuring it touches the surface to prevent a skin. Refrigerate for at least 4 hours—or overnight—to allow layers fully to set. Before serving, dust generously with cocoa powder.
⚠️ Common Mistake to Avoid: Cutting too early can result in a runny dessert; always allow the ideal set time for the custard to firm.
| Step | Action | Duration | Key Visual Cue |
|---|---|---|---|
| 1 | Whisk yolks & sugar in double boiler | 12 min | Creamy, pale, sugar fully dissolved |
| 2 | Whip mascarpone & cream | 3 min | Light peaks that hold a slight indent |
| 3 | Fold cream into yolks | 2 min | Smooth, homogenous custard |
| 4 | Prepare pan and towel | 5 min | Pan ready, towel placed |
| 5 | Soak ladyfingers | 5 min | Lightly moist, not soggy |
| 6 | First layer of cream | 1 min | Even spread |
| 7 | Second layer, final fluffy coat | 1 min | Flat finish |
| 8 | Chill | 240 min | Set custard, visible glaze |
Serving & Presentation
When you finally cut through the chilled masterpiece, eyes meet ivory dust of cocoa powder swirled at the surface, hinting at the espresso core beneath. Slice each piece with a sharp, short‑sawed knife and let it stand for 30 seconds so the crumb layers don’t crumble. Dip a small spoon into the espresso‑Marsala soak and drizzle a trace on the sides for an ornate border that mirrors my Morocco lanterns.
Pair this tiramisu with a velvety espresso martini or a tiny glass of dry Chianti for romantic evenings. For a light brunch twist, serve with fresh berries and a dollop of whipped chantilly—my favorite holiday stand‑by. If you’d like a cooling counterpoint, sprinkle sliced almonds on top before dusting with cocoa; the crunch echoes the chiffonade of my treasured elixir.
| Pairing Type | Suggestions | Why It Works |
|---|---|---|
| Side Dish | Fresh peaches, sliced strawberries, light ricotta | Bright fruit contrast with rich cream |
| Sauce / Dip | Chocolate ganache, caramel sauce, whipped chantilly | Adds luscious sweetness and moisture |
| Beverage | Coffee, espresso martini, Chianti, sparkling wine | Flavor harmony—roasted, fruity, effervescent |
| Garnish | Chocolate shavings, fresh berries, zest of orange | Visual flair & complementary citrus |
Make-Ahead, Storage & Reheating
I prep the gel in advance on slow days, assembling layers in a clean 7×9‑inch pan, then refrigerate. The chocolaty dust settles beautifully over the next 1–2 days, keeping the texture silky.
| Method | Container | Duration | Reheating Tip |
|---|---|---|---|
| Refrigerator | Sealed square pan | 7–14 days | Keep chilled; no reheating needed |
| Freezer | Vacuum‑sealed bag | 1–2 months | Reheat first hour at 350°F (176°C), then chill 15 min |
| Make-Ahead | Prep layers, store custard separate | 3–4 days in advance | Assemble right before serving, then chill 2 hrs |
When reheating a frozen tiramisu, I chill it to room temperature for 30 minutes then bake briefly—no more than 10 minutes at 350°F—removing the top crust for a subtle crispness. I never freeze a fully assembled tiramisu; separating layers preserves the airy feel.
Variations & Easy Swaps
| Variation | Key Change | Best For | Difficulty Impact |
|---|---|---|---|
| Mint‑Chocolate Tiramisu | Add a teaspoon of fresh mint oil to the custard, use dark cocoa dust | Morning brunch | Easy |
| Gluten‑Free, Dairy‑Free | Replace mascarpone with coconut cream, use almond flour ladyfingers | Gluten‑free dinner party | Medium |
| Seasonal‑Berry Tiramisu | Fold fresh raspberries into custard, top with raspberry coulis | Summer dinner | Easy |
Mint‑Chocolate Tiramisu
I love how a splash of fresh mint oil turns the classic into a backyard garden retreat—think Moroccan mint tea meets Italian cocoa. Use high‑quality dark cocoa for the dusting, then stir a clear mint stamp in each spoonful for a refreshing finish.
Gluten‑Free, Dairy‑Free
Swap mascarpone for coconut cream to keep creaminess; use lactose‑free heavy cream or dark‑almond‑milk. For the cake, choose vegan almond‑flour sponge or gluten‑free ladyfingers. The texture stays light, but the tropical undertone gives an unexpected twist that my friends applaud.
Seasonal‑Berry Tiramisu
During July, I whip up this bright version by folding thawed blueberries or raspberries into the custard. The berries’ natural sweetness skims over the richer layers, and a drizzle of raspberry coulis glows like sunrise on a rooftop balcony.
How long does tiramisu need to chill?
The ideal set time for tiramisu is at least four hours, but many bakers recommend an overnight chill—six to eight hours—so the flavors mingle and the custard firm up into a silky, cohesive dessert. If time is tight, a minimum of two hours will still give a pleasant texture, though the layers might feel a bit loose. For the best experience, let it rest in the fridge for 7–12 hours and enjoy a margin of comfort between taste and convenience.
Can I make tiramisu with powdered sugar?
Absolutely! Powdered sugar blends more smoothly into the yolk mixture, giving you fewer clumps and a finer texture. Even if you choose regular granulated sugar, whisk it into the yolks until it’s fully dissolved; that will also produce a silky custard. Don’t hesitate to experiment—just keep the amount consistent (~¾ cup) so the balance between sweet and bitter stays intact.
Is tiramisu safe to keep at room temperature?
Because tiramisu contains raw eggs and dairy products, it can only safely sit at room temperature for a few hours—generally less than two hours. For longer storage, keep it chilled to prevent bacterial growth. Even if you spread a thin layer of sugar on top or wrap it, the custard will still become unsafe after that threshold, so proper refrigeration is essential.
Can I use a different coffee in tiramisu?
Yes, swapping espresso for a fine‑ground strong brewed coffee works perfectly—just make sure the coffee is hot or at room temperature before soaking the ladyfingers. Many bakers favor French press or Italian moka espresso because of its robust, slightly oily profile. For a subtle twist, try adding a hint of hazelnut or vanilla syrup to the soak, but keep the level mild so you don’t overpower the delicate custard.
Can I store tiramisu in the freezer?
Tiramisu can be frozen, but it’s best to freeze the layers separately—store the ladyfingers soaked in coffee in a freezer bag, and keep the custard in a separate sealed container. When ready to serve, thaw overnight, mix gently, dust with cocoa, and chill for at least two hours. If you freeze a fully assembled tiramisu, the whey can separate; the texture often becomes mushy once thawed, so this method is generally discouraged.
What is the best way to dust cocoa on tiramisu?
The key is using a clean, dry hand‑held sieve or sifter to sprinkle cocoa evenly across the surface. Gently tap the pan across the fine grater, letting flour sift through in a thin layer. If you’re using a mesh or fine‑sieve, hold it steady so the cocoa forms a powdery film without sinking into the custard. A light coat keeps the texture crisp while giving the dessert that classic caramelized look.
Is tiramisu considered gluten‑free?
Classic tiramisu relies on ladyfingers, which are typically made from wheat flour. If you are gluten‑sensitive, swap the ladyfingers for gluten‑free sponge cakes or banana‑bread flan cakes. Ensure all other ingredients—mint, cocoa, or optional marsala—are processed without cross‑contamination, and you’ll have a gluten‑free dessert that still carries that authentic Italian charm.
Do I need an oven to make tiramisu?
No, tiramisu doesn’t require any baking—just careful whisking and precise folding of the custard. That’s why it’s a great option for an allergy‑friendly, oven‑light meal. All the steps happen at room temperature or in a cold refrigerator; the “cooking” takes place from the heat of the double boiler, ensuring silky custard without any baked crust.
Share Your Version!
I’d love to hear how you tweak this tiramisu to suit your taste! Drop a star rating and leave me a comment below—your honest feedback helps me grow my kitchen’s community. If you snap a picture of your pièce de résistance, tag it on Instagram or pin it to Pinterest and use the hashtag #leosfoods to earn a spot in my story. And tell me, which ingredient did you swap to make it uniquely yours? 🙌
From my NYC kitchen to yours — I hope this recipe brings as much warmth to your table as it does to mine. — Stella 🧡
Love This Recipe? Save It to Pinterest!
If you enjoyed this My Favorite Classic Italian Tiramisu recipe, don’t let it get lost in your browser tabs! 😄 Pin it now so you can find it again anytime — and explore hundreds more tried-and-tested recipes waiting for you on my Pinterest boards.
👉 Follow Stella on Pinterest @exorecipe
📌 Pin this recipe · 🔁 Re-pin your favorites · 💬 Tag me when you make it — I love seeing your creations!
Toast to a delicious tiramisu adventure! Have any last‑minute tweaks? Drop them in the comments, rate your favorite portion, and let’s keep chatting about how to elevate comfort dessert to gourmet street‑food level. Your kitchen stories make us all better chefs.
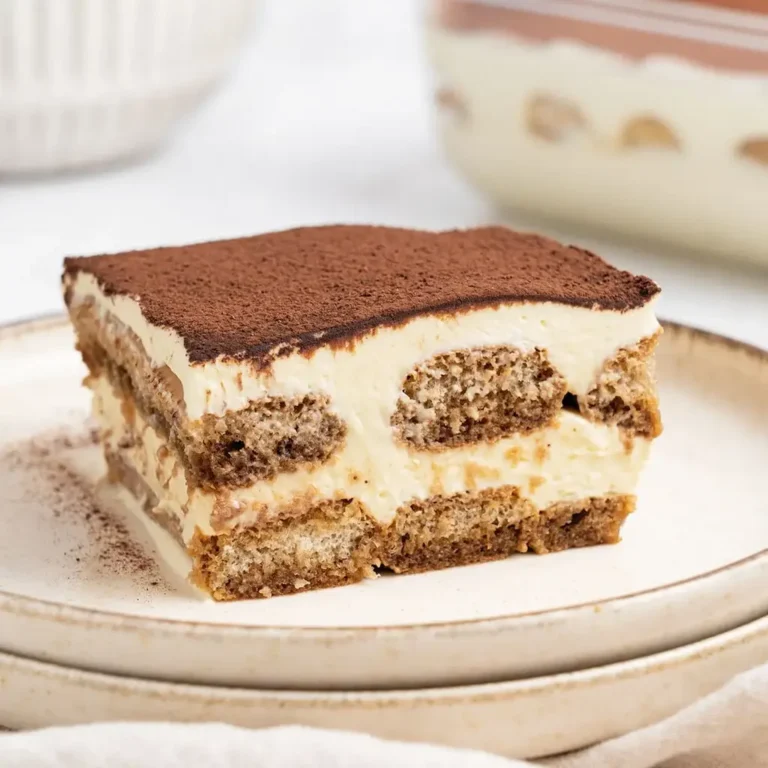
My Favorite Classic Italian Tiramisu
This authentic Italian Tiramisu features airy ladyfingers soaked in coffee, layered between a silky, enriched mascarpone cream filling and a touch of cocoa on top. Buon Appetito!
Ingredients
- 6 Egg yolk
- 150 g Granulated sugar
- 500 g Mascarpone (high fat, use it cold)
- 350 g Heavy Cream (36% fat, use it very cold – can be substituted with equal amount of mascarpone)
- 20 pieces Ladyfinger cookies
- 1 cup Coffee (mildly sweetened strong espresso to soak the ladyfingers in)
- Marsala wine (Optional. If using, mix into the coffee.)
- 1–2 tablespoons Cocoa powder (Unsweetened Dutch processed to decorate the top)
Instructions
- Prepare the egg yolk mixture: Start by setting up a double boiler. A double boiler consists of two stacked pots: the bottom pot holds simmering water, while the top pot sits above the water without touching it. The steam from the simmering water gently heats the contents of the top pot.Once your double boiler is ready, whisk the egg yolks and sugar together in the top pot over the simmering water. Whisk continuously until the sugar has fully dissolved, which will take about 5 minutes, though the time may vary depending on your bowl size and the water temperature. Keep the heat low to prevent the egg yolks from cooking. The egg yolk mixture is ready when it reaches 85C / 185F.Then, move the egg yolk mixture into a stand mixer fitted with a whisk attachment and whip it until its temperature cools to about 24C / 75F.
- In the meantime, whip together the cold mascarpone and heavy cream with the help of an electric hand mixer until early stiff peaks while the mixture is still airy and fluffy. This will take about 3 minutes. Do not overwhip as it can become runny.
- Then, switch to a rubber spatula and carefully fold the whipped mascarpone into the egg yolk mixture making sure that you don´t break the air we just incorporated into both mixtures. At this point, the cream should be airy and fluffy and it will further set in the fridge.
- Prepare a container (Im using one that measures 18×24 cm / 7×9 inches, but an 8×8-inch pan will work too).
- Dip the ladyfingers into the coffee, then arrange them in a single layer at the bottom of the pan. For my pan, I can fit 10 ladyfingers in the first layer and another 10 in the second layer.
- Spread half of the mascarpone cream on top. Repeat with the next layer, then smooth the top with an offset spatula.
- Refrigerate the tiramisu for at least 4 hours to allow it to set. Before serving, dust with cocoa powder.
- Store any leftovers in an airtight container in the refrigerator for 2-3 days. I dont recommend freezing the tiramisu, as the mascarpone cream doesn't freeze well.