Vanilla Rose Crystal Domes Recipe with Mirror Glaze
“`html
Table of Contents
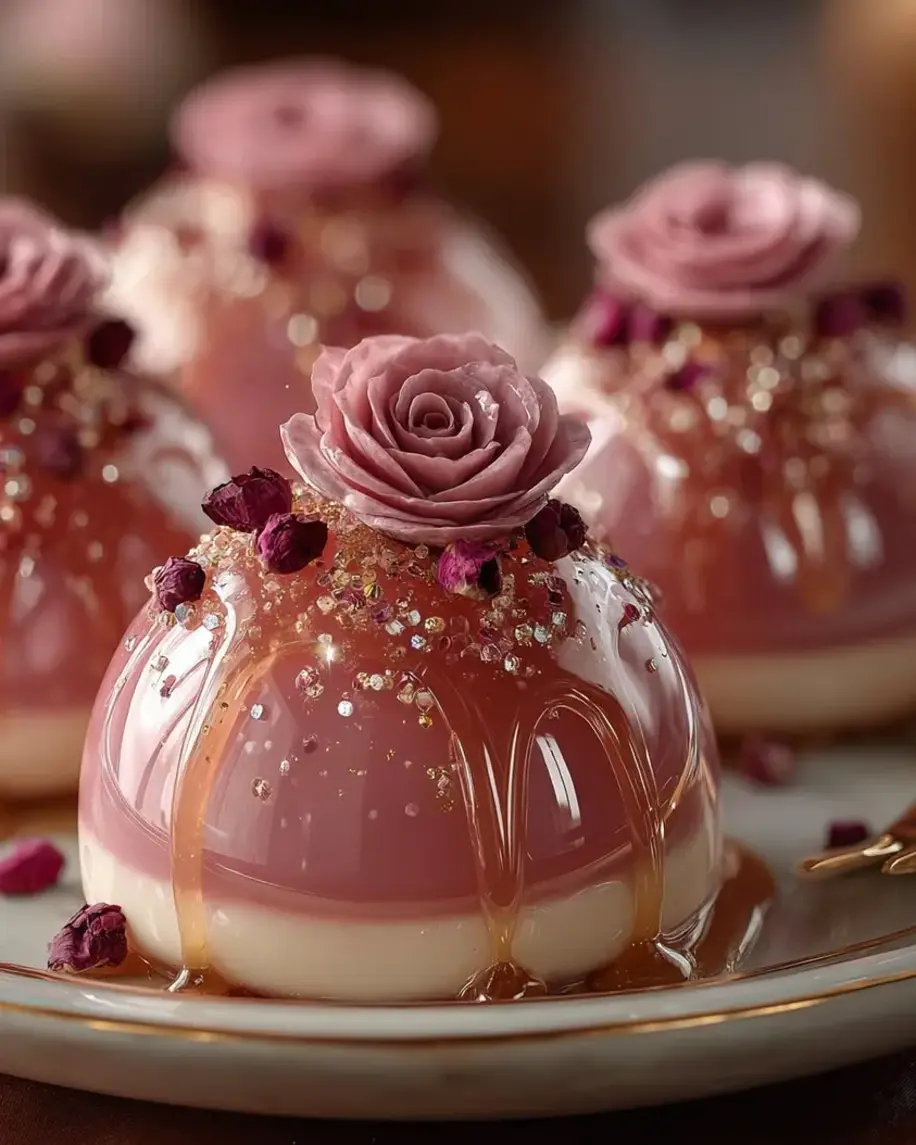
Vanilla Rose Crystal Domes Recipe – A Stunning Mirror Glaze Dessert You Can Make at Home
I still remember the first time I saw a crystal mirror glaze dome in a Parisian pâtisserie window — it stopped me mid-step. The glossy, jewel-like surface caught the afternoon light and reflected it back like stained glass. That moment, standing on a cobblestone street in the 6th arrondissement, I knew I had to learn how to create that magic myself. These Vanilla Rose Crystal Domes with White Chocolate Core are my love letter to that memory, infused with the floral warmth of Moroccan rose water that my mother used to add to everything from tea to tagines. This vanilla rose crystal domes recipe combines the ethereal beauty of a crystal mirror glaze with a creamy, dreamy white chocolate core.
When you crack through that shimmering shell with a spoon, you first hit the silky vanilla rose cream — light as a cloud, with just a whisper of rose that reminds me of the rose gardens in Marrakech. Then you reach the white chocolate core, which melts slowly on your tongue, rich and honey-sweet. The whole experience is a study in contrasts: the glossy, almost glass-like exterior, the airy mousse, and the dense, luscious center. Every bite carries a memory — of Parisian technique, of Moroccan hospitality, and of the bustling Union Square Greenmarket here in NYC where I source my vanilla bean paste and edible flowers.
This isn’t just another mousse dome recipe. I’ve spent years perfecting the crystal mirror glaze technique in my own tiny Greenwich Village kitchen, and I’m sharing every trick I’ve learned. The secret to that flawless, crack-free glaze? Temperature control and patience. I’ll also show you how to avoid the most common disaster — globby, uneven glaze — and what to do if your gelatin seizes up. Whether you’re a confident home baker looking to wow a dinner party or someone who just loves a beautiful dessert, this recipe is designed to guide you through every step with confidence. From my kitchen to yours, let’s make something extraordinary.
Why This Vanilla Rose Crystal Domes Recipe Is the Best
The Flavor Secret — Most rose desserts taste like a perfume counter. Not this one. I use rose water (the same aromatic Rose Water I grew up with in Morocco) in a measured way, combined with vanilla bean paste that rounds out the floral notes with warm, creamy depth. The white chocolate core adds a touch of honey and mascarpone richness that anchors the whole dessert. It’s elegant without being overpowering, and that balance is what makes this rose mirror glaze domes recipe truly unforgettable.
Perfected Texture — The French technique I learned at Le Cordon Bleu taught me that texture is everything in pastry. The vanilla rose mousse is stabilized with just the right amount of gelatin — enough to hold its shape under the glaze, but not so much that it feels rubbery. The white chocolate core stays soft and fudgy, even after hours in the freezer. And the crystal mirror glaze? It sets into a thin, glossy shell that shatters delicately when you dig in. Every layer has been tested and retested to get the texture exactly right.
Foolproof & Fast (for an advanced dessert) — I know this looks complicated, but I’ve broken it down into manageable steps that even a beginner can follow. The dome molds do the heavy lifting for shaping. The glaze comes together in one bowl. And because everything sets in the freezer, there’s no oven timers to worry about. I’ve included my best tips for working with gelatin, achieving a flawless mirror finish, and unmolding without drama. Trust me — if I can make these in my NYC kitchen with my cat weaving around my ankles, you can too.
Vanilla Rose Crystal Domes Recipe Ingredients
Every Saturday morning I walk through the Union Square Greenmarket, and in spring the air smells like the rose petals I used to help my mother dry on the rooftop in Casablanca. For this vanilla rose crystal domes recipe, I source my rose water from a little Middle Eastern grocery on Atlantic Avenue — the kind with no additives, just pure steam-distilled petals. The vanilla bean paste I get from a spice shop in Chelsea Market. But don’t worry — everything here is available at your local grocery store or online.
Ingredients List
- For the Vanilla Rose Mousse:
- 8 oz cream cheese, softened to room temperature
- 1 cup heavy cream (cold)
- ⅓ cup powdered sugar
- 1 tsp vanilla bean paste (or 1 vanilla bean, scraped)
- 1 tbsp rose water (adjust to taste)
- 2 tsp unflavored gelatin powder
- 2 tbsp cold water (for blooming gelatin)
- Pink food coloring, as needed (gel or powder preferred)
- For the White Chocolate Core:
- ½ cup white chocolate, melted and cooled slightly
- 2 tbsp mascarpone cheese
- 1 tbsp heavy cream
- 1 tsp honey
- For the Crystal Mirror Glaze:
- 1 cup white chocolate, finely chopped
- ½ cup sweetened condensed milk
- 2 tsp unflavored gelatin powder
- 2 tbsp cold water (for blooming)
- ¼ cup warm water
- 1 tsp clear edible shimmer dust (optional, for that crystal effect)
- For Garnish (optional):
- Dried rose petals (crushed)
- Edible pearl dust or silver leaf
Ingredient Spotlight
Rose Water — This is the soul of the recipe. Look for a brand that lists only rose and water as ingredients — no alcohol or additives. My favorite is Cortas, available in most Middle Eastern markets and online. A little goes a long way; start with 1 tablespoon and taste before adding more. If you use a cheaper imitation rose syrup, the flavor will be cloying and artificial.
White Chocolate — For the mirror glaze and the core, use a good-quality white chocolate that contains cocoa butter (at least 20%). I like Valrhona or Guittard. Avoid white “melting wafers” or candy melts — they contain oils that won’t set properly in the glaze and will leave a greasy film on your tongue.
Unflavored Gelatin — This is the structural backbone of both the mousse and the glaze. I use Knox gelatin powder, which is reliable and widely available. The bloom (soaking in cold water) step is non-negotiable — it ensures the gelatin dissolves evenly and gives you a silky-smooth texture. If you use sheet gelatin, the conversion is roughly 1 packet (2 tsp powder) = 4 sheets of platinum gelatin.
Clear Edible Shimmer Dust — This is what gives the glaze its crystalline, jewel-like sparkle. It’s available at cake supply stores or online. You can omit it for a classic mirror finish, but the shimmer dust really elevates the “crystal” effect. Mix it into the glaze while it’s still warm (around 95°F) so it disperses evenly.
| Original Ingredient | Best Substitution | Flavor / Texture Impact |
|---|---|---|
| Rose Water | Orange blossom water + ½ tsp rose extract | Lighter floral, slightly citrusy |
| White Chocolate | Dairy-free white chocolate (for DF version) | Slightly less creamy, still good |
| Cream Cheese | Full-fat Greek yogurt + 2 tbsp butter | Tangier, slightly looser texture |
| Mascarpone | Cream cheese + 1 tsp heavy cream | Slightly more tang, less rich |
| Vanilla Bean Paste | 2 tsp vanilla extract | Less intense vanilla, no specks |
How to Make Vanilla Rose Crystal Domes — Step-by-Step
I’ve made these domes more times than I can count, and I’ve learned something every single time. Follow these steps closely, especially the temperatures and timing, and you’ll be rewarded with a dessert that looks like it came from a Michelin-starred kitchen. Let’s dive in.
Step 1: Bloom the Gelatin
In a small bowl, sprinkle 2 teaspoons of unflavored gelatin powder over 2 tablespoons of cold water. Do not stir — just let it sit. The gelatin granules will absorb the water and swell into a firm, jiggly mass. This takes about 5 minutes. Blooming gelatin is essential because it hydrates the granules evenly, which prevents lumps and ensures a silky-smooth texture in your mousse. If you skip this step or rush it, your mousse will have gritty streaks.
💡 Stella’s Pro Tip: Use ice-cold water for blooming. Warm water will partially dissolve the gelatin and compromise its setting power. I keep a small bowl of ice water in the fridge just for this purpose.
Step 2: Make the Cream Base
In a large mixing bowl, beat 8 oz of softened cream cheese, ⅓ cup powdered sugar, 1 teaspoon vanilla bean paste, and 1 tablespoon rose water until smooth and fluffy. Use a hand mixer or stand mixer fitted with the paddle attachment. Scrape down the sides and bottom of the bowl at least once to ensure everything is evenly incorporated. The mixture should be light, airy, and fragrant with rose.
⚠️ Common Mistake to Avoid: Cold cream cheese will leave lumps in your mousse. Let it sit on the counter for at least 30 minutes before starting. If you’re short on time, cut it into small cubes and microwave in 5-second bursts until just softened.
Step 3: Fold in the Cream
In a separate bowl, whip 1 cup of cold heavy cream to soft peaks — when you lift the whisk, the cream should form gentle, droopy peaks that hold their shape briefly. Now, melt the bloomed gelatin. Microwave it for 5–7 seconds until it becomes liquid (do not boil). Stir a few tablespoons of the cream cheese mixture into the melted gelatin to temper it, then pour it all back into the cream cheese bowl and mix well. Finally, gently fold the whipped cream into the cream cheese mixture using a spatula. Add a few drops of pink food coloring if desired. Fold until just combined — no white streaks.
💡 Stella’s Pro Tip: Fold in the whipped cream in three additions, using a figure-eight motion. This incorporates air without deflating the mixture. If you lose too much air, your domes will be dense instead of cloud-like.
Step 4: Prepare the White Chocolate Core
Melt ½ cup of white chocolate in a double boiler or microwave in 15-second bursts, stirring after each burst. Let it cool for 2–3 minutes, then stir in 2 tablespoons of mascarpone cheese, 1 tablespoon of heavy cream, and 1 teaspoon of honey until smooth and glossy. The mixture should be thick but spoonable — like a soft fudge. Set it aside at room temperature. It will firm up slightly as it cools, which is perfect for creating a distinct core layer.
⚠️ Common Mistake to Avoid: If the white chocolate mixture seizes (turns grainy and stiff), you may have overheated the chocolate. Next time, melt it more gently. You can sometimes rescue it by stirring in a teaspoon of vegetable oil, but prevention is better.
Step 5: Assemble the Domes
Take your dome molds (silicone half-sphere molds work best) and fill each cavity about halfway with the vanilla rose mousse. Use a piping bag or a spoon. Then, drop a small spoonful (about 1 teaspoon) of the white chocolate core mixture into the center of each dome. Gently press it down so it sits in the middle of the mousse. Cover with the remaining mousse, smoothing the tops with an offset spatula. The molds should be filled flush with the rim.
💡 Stella’s Pro Tip: For perfectly centered cores, pipe a small dollop of the white chocolate mixture into the frozen mousse halfway through freezing. Or, use a melon baller to scoop the core mixture into neat little spheres and freeze them separately before embedding.
Step 6: Freeze the Domes
Place the filled molds on a baking sheet and freeze for at least 5 hours, or overnight. The domes must be completely solid — not just firm — before you attempt to unmold them. A fully frozen dome unmolds cleanly and holds its shape perfectly under the warm glaze. If the dome is even slightly soft, it will crack or collapse when you try to unmold it.
⚠️ Common Mistake to Avoid: Don’t rush the freezing. If you try to unmold after 3 hours, the mousse will stick to the silicone and tear. I always freeze overnight to be safe. Patience is the secret to clean, beautiful domes.
Step 7: Make the Crystal Mirror Glaze
Bloom 2 teaspoons of gelatin in 2 tablespoons of cold water (5 minutes). In a small saucepan, heat ½ cup sweetened condensed milk and ¼ cup warm water over medium heat until just simmering. Remove from heat and stir in the bloomed gelatin until fully dissolved. Pour this warm liquid over 1 cup of finely chopped white chocolate in a heatproof bowl. Let it sit for 1 minute, then stir gently until the chocolate is completely melted and the glaze is smooth. Stir in 1 teaspoon of clear edible shimmer dust. Let the glaze cool to 95°F (35°C) — it should feel warm to the touch but not hot. If it’s too hot, it will melt your frozen domes. If it’s too cool, it will thicken and won’t flow smoothly.
💡 Stella’s Pro Tip: Use an instant-read thermometer. 95°F is the sweet spot where the glaze is fluid enough to flow over the dome but cool enough to set immediately on contact with the frozen surface. If you don’t have a thermometer, test a small drip on the back of your hand — it should feel warm, not hot, and not cold.
Step 8: Glaze and Garnish
Unmold the frozen domes from the silicone molds. Place them on a wire rack set over a baking sheet (to catch drips). Pour the mirror glaze over each dome in one smooth, continuous motion, covering the entire surface. Let the excess drip off for a few seconds. Carefully transfer each glazed dome to a serving plate using a spatula. While the glaze is still tacky, sprinkle with crushed dried rose petals and a dusting of edible pearl dust. Work quickly — the glaze sets in about 30 seconds. Refrigerate the finished domes for at least 30 minutes to thaw the mousse slightly before serving. Serve chilled but not frozen solid.
⚠️ Common Mistake to Avoid: If you pour the glaze when it’s too thick (below 90°F), it will glob up and leave thick, uneven patches. If it’s too thin (above 100°F), it will run off completely and leave a thin, patchy coating. Temperature is everything. Also, don’t touch the glazed surface — fingerprints won’t smooth out.
| Step | Action | Duration | Key Visual Cue |
|---|---|---|---|
| 1 | Bloom gelatin (mousse) | 5 mins | Gelatin becomes firm, jiggly |
| 2 | Make cream base | 3–5 mins | Smooth, fluffy, no lumps |
| 3 | Fold in whipped cream | 3 mins | Uniform color, airy texture |
| 4 | Prepare white chocolate core | 5 mins | Glossy, fudge-like consistency |
| 5 | Assemble domes | 10 mins | Molds filled flush, core centered |
| 6 | Freeze domes | 5 hrs (min) | Rock solid, unmolds cleanly |
| 7 | Make crystal mirror glaze | 15 mins | Smooth, shiny, 95°F |
| 8 | Glaze and garnish | 5 mins | Glossy even coating, garnish sticks |
Serving & Presentation
Serving these Vanilla Rose Crystal Domes is a moment in itself. I like to place each dome on a simple white plate — the contrast makes the pink glaze and shimmer dust really pop. For a touch of drama, you can set the plate on a bed of crushed ice or scatter a few dried rose petals around the base. If you’re serving these at a dinner party, bring them out one by one, still slightly chilled, and let your guests crack into that glossy shell with the side of a spoon. The sound alone will earn you applause. I once served these at a gathering in my Brooklyn apartment, and one friend said it felt like eating jewelry.
Garnishing is where you can make these your own. A light dusting of edible pearl dust gives them an opalescent, moonlit glow. Crushed dried rose petals add a lovely organic texture and a whisper of extra floral aroma. If you’re feeling extra fancy, a tiny piece of edible gold leaf on top transforms these into a truly celebratory dessert. I’ve also placed a single fresh raspberry next to the dome — the tartness cuts through the sweetness and the red color is gorgeous against the pink glaze.
For a beverage pairing, I love serving these with a pot of Moroccan mint tea (the classic green tea with fresh mint) — the bright, herbaceous notes balance the richness of the white chocolate and rose. A chilled glass of Moscato d’Asti or a floral-scented oolong tea are also wonderful choices. The key is to keep the accompanying drink light and not too sweet, so the dessert remains the star.
| Pairing Type | Suggestions | Why It Works |
|---|---|---|
| Side / Accompaniment | Fresh raspberries, crushed pistachios, shortbread cookie | Tartness and crunch cut the richness |
| Sauce / Drizzle | Raspberry coulis, salted caramel, honey drizzle | Adds contrast and visual appeal |
| Beverage | Moroccan mint tea, Moscato d’Asti, jasmine oolong | Floral, light, not overly sweet |
| Garnish | Dried rose petals, edible pearl dust, gold leaf, fresh mint | Enhances visual and aromatic experience |
Make-Ahead, Storage & Reheating
As a busy NYC food blogger and cook, I’m a huge advocate for make-ahead desserts. These Vanilla Rose Crystal Domes are actually ideal for prepping ahead of time. You can make the full domes (mousse + core + frozen) up to 2 weeks in advance, then glaze them fresh on the day you plan to serve. The glaze itself is best used within a few hours of making it, but the frozen domes are your best friend for stress-free entertaining.
| Method | Container | Duration | Reheating / Finishing Tip |
|---|---|---|---|
| Refrigerator (glazed) | Airtight container, single layer | Up to 3 days | Serve chilled directly from fridge |
| Freezer (unglazed) | Freezer-safe bag, domes separated by parchment | Up to 2 months | Glaze straight from frozen |
| Make-Ahead (fully assembled) | Freeze domes on baking sheet, then transfer to bag | Up to 2 weeks before glazing | Glaze the morning of serving, keep refrigerated |
To reheat? Well, you don’t really “reheat” these — they’re meant to be served chilled. But if your glazed domes have been in the fridge for a day or two and the glaze has softened slightly, you can pop them back in the freezer for 15 minutes before serving to firm up the shell again. If you’ve frozen unglazed domes, simply thaw them in the refrigerator for 2–3 hours before glazing, or glaze them straight from the freezer (the glaze will set instantly on the frozen surface, which actually gives a cleaner result).
💡 Stella’s Pro Tip: For the absolute best texture and shine, I recommend glazing the domes no more than 4–6 hours before serving. The glaze is at its most brilliant and crackly within the first few hours. After 24 hours in the fridge, it will still look beautiful, but the mirror finish may soften slightly.
Variations & Easy Swaps
One of the things I love most about this recipe is how adaptable it is. Once you master the basic technique of the vanilla rose crystal domes recipe, the world of flavor combinations opens up. Here are three of my favorite variations, each with its own personality.
| Variation | Key Change | Best For | Difficulty Impact |
|---|---|---|---|
| Chocolate-Orange Rose Domes | Add 2 tbsp cocoa powder to mousse; replace rose with orange zest | Chocolate lovers, holiday tables | Easy (no extra steps) |
| Dairy-Free / Vegan Rose Domes | Use dairy-free cream cheese, coconut cream, & vegan white chocolate | Dairy-sensitive guests, plant-based | Medium (adjust gelatin) |
| Lavender-Honey Domes | Replace rose water with 1 tsp lavender extract; use honey in mousse | Spring gatherings, afternoon tea | Easy (simple swap) |
Variation 1: Chocolate-Orange Rose Domes
This variation is inspired by the chocolate-orange confections I used to sneak from my mother’s tin in Morocco. Replace the rose water with the zest of one large orange (about 2 tablespoons) and add 2 tablespoons of unsweetened cocoa powder to the cream cheese mixture before folding in the whipped cream. The white chocolate core stays the same, but the contrast between the dark, citrusy mousse and the sweet white center is absolutely stunning. For the glaze, you can either keep it classic white or add a pinch of orange food coloring for a sunset effect. This version is especially lovely during the winter holidays.
Variation 2: Dairy-Free / Vegan Rose Domes
I developed this version for a friend who’s lactose intolerant, and it’s become a fan favorite. Use a high-quality vegan cream cheese (I like Kite Hill) and full-fat coconut cream in place of the heavy cream. For the white chocolate core, look for a dairy-free white chocolate (Absolutely Dairy Free is a good brand). The key change is the gelatin — swap it for agar-agar powder (use 1½ tsp agar-agar for the mousse, bloomed in 2 tbsp water, and 1½ tsp for the glaze). Agar-agar sets more firmly than gelatin, so the texture will be slightly more gel-like, but the flavor is still wonderful. The mousse might be a touch less airy, but the coconut adds a lovely tropical undertone that pairs beautifully with rose.
Variation 3: Lavender-Honey Domes
When spring hits New York City and the lavender plants at the Union Square Greenmarket start blooming, this is the variation I turn to. Replace the rose water with 1 teaspoon of lavender extract (or steep 1 tablespoon of dried culinary lavender in the heavy cream overnight, then strain). In the mousse, swap the powdered sugar for ⅓ cup of honey — the floral notes of honey amplify the lavender beautifully. For the core, use a honey-scented white chocolate or add an extra teaspoon of honey. The glaze can be tinted pale purple with a mix of pink and blue food coloring. This version is delicate, fragrant, and utterly romantic — perfect for bridal showers or Mother’s Day.
How do you make the vanilla rose crystal domes without a dome mold?
If you don’t have silicone dome molds, you have several good alternatives. The easiest substitute is a standard muffin tin — use the back of a spoon to gently press the mousse into the cavities to create a rounded shape. For a more polished result, you can use small glass or ceramic bowls (like ramekins) lined with plastic wrap. Fill them with the mousse and core, then freeze as directed. Once frozen, lift the domes out using the plastic wrap. You can also use spherical ice cube molds, which are widely available online and come in various sizes. The key is to ensure whatever you use is freezer-safe and has a smooth interior surface so the domes unmold cleanly. The final shape won’t be as perfectly hemispherical as with a dedicated dome mold, but the flavor and texture will be exactly the same.
What can I substitute for white chocolate in the core of vanilla rose crystal domes?
There are several excellent substitutions for the white chocolate core depending on your dietary needs or flavor preferences. For a dairy-free option, use a vegan white chocolate made with rice milk or coconut milk — the texture will be slightly softer but still delicious. If you want a less sweet core, you can replace the white chocolate with a mixture of ¼ cup mascarpone, 1 tablespoon honey, and 1 tablespoon heavy cream (increase the mascarpone to ¼ cup and omit the white chocolate entirely) — this creates a creamy, tangy center that contrasts beautifully with the sweet mousse. For a chocolate lover’s twist, use milk chocolate or dark chocolate (at least 60% cacao) in place of white chocolate; the bitterness will cut through the sweetness of the rose mousse wonderfully. If you’re avoiding chocolate altogether, a dollop of lemon curd or raspberry jam also makes a lovely, bright core — just freeze it into small spheres before embedding it in the mousse.
How long does it take for the crystal dome shell to set and harden properly?
The crystal mirror glaze sets almost immediately upon contact with the frozen dome — typically within 30 to 60 seconds. However, the glaze continues to firm up as the dome sits in the refrigerator. For the best results, I recommend letting the glazed domes rest in the refrigerator for at least 30 minutes before serving. This allows the mousse to soften slightly from its frozen state (so it’s creamy rather than icy) while the glaze stays firm and glossy. If you need to speed things up, you can put the glazed domes in the freezer for 10–15 minutes, but be careful not to over-freeze them or the mousse will be too hard. The glaze itself will remain stable at refrigerator temperature for up to 24 hours, though the mirror finish may soften slightly after the first 6–8 hours. For the most dramatic crackly shell, serve within 4 hours of glazing.
Can I make vanilla rose crystal domes ahead of time for a special occasion?
Absolutely — in fact, I encourage it! These vanilla rose crystal domes are one of the best make-ahead desserts I know. The frozen, unglazed domes can be stored in a freezer-safe bag for up to 2 months, so you can prepare the mousse and core components weeks in advance. On the day of your event, simply make the crystal mirror glaze (which takes about 15 minutes), unmold the frozen domes, glaze them, and let them thaw in the refrigerator for 30 minutes before serving. For best results, glaze the domes no more than 4–6 hours before serving to preserve the mirror finish. If you’re short on time, you can even glaze them the night before — the glaze will still look lovely, though it won’t have the same crackly texture. I often prep a double batch of unglazed domes and keep them in the freezer for impromptu dinner parties or when I need a showstopping dessert without the stress.
Why did my mirror glaze crack or split when I poured it over the domes?
Cracked or split mirror glaze is usually caused by one of two issues: the glaze was too cold when poured, or the frozen dome was not cold enough. If the glaze has cooled below 90°F (32°C), it becomes too thick and will not flow smoothly over the dome, leading to thick patches and cracks. Always use an instant-read thermometer and aim for 95°F (35°C) — the glaze should flow like warm honey. The second culprit is a dome that has started to thaw on the surface. If the dome is not frozen solid, the warm glaze will melt the surface and create a watery layer that causes the glaze to slide off in sheets. Make sure your domes have been frozen for at least 5 hours, and unmold them only when you’re ready to glaze. Working quickly and confidently is key — pour the glaze in one smooth motion and don’t go back to touch it.
Can I use a different flavor instead of rose in the vanilla rose crystal domes?
Absolutely — the vanilla rose crystal domes recipe is incredibly flexible. The rose water can be replaced with other floral extracts like orange blossom water (for a North African-inspired twist), lavender extract (for a Provence-style dessert), or even jasmine syrup. For fruit-forward versions, you can fold in ¼ cup of fruit purée (raspberry, passion fruit, or mango) into the mousse in place of the rose water — just reduce the heavy cream slightly to compensate for the extra liquid. The white chocolate core works beautifully with any of these flavors. If you’re using a citrus flavor, add a teaspoon of zest to the core as well. For a coffee or caramel version, replace the rose water with 1 teaspoon of espresso powder dissolved in 1 tablespoon of warm water, and use a dulce de leche core instead of white chocolate. The basic technique remains the same, so feel free to experiment!
How do I get the mirror glaze to be perfectly smooth and shiny without bubbles?
A flawless, bubble-free mirror glaze comes down to three things: temperature, straining, and gentle handling. First, make sure your glaze is at the right temperature (95°F / 35°C) — if it’s too hot, it will form bubbles as you stir; too cold and it will thicken and trap air. Second, always strain the glaze through a fine-mesh sieve before using it. This catches any undissolved gelatin or chocolate bits that could create texture issues. Third, use a spatula to stir the glaze gently in one direction — avoid whisking vigorously, as that incorporates air bubbles. If you do see bubbles on the surface of your glazed domes, you can carefully pass a kitchen torch over the surface (just a few seconds) to pop them, or use a toothpick to burst them before the glaze sets. Finally, make sure the frozen domes are perfectly smooth — any bumps or cracks in the mousse will show through the glaze.
What is the best way to store leftover vanilla rose crystal domes?
If you have leftover glazed domes (lucky you!), they can be stored in an airtight container in the refrigerator for up to 3 days. Place them in a single layer — don’t stack them — and cover them gently with plastic wrap or a lid that doesn’t touch the glaze. The mirror finish will soften and become less glossy over time, but the flavor will still be wonderful. If you want to store them longer, unglazed domes freeze beautifully for up to 2 months. Simply wrap each frozen dome individually in plastic wrap, then place them in a freezer-safe bag. To serve, glaze them directly from the freezer (no need to thaw first). I don’t recommend refreezing glazed domes, as the glaze will become cloudy and may separate when thawed. The mousse itself freezes well, but the glaze is best enjoyed fresh.
Can I use this vanilla rose crystal domes recipe for a larger crowd or scale it up?
Yes, this recipe scales up very well! The recipe as written makes approximately 8 standard-size domes (about 2½ inches in diameter). For a crowd of 16, simply double all the ingredients. The technique remains exactly the same — just make sure you have enough dome molds or work in batches if you’re using a single mold. One important scaling tip: when making the mirror glaze, don’t double the gelatin proportionally for larger batches — use 1½ times the gelatin for a double batch, as larger volumes of glaze set more firmly. For a larger presentation, you can also make the domes in larger molds (3–4 inches) and serve one per person as a generous dessert. If you’re serving a buffet, consider making mini domes (1½ inches) using a smaller mold — they’re perfect for passing on trays and the yield will be about 20–24 mini domes. Just reduce the freezing time slightly for smaller domes (about 3–4 hours).
The white chocolate core in my vanilla rose crystal domes sank to the bottom — how do I keep it centered?
This is a common issue, and I had it happen to me more times than I’d like to admit! The white chocolate core sinks because it’s heavier than the mousse. Here are three foolproof solutions. First, partially freeze the domes before adding the core: fill the molds halfway with mousse, freeze for 45 minutes until the surface is firm, then add the core and cover with the remaining mousse. Second, freeze the white chocolate core mixture into small spheres before embedding it: drop teaspoon-sized portions of the core mixture onto a parchment-lined baking sheet, freeze for 1 hour, then place a frozen sphere into each dome cavity and cover with mousse. Third, make sure your white chocolate core mixture is thick enough — if it’s too thin (from overheating the white chocolate), it will sink immediately. The mixture should be the consistency of a soft fudge. If it’s runny, let it cool and thicken before using.
Share Your Version!
I absolutely love seeing how you make this recipe your own. Whether you’ve added a personal twist, tried a substitution, or nailed that perfect mirror glaze for the first time — I want to hear about it! Drop a comment below and let me know how your Vanilla Rose Crystal Domes turned out. Did you go classic with the rose, or try one of the variations? How did your guests react when you brought these to the table? Your stories and photos are what make this community so special.
If you found this recipe helpful, please give it a star rating — it helps other home cooks find it too. And if you share a photo on Instagram or Pinterest, tag me @leosfoods so I can see your beautiful creations. I personally read every comment and love answering your questions. The thing I get asked most is how to keep the glaze perfectly smooth — so if you mastered that, let me know your secret! From my NYC kitchen to yours — I hope this recipe brings as much warmth to your table as it does to mine. — Stella 🧡
Love This Recipe? Save It to Pinterest!
If you enjoyed this Vanilla Rose Crystal Domes with White Chocolate Core recipe, don’t let it get lost in your browser tabs! 😄 Pin it now so you can find it again anytime — and explore hundreds more tried-and-tested recipes waiting for you on my Pinterest boards.
👉 Follow Stella on Pinterest @stellarecipeblog
📌 Pin this recipe · 🔁 Re-pin your favorites · 💬 Tag me when you make it — I love seeing your creations!
💬 Did you make this recipe? I’d love to know! Leave a comment below, rate the recipe, and tag @leosfoods on social media. Your feedback helps me create more recipes you’ll love. — Stella 🧡
“`
Print

Vanilla Rose Crystal Domes with White Chocolate Core
Vanilla Rose Crystal Domes with White Chocolate Core
Ingredients
- For the Vanilla Rose Crystal Domes:
- 8 oz cream cheese, softened
- 1 cup heavy cream
- 1/3 cup powdered sugar
- 1 tsp vanilla bean paste
- 1 tbsp rose water
- 2 tsp unflavored gelatin
- 2 tbsp cold water
- Pink food coloring, as needed
- For the White Chocolate Core:
- 1/2 cup white chocolate, melted
- 2 tbsp mascarpone cheese
- 1 tbsp heavy cream
- 1 tsp honey
- For the Crystal Mirror Glaze:
- 1 cup white chocolate, finely chopped
- 1/2 cup sweetened condensed milk
- 2 tsp unflavored gelatin
- 2 tbsp cold water
- 1/4 cup warm water
- 1 tsp clear edible shimmer dust
- For Garnish (optional):
- Dried rose petals
- Edible pearl dust
Instructions
- 1. Mix gelatin and cold water in a small bowl and let bloom for 5 minutes.
- 2. Beat cream cheese, powdered sugar, vanilla bean paste, and rose water until smooth.
- 3. Melt the bloomed gelatin and stir into the cream mixture.
- 4. Whip heavy cream to soft peaks and gently fold into the mixture.
- 5. Add a few drops of pink food coloring for a soft blush tone.
- 6. Combine melted white chocolate, mascarpone, heavy cream, and honey until smooth.
- 7. Fill dome molds halfway with the vanilla rose mixture.
- 8. Add a spoonful of white chocolate core into each mold.
- 9. Cover with remaining mixture and smooth tops.
- 10. Freeze for at least 5 hours until fully firm.
- 11. Bloom gelatin for the glaze in cold water.
- 12. Heat condensed milk and warm water, then stir in gelatin until dissolved.
- 13. Pour over white chocolate and mix until smooth and glossy.
- 14. Stir in clear shimmer dust and allow glaze to cool slightly.
- 15. Unmold frozen domes and place on a wire rack.
- 16. Pour mirror glaze evenly over each dome.
- 17. Garnish with dried rose petals and pearl dust.
- 18. Serve chilled.
Nutrition
- Calories: 355
- Sugar: 24 g
- Fat: 25 g
- Carbohydrates: 28 g
- Protein: 5 g
Tried This Recipe? Leave a Comment!
Did you make this recipe? I’d love to hear how it turned out! Please leave a comment and a rating below. Your feedback helps other home cooks and supports cheerychop.com!
For more delicious inspiration, follow me on Pinterest!