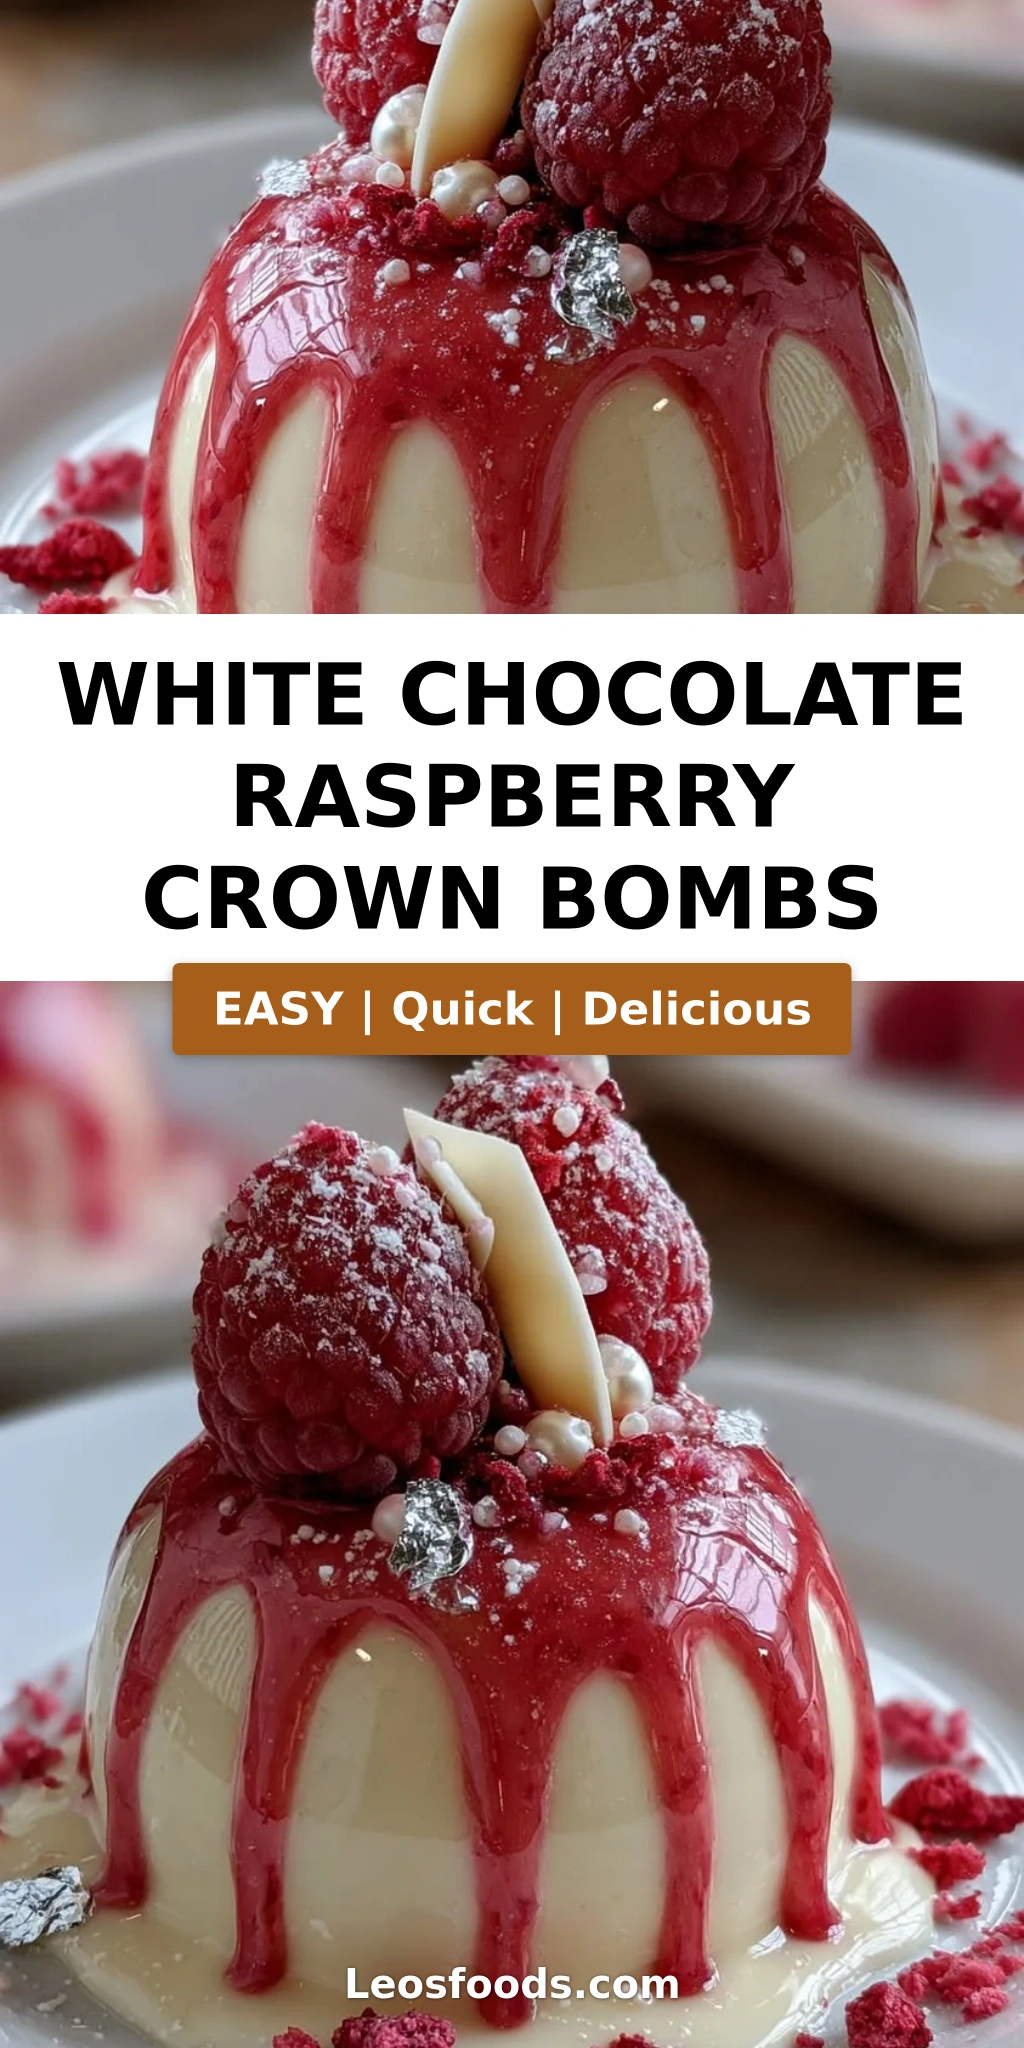
White Chocolate Raspberry Crown Bombs with Mirror Glaze
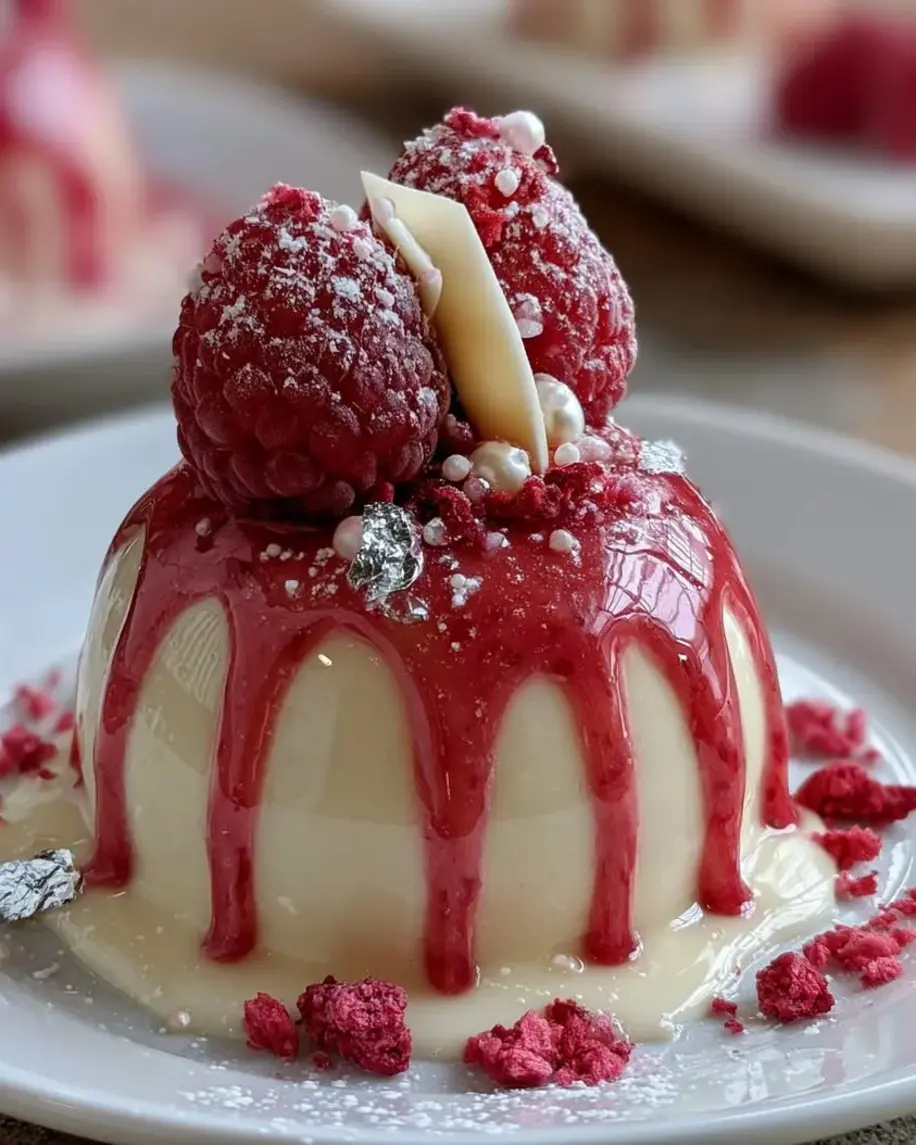
Table of Contents
White Chocolate Raspberry Crown Bombs Recipe – Mirror Glaze Magic
Let me take you back to a snowy afternoon in my mother’s kitchen in Morocco. The tang of raspberries simmering on the stove mingled with the warm, sweet scent of white chocolate melting in a bowl set over steaming water. She was teaching me how to make a simple fruit gelée, but I remember thinking: what if we turned this into something truly regal? Years later, after training at Le Cordon Bleu in Paris and settling into my NYC kitchen, that memory sparked this very recipe for white chocolate raspberry crown bombs — a dessert that feels like a jewel box opening at the table. The glossy mirror glaze, the creamy vanilla center, the bright raspberry shell — every bite is a lesson in contrasts, and every step is rooted in techniques I learned across continents.
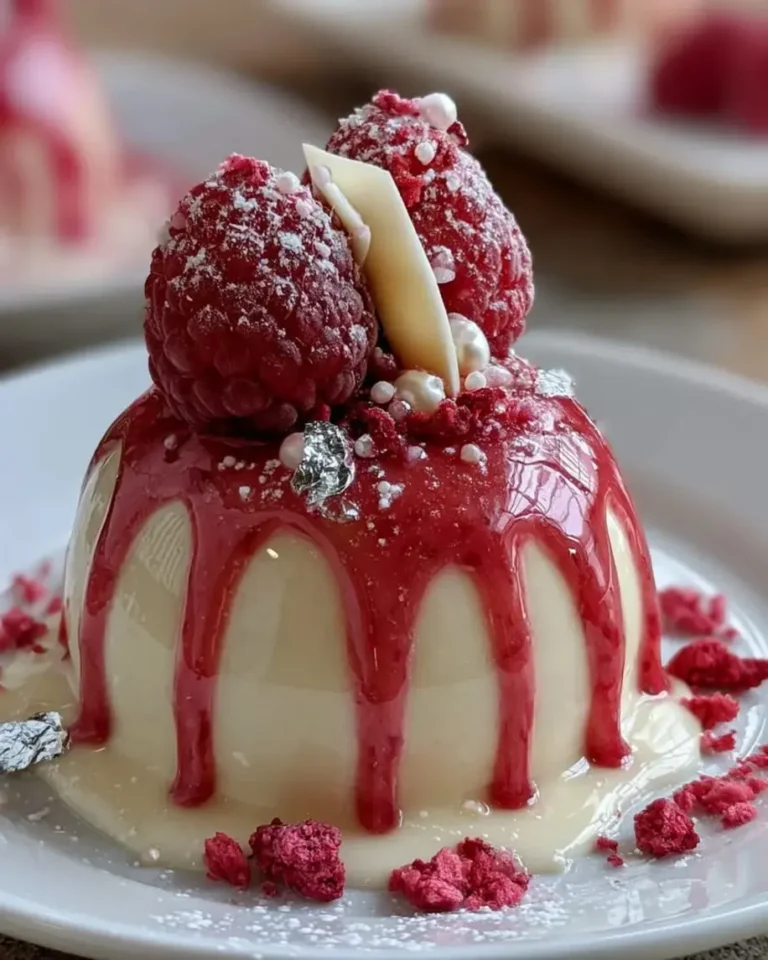
Imagine cutting into one of these crown bombs dessert beauties: the mirror glaze cracks ever so slightly, revealing a deep pink shell that gives way to a cloud-soft mascarpone-vanilla heart. The raspberry puree, brightened with lemon and a whisper of salt, delivers a tartness that cuts through the richness of the white chocolate. That glossy finish — shimmering with edible pearl luster dust and a hint of pink — catches the light like stained glass. It’s the kind of dessert that makes everyone at the table go quiet for a moment, then burst into conversation. The aroma alone — sweet cream, ripe berries, a touch of vanilla bean paste — is enough to pull anyone into the kitchen.
What sets my version apart? I don’t just pour a mirror glaze — I layer flavor and texture with precision. The shell is a raspberry-white chocolate gelée stabilized with gelatin, so it holds its shape even as it softens on the tongue. The center is an airy mascarpone whip, not too sweet, with vanilla bean paste for those tiny black specks that signal real flavor. And the glaze? I add a touch of raspberry puree and pearl luster dust for a finish that looks like molten silk. 💡 Stella’s Pro Tip: The key to a flawless mirror glaze is letting it cool to exactly 90°F before pouring — too warm and it slides right off, too cool and it sets before you get that sleek coating. One common mistake? Not freezing the bombs long enough — they need at least 4 hours to unmold cleanly. Trust me, patience pays off in a dessert that looks like a pastry shop display.
Why This White Chocolate Raspberry Crown Bombs Recipe Is the Best
The Flavor Secret. Growing up in Morocco, I learned that the best desserts balance sweetness with something bright and unexpected. Here, the raspberry puree gets a hit of lemon juice and a pinch of salt — it deepens the berry flavor and cuts through the white chocolate’s richness. That technique came straight from my mother’s kitchen, where she’d always say, “A pinch of salt makes the fruit sing.” Then in Paris, my pastry chef taught me to bloom gelatin properly — it’s the difference between a shell that’s silky versus one that’s rubbery. This recipe marries those two worlds: North African intuition and French precision.
Perfected Texture. The raspberry white chocolate bombe has three distinct textures: a firm-but-tender gelée shell, an airy mousse-like cream center, and a glass-smooth glaze. Getting that shell right requires you to pour a thin layer, chill it until it’s just set but still tacky, then add the filling. That tackiness is what bonds the layers together — skip that step, and the filling will separate. I also use a blend of mascarpone and heavy cream for the center, which gives it structure without being dense. The vanilla bean paste adds those beautiful specks and a deeper, rounder flavor than extract.
Foolproof & Fast (for the home cook). Yes, this is an advanced recipe, but I’ve broken it into clear stages that any confident home baker can follow. The active prep is about 45 minutes; the rest is chilling and freezing. I’ve tested this with crown-shaped silicone molds (available on Amazon or at any baking supply store), and I’ll show you exactly how to coat them evenly, fill them without air pockets, and unmold them like a pro. Even if you’ve never worked with mirror glaze before, my step-by-step instructions and visual cues will guide you to a stunning result.
White Chocolate Raspberry Crown Bombs Recipe Ingredients
I source my raspberries from the Union Square Greenmarket in summer — there’s a farmer named Rosa who grows the most intensely flavored berries I’ve ever tasted. In winter, I use good-quality frozen raspberries (look for IQF — individually quick frozen — with no added sugar). The white chocolate I buy from a small shop in Brooklyn that imports Valrhona, but any high-quality couverture with at least 30% cocoa butter will work beautifully. And the mascarpone? Always fresh from a local Italian deli on Arthur Avenue. Here’s everything you’ll need.
Ingredients List
- For the White Chocolate Raspberry Shells:
- 1 1/2 cups raspberry puree (from fresh or frozen berries)
- 3/4 cup white chocolate, finely chopped
- 1/2 cup heavy cream
- 1/3 cup granulated sugar
- 1 tsp vanilla extract
- 2 tsp gelatin powder
- 2 tbsp cold water
- 1 tbsp lemon juice
- Pinch of salt
- For the Vanilla Cream Center:
- 1 cup mascarpone cheese
- 1/2 cup heavy whipping cream
- 3 tbsp powdered sugar
- 1 tsp vanilla bean paste
- For the Crown Mirror Glaze:
- 1 cup white chocolate, finely chopped
- 1/2 cup sweetened condensed milk
- 1/4 cup water
- 1 tbsp gelatin powder
- 3 tbsp cold water
- 1 tbsp raspberry puree
- 1/2 tsp edible pearl luster dust
- A few drops pink food coloring
- For Garnish (optional):
- 2 tbsp freeze-dried raspberry crumbs
- 1 tbsp white chocolate shards
- Edible silver flakes
Ingredient Spotlight
Raspberry Puree. This is the backbone of your shell and part of your glaze. In a US grocery store, you can find jarred raspberry puree (like Boiron) in the frozen section or make your own by blending fresh or frozen berries and straining out the seeds. A fine-mesh sieve is essential here — seeds in the shell would ruin the silky texture. If using frozen berries, thaw them first and reserve the juice. Substitution: You can use strawberry or blackberry puree for a different flavor, but expect a slightly less tart result.
White Chocolate. Not all white chocolate is created equal. Look for brands like Valrhona, Callebaut, or Ghirardelli that list cocoa butter (not just palm oil) as a main ingredient. The higher the cocoa butter content, the smoother your shell and glaze will be. Avoid white “melting wafers” — they contain stabilizers that can make the texture grainy. For the shell and glaze, chop the chocolate very finely so it melts evenly. Substitution: For a dairy-free version, use a high-quality plant-based white chocolate (check for cocoa butter content), though the texture will be slightly less creamy.
Gelatin Powder. This is what gives the shell its structure and the glaze its signature “shard” effect when you tap it with a spoon. I use Knox brand gelatin powder, which is widely available. Bloom it in cold water for exactly 5 minutes — if you bloom it too long, the gelatin weakens; if too short, it won’t dissolve properly. Substitution: Agar-agar (1 tsp powder to replace 2 tsp gelatin) will work for a vegetarian version, but the texture will be firmer and less melt-in-the-mouth. The glaze will set at a higher temperature, so you’ll need to work faster.
| Original Ingredient | Best Substitution | Flavor / Texture Impact |
|---|---|---|
| Raspberry Puree | Strawberry or blackberry puree | Less tart, slightly sweeter; color shifts from deep pink to red or purple |
| White Chocolate | High-quality dairy-free white chocolate | Slightly less creamy, still good; check cocoa butter content |
| Gelatin Powder | Agar-agar (1 tsp for 2 tsp gelatin) | Firmer set, less delicate; glaze sets faster, work quickly |
| Mascarpone | Full-fat cream cheese + 1 tbsp heavy cream | Slightly tangier, a bit denser; still delicious |
How to Make White Chocolate Raspberry Crown Bombs — Step-by-Step
I’ve tested this recipe a dozen times to make sure every step is clear. Work through each stage with confidence — and remember, the freezer is your best friend here. Let’s make some crown bombs dessert magic!
Step 1: Bloom the Gelatin
In a small bowl, sprinkle 2 teaspoons of gelatin powder over 2 tablespoons of cold water. Stir gently and let it sit for 5 minutes. The gelatin will absorb the water and turn into a firm, jiggly mass — that’s exactly what you want. This process, called blooming, ensures the gelatin dissolves smoothly into your warm mixture without clumps.
⚠️ Common Mistake to Avoid: Don’t use hot water to bloom gelatin — it will create lumps and weaken the setting power. Always use cold water and let it sit the full 5 minutes.
Step 2: Make the Raspberry Shell Base
In a medium saucepan, combine 1 1/2 cups raspberry puree, 1/2 cup heavy cream, 1/3 cup granulated sugar, 1 tablespoon lemon juice, 1 teaspoon vanilla extract, and a pinch of salt. Heat over medium, stirring occasionally, until the mixture is warm and smooth — about 3-4 minutes. Do not let it boil. Remove from heat and add the bloomed gelatin, whisking until fully dissolved. Then add 3/4 cup finely chopped white chocolate and whisk continuously until the chocolate is completely melted and the mixture is silky.
💡 Stella’s Pro Tip: To ensure the white chocolate melts evenly, chop it very finely (the size of small peas) and remove the pan from heat before adding it. The residual heat of the liquid will do the work without scorching the chocolate.
Step 3: Coat the Molds
Pour a thin layer of the raspberry mixture into each crown-shaped silicone mold — about 2-3 tablespoons per crown, depending on the size of your mold. Use a small offset spatula or the back of a spoon to spread it evenly up the sides, making sure there are no gaps or bubbles. Tap the molds gently on the counter to release any air bubbles. Place the molds on a baking sheet and chill in the refrigerator for 20-25 minutes, until the mixture is partially set — it should feel firm but still slightly tacky to the touch.
⚠️ Common Mistake to Avoid: If the shell sets completely (becomes hard and non-tacky), the filling won’t adhere properly and may separate later. Check it at 20 minutes — it should have the consistency of a firm gel that your finger lightly sticks to.
Step 4: Make the Vanilla Cream Center
In a mixing bowl, combine 1 cup mascarpone cheese, 1/2 cup heavy whipping cream, 3 tablespoons powdered sugar, and 1 teaspoon vanilla bean paste. Using a hand mixer or stand mixer with the whisk attachment, whip on medium speed until light, fluffy, and stiff peaks form — about 2-3 minutes. Be careful not to over-whip, or the mixture will become grainy. Transfer the cream to a piping bag fitted with a round tip (or a zip-top bag with a corner snipped off).
💡 Stella’s Pro Tip: For the fluffiest center, make sure your mascarpone and cream are both very cold — straight from the fridge. And scrape the bowl once during whipping to ensure even incorporation.
Step 5: Fill and Seal the Molds
Pipe the vanilla cream into each mold, filling it almost to the top but leaving a small border (about 1/4 inch) around the edges. This border is crucial — it allows the remaining raspberry mixture to seal the bomb completely. Spoon or pipe the remaining raspberry mixture (keep it at room temperature; if it has thickened, warm it gently for a few seconds) over the cream, covering it completely and smoothing the tops with a small spatula or the back of a spoon. Freeze the molds for at least 4 hours, or preferably overnight, until completely solid.
⚠️ Common Mistake to Avoid: If you fill the molds too full, the bombs will bulge at the top and won’t sit flat when unmolded. Leave that border — it creates a clean, even base.
Step 6: Make the Mirror Glaze
About 30 minutes before you’re ready to glaze, make the mirror glaze. Bloom 1 tablespoon gelatin powder in 3 tablespoons cold water for 5 minutes. In a small saucepan, heat 1/2 cup sweetened condensed milk and 1/4 cup water until steaming — do not boil. Remove from heat and stir in the bloomed gelatin until fully dissolved. Pour this mixture over 1 cup finely chopped white chocolate in a heatproof bowl. Let it sit for 1 minute, then whisk until smooth and glossy. Add 1 tablespoon raspberry puree, 1/2 teaspoon edible pearl luster dust, and a few drops of pink food coloring, whisking until the color is even and the glaze is luminous. Let the glaze cool to 90°F — it should be slightly thickened but still pourable, like warm honey. You can speed this up by stirring it over an ice bath, but watch it carefully.
💡 Stella’s Pro Tip: The temperature of the glaze is everything. Too hot (above 95°F) and it will run right off the frozen bomb, pooling at the base. Too cool (below 85°F) and it will set before you get an even coat. Use an instant-read thermometer for precision.
Step 7: Unmold and Glaze
Remove the frozen bombs from the molds. If they’re stubborn, gently flex the silicone mold or dip the bottom in warm water for 2-3 seconds. Place each bomb on a wire rack set over a baking sheet (to catch the drips). Pour the mirror glaze evenly over each bomb, starting at the top and letting it flow down the sides. Use a small offset spatula to encourage the glaze to cover any bare spots, but work quickly — the frozen bomb will start to set the glaze immediately. Let the excess drip away for about 30 seconds, then carefully transfer the glazed bomb to a serving plate or a parchment-lined tray using a thin spatula.
⚠️ Common Mistake to Avoid: Don’t pour the glaze over a bomb that’s been sitting at room temperature for more than 30 seconds after unmolding — it will start to soften and the glaze won’t adhere properly. Work in batches: unmold one, glaze it, set it aside, then unmold the next.
Step 8: Garnish and Chill
While the glaze is still tacky (about 2-3 minutes after pouring), sprinkle the tops with freeze-dried raspberry crumbs, white chocolate shards, and a few edible silver flakes. The tackiness will help the garnishes stick. Transfer the glazed bombs to the refrigerator to set completely — at least 30 minutes. The glaze will become firm to the touch but will soften again slightly when brought to room temperature for serving.
💡 Stella’s Pro Tip: If you’re making these for a party, glaze them up to 4 hours in advance and keep them chilled. The glaze stays glossy and the bombs slice beautifully straight from the fridge.
| Step | Action | Duration | Key Visual Cue |
|---|---|---|---|
| 1 | Bloom gelatin | 5 mins | Firm, jiggly mass |
| 2 | Make shell base | 5 mins | Smooth, silky, no lumps |
| 3 | Coat molds & chill | 25 mins | Firm but tacky to touch |
| 4 | Make vanilla cream center | 3 mins | Stiff peaks, fluffy |
| 5 | Fill, seal & freeze | 4+ hours | Completely solid |
| 6 | Make mirror glaze | 15 mins | 90°F, glossy, pourable |
| 7 | Unmold & glaze | 2-3 mins per bomb | Even, glossy coat |
| 8 | Garnish & chill | 30 mins | Glaze firm to touch |
Serving & Presentation
When it’s time to serve, let the mirror glaze crown cake (or individual bombs) sit at room temperature for about 10 minutes — this softens the glaze and shell just enough so they crack open beautifully when you cut into them. I like to place each bomb on a small white plate with a spoonful of extra raspberry puree or a few fresh berries on the side. The contrast of the glossy pink glaze against the white plate is stunning. For a special touch, I sometimes add a tiny mint sprig or a dusting of powdered sugar on the plate.
In Morocco, we would serve something like this with a pot of hot mint tea — the sweetness of the dessert plays beautifully against the herbal, slightly bitter tea. In my NYC apartment, I pair it with a late-harvest Riesling or a sparkling rosé. The bright acidity of the wine mirrors the raspberry, while the bubbles cleanse the palate. If you’re serving these at a brunch, a strong flat white or cappuccino works wonderfully.
These fancy raspberry dessert bombs are also spectacular as a centerpiece on a dessert buffet. Arrange them on a tiered stand, and watch your guests’ eyes light up. The edible silver flakes catch the light, and the freeze-dried raspberry crumbs add a pop of deep color against the pink glaze. One bomb is perfectly sized for a single serving — rich enough to satisfy, but not so heavy that it overwhelms.
| Pairing Type | Suggestions | Why It Works |
|---|---|---|
| Side Dish | Fresh raspberries, mint sprig, extra raspberry sauce | Brightens the plate, adds freshness and acidity |
| Sauce / Dip | Warm raspberry coulis, vanilla crème anglaise | Adds moisture and a second layer of flavor |
| Beverage | Late-harvest Riesling, sparkling rosé, flat white, mint tea | Acidity and bubbles cut richness; tea adds warmth |
| Garnish | Freeze-dried raspberry crumbs, white chocolate shards, edible silver flakes | Adds texture, color contrast, and a touch of elegance |
Make-Ahead, Storage & Reheating
This is the ultimate make-ahead dessert — perfect for busy NYC hosts who want to enjoy the party, not the kitchen. I often prepare the bombs through Step 5 (freezing) up to 2 weeks in advance, then glaze and garnish them the morning of the event. Here’s exactly how to store every component.
| Method | Container | Duration | Reheating Tip |
|---|---|---|---|
| Refrigerator | Airtight container, single layer | Up to 3 days | Serve chilled or let sit 10 mins at room temp |
| Freezer | Airtight container, separated by parchment | Up to 2 months | Thaw in fridge overnight; glaze after thawing |
| Make-Ahead | In mold, covered with plastic wrap | Up to 2 weeks | Glaze directly from frozen — do not thaw first |
If you’ve already glazed the bombs, store them in the refrigerator in a single layer, covered loosely with plastic wrap (don’t let the wrap touch the glaze or it will stick). They’ll keep for up to 3 days, but the glaze may lose a bit of its mirror shine after 24 hours — so I recommend glazing them the day you plan to serve. To freeze unglazed bombs, wrap each one individually in plastic wrap, then place them in an airtight container. When you’re ready to serve, unmold them (if still in the mold), then glaze directly from frozen. The glaze will set beautifully on the frozen surface.
One thing I learned the hard way: never microwave a frozen bomb to soften it for glazing! The center will start to melt and the shell will crack. Just let the glaze do its job — the frozen bomb will cause the glaze to set quickly, giving you that perfect thin, glossy shell.
Variations & Easy Swaps
| Variation | Key Change | Best For | Difficulty Impact |
|---|---|---|---|
| Dark Chocolate & Cherry | Replace white chocolate with dark (70%), raspberry with cherry | Less sweet, deeper flavor | Same |
| Vegan / Dairy-Free | Use plant-based white chocolate, coconut cream + cashew cream | Dairy-free diets | Medium — texture slightly different |
| Passion Fruit & Coconut | Replace raspberry with passion fruit puree, add coconut flakes | Tropical, tangy twist | Same — but passion fruit seeds may need straining |
Dark Chocolate & Cherry Bombs
This is my husband’s favorite variation. Swap the white chocolate in both the shell and glaze for good-quality dark chocolate (70-72% cocoa). Replace the raspberry puree with cherry puree — I use dark sweet cherries from the farmers market in summer. The result is a less sweet, more intensely fruity bomb with a gorgeous deep red glaze. The cherry puree pairs beautifully with the dark chocolate’s bitterness. I’ll sometimes add a drop of almond extract to the cherry puree for a note that reminds me of my mother’s cherry clafoutis.
Vegan / Dairy-Free Version
For a plant-based version, use a high-quality vegan white chocolate (I like the brand “Moo Free” or “ChocAffair” for clean ingredient lists). Replace the heavy cream in the shell with full-fat coconut cream, and for the center, whip 1 cup soaked cashews with 1/2 cup coconut cream, powdered sugar, and vanilla. The texture will be slightly less airy but still deliciously creamy. For the glaze, use a vegan white chocolate and condensed coconut milk (available at most health food stores). The gelatin can be replaced with agar-agar (1 tsp powder for the shell, 1/2 tbsp for the glaze). Everything else stays the same. I tested this version for a friend’s birthday, and honestly, no one noticed it was vegan.
Passion Fruit & Coconut Twist
This is my go-to for summer gatherings. Replace the raspberry puree with passion fruit puree (available frozen at specialty stores). The tartness of passion fruit is brighter than raspberry, and the seeds add a lovely crunch — but I recommend straining them out for the shell to keep it smooth. For the center, fold 1/4 cup toasted unsweetened coconut flakes into the vanilla cream. Top the glaze with more toasted coconut instead of the raspberry crumbs. It’s like a tropical vacation in dessert form. I discovered this combination while visiting a patisserie in the West Village — they made a passion fruit mirror cake, and I knew I had to try it in crown form.
How do you make white chocolate raspberry crown bombs without the filling leaking out?
The most important step is properly sealing the filling inside the raspberry shell. After you pipe the vanilla cream center into the mold, make sure you leave a small border — about 1/4 inch — around the edges. This border is where the remaining raspberry mixture will bond with the shell to create a complete seal. Also, the shell must be partially set (tacky to the touch) when you add the filling — if it’s too firm, the filling won’t adhere. Another key factor: freeze the bombs for at least 4 hours (or overnight) so the filling is completely solid before you unmold and glaze. If the center is still soft, it can push through any weak spots in the seal during the glazing process. Finally, use high-quality gelatin that’s been properly bloomed — it gives the shell the strength to hold everything together.
What type of white chocolate works best for coating white chocolate raspberry crown bombs?
For the best results, use a high-quality white chocolate couverture with at least 30% cocoa butter. Brands like Valrhona, Callebaut, or Ghirardelli are excellent choices. The cocoa butter is what gives the shell and glaze that silky, melt-in-your-mouth texture. Avoid white chocolate chips or “melting wafers” — they often contain added stabilizers and palm oil that prevent smooth melting and can result in a grainy texture. If you’re using white chocolate bars from the grocery store, check the ingredients list: cocoa butter should be listed first or second. Chop the chocolate very finely (uniform small pieces) so it melts evenly. For the mirror glaze, good-quality white chocolate is especially critical — cheap white chocolate can seize or separate when combined with the warm condensed milk mixture.
Can you use frozen raspberries for white chocolate raspberry crown bombs, or should they be fresh?
Yes, you can absolutely use frozen raspberries — in fact, I often do, especially in winter when fresh berries are not at their peak. Look for individually quick frozen (IQF) raspberries with no added sugar. Thaw them completely, then puree and strain through a fine-mesh sieve to remove the seeds. The key is to measure the puree after straining — you need 1 1/2 cups for the shell and 1 tablespoon for the glaze. Frozen berries tend to be slightly more watery than fresh, so if your puree seems thin, you can simmer it gently for 5-10 minutes to reduce and concentrate the flavor. Fresh raspberries are wonderful in summer (I buy them at the Union Square Greenmarket), but frozen are a perfectly good substitute and often more consistent in flavor year-round.
How far in advance can you prepare white chocolate raspberry crown bombs for a party?
These crown bombs are perfect for make-ahead entertaining. You can prepare the bombs through Step 5 (filling and freezing) up to 2 weeks in advance — keep them in the silicone molds, tightly wrapped in plastic wrap, then in an airtight container in the freezer. On the day of your party, unmold and glaze them in the morning (they take about 30 minutes for the glaze to set), then refrigerate them until serving. The glaze stays glossy for about 4-6 hours in the fridge. If you want to push it further, you can even glaze them the day before, but the mirror shine may dull slightly after 24 hours. I don’t recommend freezing glazed bombs — the glaze can crack or become sticky when thawed. My strategy: prep the bases up to 2 weeks ahead, then glaze the morning of the event. It takes less than 30 minutes and feels like you just made everything from scratch.
Why is my mirror glaze not shiny and what can I do to fix it?
A dull mirror glaze usually happens for one of three reasons. First, the glaze was too warm when poured — if it’s above 95°F, the frozen bomb will melt the glaze on contact, creating a dull, streaky finish. Always cool your glaze to exactly 90°F (use an instant-read thermometer). Second, the glaze may have been overmixed or under-whisked, which incorporates too many air bubbles and breaks the light reflection. Whisk gently but thoroughly, and let the glaze sit for a minute after whisking to allow any bubbles to rise to the surface. Third, your white chocolate might be low quality — cheap white chocolate contains less cocoa butter, which is what creates that glass-like sheen. If your glaze is already dull, you can try warming it slightly (to about 95°F) and pouring a very thin second layer over the existing one. But prevention is best: use good chocolate, control your temperature, and whisk with a light hand.
Can I make these white chocolate raspberry crown bombs without a silicone crown mold?
Yes, you can still make this recipe even if you don’t have a crown-shaped silicone mold. The technique works with any small, round silicone mold — think hemisphere molds (like the ones used for dome cakes) or even mini Bundt molds. The shape will be different, but the flavors and textures will be just as delicious. If you don’t have silicone molds at all, you can use a standard muffin tin lined with plastic wrap (press the wrap firmly into the cups), but the bombs may not have as clean a shape. The key requirement is that the mold be somewhat flexible so you can unmold the frozen bombs without cracking the shell. Glass or ceramic dishes will make unmolding nearly impossible. I recommend investing in a crown-shaped silicone mold — they’re widely available online and give you that beautiful regal shape that makes this dessert truly special.
What is the best way to store leftover white chocolate raspberry crown bombs?
Leftover glazed crown bombs can be stored in an airtight container in the refrigerator for up to 3 days. Place them in a single layer and cover loosely with plastic wrap — avoid letting the wrap touch the glaze directly, as it can stick and mar the surface. If you need to stack them, use parchment paper between layers. The mirror glaze may lose some of its high shine after 24 hours, but the flavor will still be excellent. For longer storage, it’s better to freeze the bombs before glazing (up to 2 months wrapped tightly in plastic wrap and then foil). When you’re ready to enjoy them, thaw them in the refrigerator overnight, then glaze fresh. I personally think these taste best within the first 24 hours after glazing, when the shell has the perfect texture — firm but tender, and the glaze is still brilliantly glossy.
Can I use a different fruit puree for the mirror glaze on these crown bombs?
Absolutely! The mirror glaze recipe is quite versatile. You can swap the raspberry puree for strawberry, cherry, passion fruit, mango, or even blackberry puree. The color will change accordingly — strawberry gives a soft pink, cherry a deep red, mango a bright yellow-orange, and passion fruit a golden hue. Keep in mind that the flavor should complement the white chocolate and vanilla cream center. Tart fruits (raspberry, passion fruit, cherry) work best because they balance the sweetness. If you use a very sweet fruit like mango, you may want to add a squeeze of lemon juice to brighten it. The amount of food coloring you’ll need will vary depending on the natural color of your puree. I often use a combination: passion fruit for flavor plus a drop of pink coloring for a sunset effect. The pearl luster dust works with any color — it’s what gives that luminous, almost wet-looking finish.
Why did my white chocolate seize when I added it to the raspberry mixture?
White chocolate seizing is almost always caused by temperature shock or moisture. If your raspberry mixture was too hot when you added the white chocolate (above 120°F), the cocoa butter in the chocolate can separate, causing a grainy, lumpy texture. Always remove the saucepan from the heat and let it cool for 30-60 seconds before adding the chocolate. Another common cause is a drop of water getting into the mixture — even a single drop can cause white chocolate to seize because the sugar in the chocolate absorbs the moisture and forms a paste. Make sure all your utensils are completely dry. If your mixture does seize, you can sometimes save it by adding a small amount of warm heavy cream (1 tablespoon at a time) and whisking vigorously over very low heat. But prevention is easier: let the base cool slightly, use dry equipment, and add the chocolate off the heat, whisking continuously until smooth.
How do I get a perfectly smooth mirror glaze without bubbles?
A smooth, bubble-free mirror glaze comes down to technique. First, when you whisk the glaze, do it gently — vigorous whisking incorporates air. Use a spatula for most of the mixing, and only use a whisk at the very end for just a few strokes. Second, after the glaze is fully mixed, let it sit for 1-2 minutes so any tiny bubbles rise to the surface. Before pouring, you can pop any remaining bubbles with a toothpick or by lightly spritzing the surface with a kitchen torch. Third, strain the glaze through a fine-mesh sieve before using it — this catches any undissolved gelatin or chocolate lumps that could create texture issues. Finally, when pouring, pour in a steady stream over the center of the frozen bomb, allowing the glaze to flow naturally down the sides. Don’t spread it with a spatula unless absolutely necessary — let gravity do the work. The frozen surface of the bomb also helps by quickly setting the glaze, minimizing the time for bubbles to form.
Share Your Version!
I absolutely love hearing from you — there’s something so special about knowing that a recipe born in my NYC kitchen is being made in homes across the country. If you try these white chocolate raspberry crown bombs, please come back and leave a star rating and a comment below. Tell me how it went: did the mirror glaze shine? Did your family go quiet when they took that first bite? Did you try one of the variations? Your feedback not only helps me improve but also helps other readers who are considering making this recipe.
And if you’re on Instagram or Pinterest, snap a photo of your crown bombs and tag me @leosfoods — I feature my favorite reader creations in my stories every week! I’m especially curious: did you try the passion fruit variation? Or did you add your own twist, like a sprinkle of crushed pistachios or a drizzle of caramel? Let me know in the comments. From my NYC kitchen to yours — I hope this recipe brings as much warmth to your table as it does to mine. — Stella 🧡
Love This Recipe? Save It to Pinterest!
If you enjoyed this White Chocolate Raspberry Crown Bombs recipe, don’t let it get lost in your browser tabs! 😄 Pin it now so you can find it again anytime — and explore hundreds more tried-and-tested recipes waiting for you on my Pinterest boards.
👉 Follow Stella on Pinterest @stellarecipeblog
📌 Pin this recipe · 🔁 Re-pin your favorites · 💬 Tag me when you make it — I love seeing your creations!
White Chocolate Raspberry Crown Bombs
Decadent white chocolate raspberry crown bombs with a creamy vanilla center, topped with a glossy mirror glaze and festive garnishes.
- Yield: 6 1x
Ingredients
- For the White Chocolate Raspberry Shells:
- 1 1/2 cups raspberry puree
- 3/4 cup white chocolate, finely chopped
- 1/2 cup heavy cream
- 1/3 cup granulated sugar
- 1 tsp vanilla extract
- 2 tsp gelatin powder
- 2 tbsp cold water
- 1 tbsp lemon juice
- Pinch of salt
- For the Vanilla Cream Center:
- 1 cup mascarpone cheese
- 1/2 cup heavy whipping cream
- 3 tbsp powdered sugar
- 1 tsp vanilla bean paste
- For the Crown Mirror Glaze:
- 1 cup white chocolate, finely chopped
- 1/2 cup sweetened condensed milk
- 1/4 cup water
- 1 tbsp gelatin powder
- 3 tbsp cold water
- 1 tbsp raspberry puree
- 1/2 tsp edible pearl luster dust
- A few drops pink food coloring
- For Garnish (optional):
- 2 tbsp freeze-dried raspberry crumbs
- 1 tbsp white chocolate shards
- Edible silver flakes
Instructions
- Bloom gelatin in cold water for 5 minutes.
- Heat raspberry puree, heavy cream, sugar, lemon juice, vanilla extract, and salt until warm and smooth.
- Remove from heat and stir in the bloomed gelatin until fully dissolved.
- Add white chocolate and whisk until silky and completely melted.
- Pour a thin layer of the mixture into crown-shaped silicone molds, coating the sides evenly.
- Chill until partially set.
- Whip mascarpone, heavy cream, powdered sugar, and vanilla bean paste until light and fluffy.
- Fill each mold with the vanilla cream center, leaving a small border around the edges.
- Cover with the remaining raspberry mixture and smooth the tops.
- Freeze for at least 4 hours until completely firm.
- For the mirror glaze, bloom gelatin in cold water for 5 minutes.
- Heat sweetened condensed milk and water until steaming. Remove from heat and stir in gelatin until dissolved.
- Pour over white chocolate and whisk until smooth and glossy.
- Add raspberry puree, pearl luster dust, and pink food coloring until a luminous finish is achieved.
- Allow glaze to cool until slightly thickened but still pourable.
- Unmold the frozen crown bombs and place on a wire rack.
- Pour the mirror glaze evenly over each bomb, allowing excess glaze to drip away.
- Let the glaze set before transferring to serving plates.
- Finish with freeze-dried raspberry crumbs, white chocolate shards, and edible silver flakes.
- Serve chilled.
Nutrition
- Calories: 440
- Sugar: 33g
- Fat: 30g
- Carbohydrates: 39g
- Protein: 6g
Tried This Recipe? Leave a Comment!
Did you make this recipe? I’d love to hear how it turned out! Please leave a comment and a rating below. Your feedback helps other home cooks and supports cheerychop.com!
For more delicious inspiration, follow me on Pinterest!