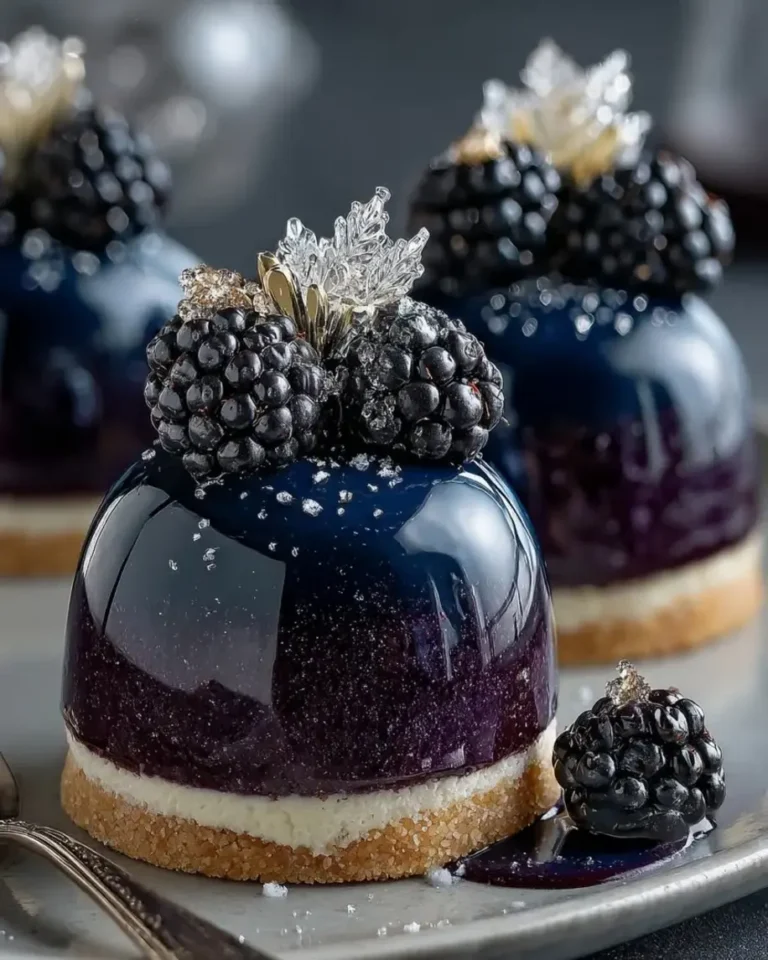
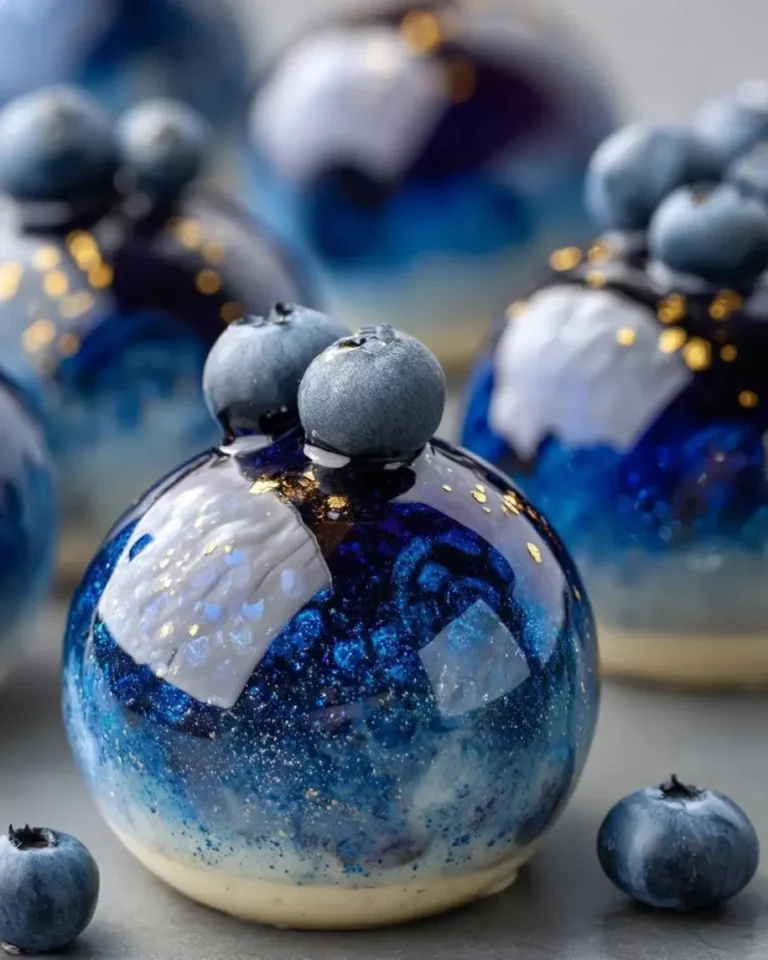
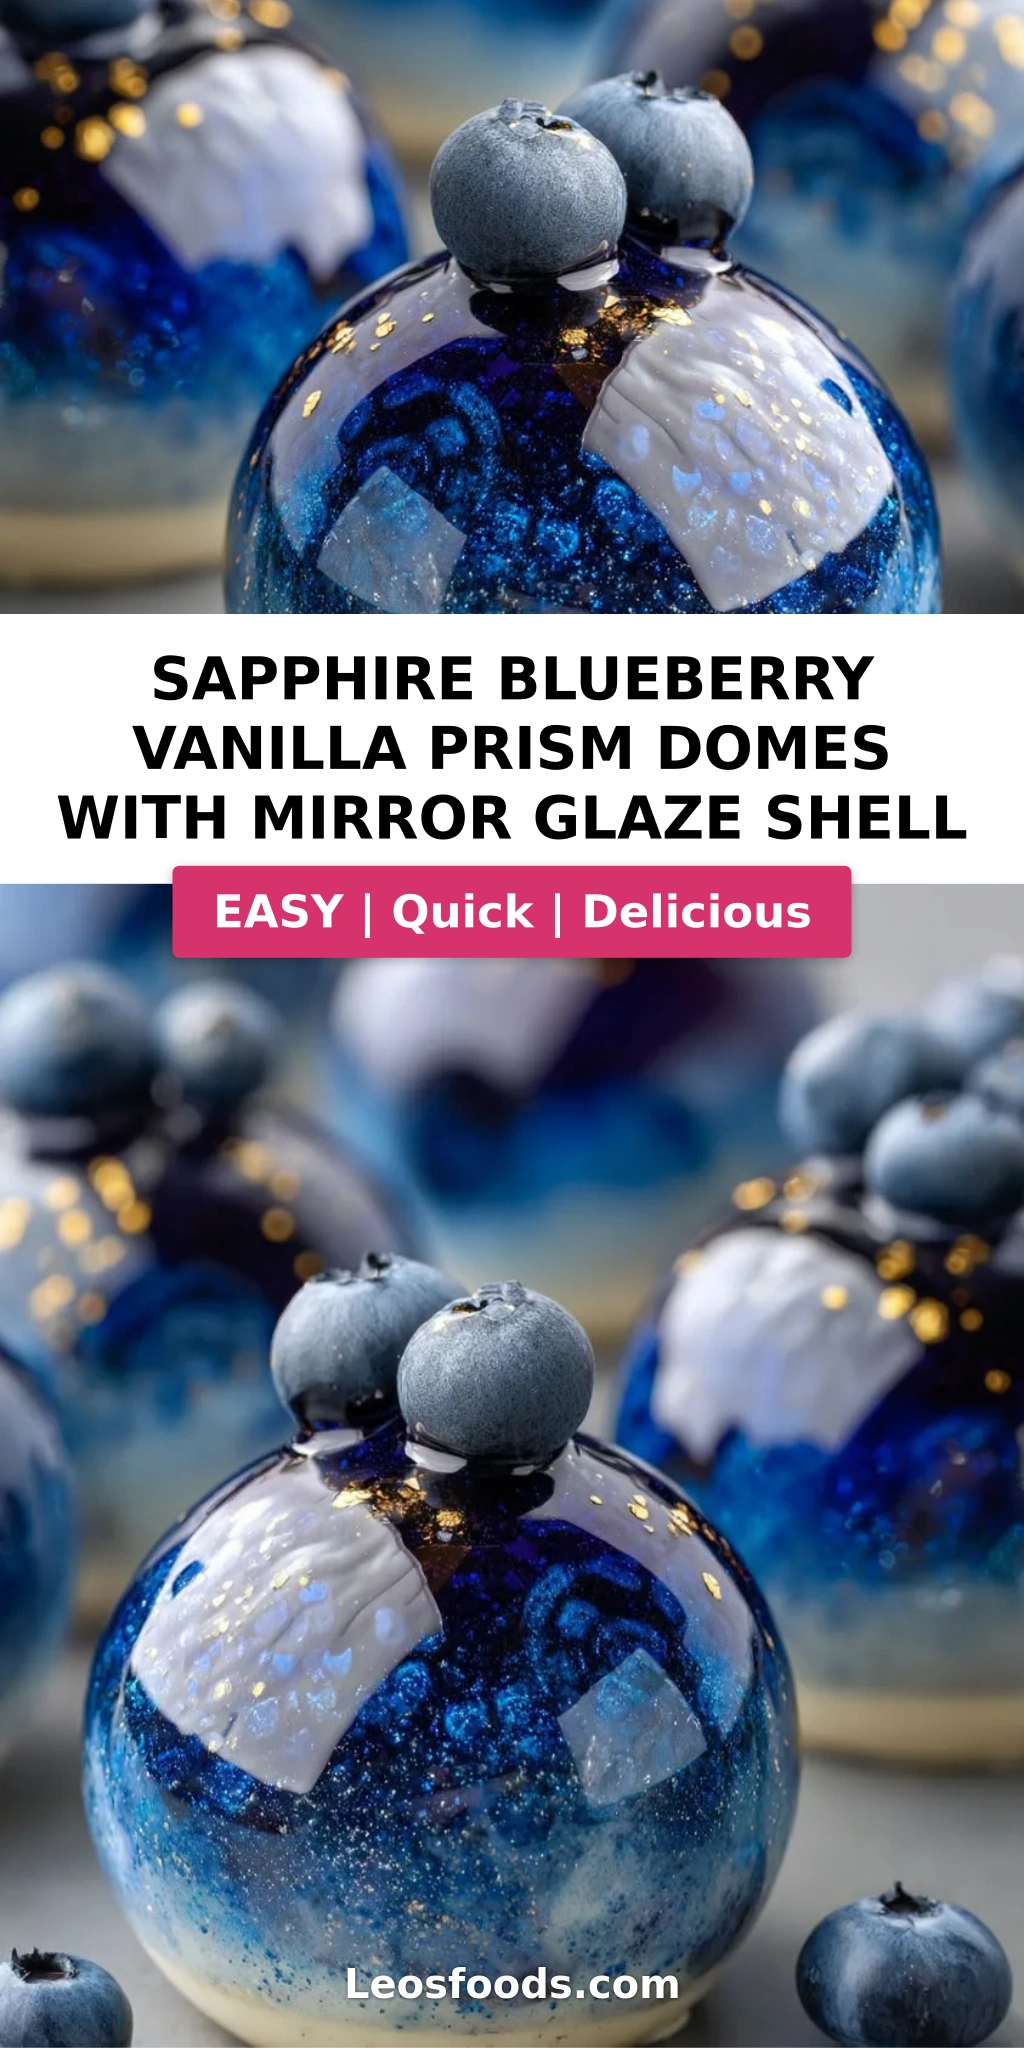
Sapphire Blueberry Vanilla Prism Domes with Mirror Glaze

Table of Contents
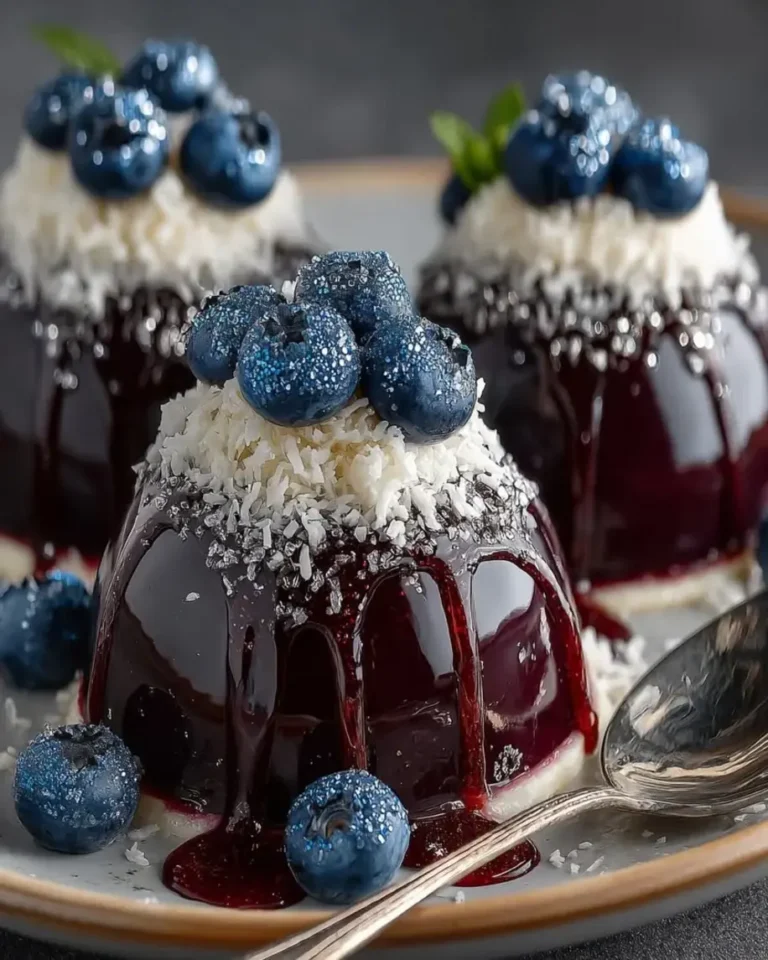
Sapphire Blueberry Vanilla Prism Domes with Mirror Glaze Shell – A Stunning Dessert Showstopper
Some desserts stop you mid-sentence. The first time I unmolded a Sapphire Blueberry Vanilla Prism Dome—its glossy, jewel-toned shell catching the light like a faceted gem—I actually gasped. Growing up in Morocco, my mother would make simple fruit compotes that gleamed with the sun’s warmth, but here in my New York City kitchen, I dreamed of something that shimmered like the sky after rain. These prism domes are that dream realized: a cascade of silky blueberry vanilla mousse, a hidden creamy vanilla heart, and a tender vanilla sponge base, all wrapped in a mirror glaze shell that looks too beautiful to eat. This Sapphire Blueberry Vanilla Prism Domes recipe is my love letter to the magic of pastry—where French technique meets the bold flavors of the city that never sleeps. The key to that flawless mirror glaze? Patience, precision, and one very special trick I learned during my days at culinary school in Paris.
Imagine cutting into a dome that reflects your kitchen lights like a polished sapphire. The spoon meets slight resistance at the glaze, then sinks through airy blueberry mousse into a lush vanilla cream center, finally hitting a soft, buttery sponge base. Each bite moves from tart and fruity to sweet and creamy—layers that dance on your tongue. The blueberry puree, brightened with lemon juice and vanilla, delivers a natural tang that cuts through the richness of the heavy cream and white chocolate glaze. It’s a dessert that feels both luxurious and familiar, like something you’d order at a chic NYC bistro but can absolutely make at home with the right guidance. I’ve tested this mirror glaze dessert more times than I can count, and I’m sharing every hard-won trick—including how to avoid cracking, weeping, or dull spots on that gorgeous shell.
What sets this blueberry dome cake recipe apart from others is the way I’ve structured the assembly—each component builds on the last without overwhelming the home baker. The vanilla sponge is intentionally simple; the vanilla cream center comes together in minutes; and the mirror glaze, while demanding respect, becomes manageable when you understand the science of gelatin and temperature. Trained at Le Cordon Bleu in Paris, I learned that great pastry isn’t about complexity—it’s about precision and heart. I’ve designed this recipe to be approachable for confident home cooks ready to try their first mirror glaze project. One common mistake I see is pouring the glaze too cold or too thick—I’ll show you exactly how to get that pourable, liquid-sapphire consistency every time. Let’s make something unforgettable together.
Why This Sapphire Blueberry Vanilla Prism Domes Recipe Is the Best
The Flavor Secret. Most blueberry mirror glaze recipes rely on artificial flavoring, but I insist on real blueberry puree made from fresh or frozen berries. It delivers a tangy, authentic fruitiness that balances the sweet white chocolate glaze and vanilla layers. My Moroccan roots taught me that fruit should sing—not be drowned in sugar. This recipe lets each element speak, from the bright berry notes to the lush vanilla finish.
Perfected Texture. The magic of these domes lies in the contrast: the mirror glaze shell is firm but not brittle, the blueberry vanilla mousse is airy yet stable, and the vanilla cream center is rich and luscious. During my Paris training, I spent weeks mastering mousse textures. The ratio of gelatin to cream matters enormously—too much gelatin and your mousse bounces like jelly; too little and it won’t hold the dome shape. I’ve calibrated this recipe so you get a silky, cloud-like mousse that holds its form beautifully.
Foolproof & Fast. While this blueberry dome cake recipe looks like it belongs in a patisserie window, the step-by-step process is designed for home kitchens. You don’t need professional equipment—just a few bowls, a hand mixer, a digital thermometer, and silicone dome molds. I’ve simplified the mirror glaze method so you can achieve that glossy, reflective shell without stress. Each component can be made in advance, making it perfect for special occasions. I’ve used this same method for birthdays, dinner parties, and holiday gatherings—and it never fails to impress.
Sapphire Blueberry Vanilla Prism Domes Recipe Ingredients
One of my favorite rituals is visiting the Union Square Greenmarket in early summer, when blueberries are piled high like tiny sapphires. I handpick flats of them for this mirror glaze dessert, remembering how my mother would send me to the souk in Marrakech to choose the ripest fruit. For this Sapphire Blueberry Vanilla Prism Domes recipe, quality matters—but with a few smart substitutions, you can absolutely adapt it to what’s available in your local grocery store.
Ingredients List
- For the Blueberry Vanilla Mousse: 2 cups blueberry puree, 1/3 cup granulated sugar, 1 tbsp lemon juice, 1 tsp vanilla extract, 1 cup heavy cream, 2 tsp powdered gelatin, 2 tbsp cold water
- For the Vanilla Cream Center: 4 oz cream cheese (softened), 1/4 cup powdered sugar, 1 tsp vanilla extract, 1/4 cup heavy cream
- For the Vanilla Sponge Base: 1 cup all-purpose flour, 1/2 tsp baking powder, 1/4 tsp salt, 1/4 cup unsalted butter (softened), 1/3 cup granulated sugar, 1 large egg, 1/2 tsp vanilla extract, 1/4 cup milk
- For the Mirror Glaze Shell: 1 cup white chocolate (finely chopped), 1/3 cup sweetened condensed milk, 1/4 cup water, 1/2 cup granulated sugar, 2 tsp powdered gelatin, 2 tbsp cold water, blue food coloring (as needed), edible pearl shimmer dust (as needed)
- For Garnish (optional): Fresh blueberries, white chocolate shards
Ingredient Spotlight
Blueberry Puree: The soul of the mousse layer. Use store-bought puree (check for no added sugar) or make your own by cooking fresh or frozen blueberries until soft and blending them until smooth. I prefer wild blueberries for their intense, slightly tart flavor—they mirror the deep, complex notes I grew up with in Moroccan fruit compotes. A good substitution is thawed frozen blueberries blended and strained to remove seeds.
White Chocolate for Glaze: This is non-negotiable for that glossy, reflective finish. Use a high-quality brand with at least 30% cocoa butter—cheap white chocolate contains stabilizers that prevent smooth melting and create a dull, streaky glaze. I use Valrhona or Callebaut. A tested substitution is using couverture white chocolate, which flows more smoothly and gives a deeper shine.
Powdered Gelatin: The structural backbone of both the mousse and the mirror glaze. It must be bloomed in cold water first—never skip this step. For a vegetarian version, you can substitute agar-agar, but the texture will be slightly firmer and the glaze less glossy. I’ve tested this and recommend sticking with gelatin for the mirror glaze shell to achieve that perfect mirror effect.
Heavy Cream: Provides richness and body to both the mousse and the vanilla cream center. Look for heavy cream with at least 36% milk fat. In a pinch, you can substitute full-fat coconut cream for the mousse (not the glaze) for a dairy-free option, though the flavor will shift slightly—still delicious, just different.
| Original Ingredient | Best Substitution | Flavor / Texture Impact |
|---|---|---|
| Blueberry puree (fresh) | Frozen blueberry puree (thawed & strained) | Slightly less intense color, same tangy flavor |
| White chocolate (chopped) | White chocolate couverture | Glossier finish, smoother flow |
| Powdered gelatin | Agar-agar (vegetarian) | Firmer mousse, less glossy glaze |
| Heavy cream (36% fat) | Full-fat coconut cream (for mousse only) | Subtle coconut note, still airy texture |
| Cream cheese (vanilla center) | Mascarpone cheese | Richer, even creamier center |
How to Make Sapphire Blueberry Vanilla Prism Domes — Step-by-Step
Trust me on this: you can absolutely do this. Take it one step at a time, and you’ll be rewarded with domes that look like they belong in a Parisian vitrine. I’ll walk you through each stage with my best tips and the mistakes to avoid.
Step 1: Make the Vanilla Sponge Base
Preheat your oven to 350°F (175°C) and line a small baking pan (about 8×8 inches works well) with parchment paper. In a medium bowl, whisk together 1 cup all-purpose flour, 1/2 tsp baking powder, and 1/4 tsp salt. In a separate large bowl, beat 1/4 cup softened unsalted butter and 1/3 cup granulated sugar using a hand mixer until light and fluffy—about 2 to 3 minutes. Add 1 large egg and 1/2 tsp vanilla extract, and beat until well combined and smooth. Gradually add the dry ingredients in two additions, alternating with 1/4 cup milk, mixing on low speed just until combined—avoid overmixing or the sponge will be dense. Spread the batter evenly into the prepared pan and bake for 18–20 minutes, until a toothpick inserted in the center comes out clean and the edges are lightly golden. Cool in the pan for 5 minutes, then transfer to a wire rack to cool completely. Once cool, use a round or prism-shaped cutter to cut out small base pieces that fit your dome molds—set aside.
⚠️ Common Mistake to Avoid: Overmixing the batter can develop gluten and make your sponge tough. Mix just until the flour disappears. I learned this the hard way during my first pastry exam in Paris—my sponge came out like a brick. Now I always stop the mixer the moment the batter looks cohesive.
Step 2: Prepare the Vanilla Cream Center
In a medium bowl, combine 4 oz softened cream cheese, 1/4 cup powdered sugar, and 1 tsp vanilla extract. Beat with a hand mixer until smooth and creamy, about 1 minute. Add 1/4 cup heavy cream and beat on medium-high speed until the mixture thickens and holds soft peaks—this takes about 2 minutes. Transfer the mixture to a piping bag fitted with a small round tip (or use a zip-top bag with a corner snipped off). Pipe small dollops—about the size of a walnut—onto a parchment-lined tray. You should have 8 portions. Freeze these until they are completely firm, at least 1 hour. They need to be solid so they hold their shape when nestled into the mousse.
💡 Stella’s Pro Tip: Make sure your cream cheese is truly at room temperature before beating—cold cream cheese creates lumps that won’t smooth out. I leave mine on the counter for about 30 minutes before starting. This little step makes a world of difference in achieving that velvety, luscious center.
Step 3: Make the Blueberry Vanilla Mousse
Start by blooming the gelatin: sprinkle 2 tsp powdered gelatin over 2 tbsp cold water in a small bowl. Let it sit for 5–10 minutes until it becomes firm and spongey—this is called blooming and it’s essential for proper dissolving. Meanwhile, in a medium saucepan, combine 2 cups blueberry puree, 1/3 cup granulated sugar, 1 tbsp lemon juice, and 1 tsp vanilla extract. Heat over medium heat, stirring occasionally, until the mixture is warm and the sugar is fully dissolved—do not let it boil. Remove from heat and add the bloomed gelatin, stirring until it is completely dissolved and smooth. Set aside to cool to room temperature—you want it warm but not hot, or it will deflate the whipped cream later. In a large bowl, whip 1 cup heavy cream to soft peaks (when the cream holds a gentle curl when you lift the whisk). Gently fold the cooled blueberry mixture into the whipped cream in three additions, using a rubber spatula and a light hand—fold until no white streaks remain. Work carefully to keep the mousse airy.
⚠️ Common Mistake to Avoid: Folding the blueberry mixture into the cream while it’s still warm will collapse the whipped cream and give you a dense, liquid mousse. Test the temperature on your wrist—it should feel neutral, not warm. I always wait until the bowl feels cool to the touch before folding.
Step 4: Assemble the Domes
Have your silicone dome molds ready (½-cup capacity is ideal for these domes). Using a piping bag or a spoon, fill each mold cavity about one-third full with blueberry mousse. Take a frozen vanilla cream center and press it gently into the center of each cavity—it should sit just below the surface. Pipe or spoon additional mousse on top, covering the cream center completely and filling the mold about three-quarters full. Press a sponge base piece gently into the top, ensuring it sits flush with the rim of the mold—this will be the bottom of your dome. Use a small offset spatula or butter knife to level it off. Place the filled molds on a baking tray and freeze for at least 4 hours, or overnight, until the domes are completely solid. Proper freezing is critical for the mirror glaze step.
💡 Stella’s Pro Tip: If you don’t have silicone dome molds, you can use oven-safe glass bowls (about 4 inches wide) lined with plastic wrap that overhangs the edges. After filling, fold the overhang over the top to seal. This is a trick I used in my early NYC apartment kitchen before I invested in professional molds—it works beautifully!
Step 5: Create the Mirror Glaze
Bloom 2 tsp powdered gelatin in 2 tbsp cold water for 5–10 minutes. In a small saucepan, combine 1/4 cup water, 1/2 cup granulated sugar, and 1/3 cup sweetened condensed milk. Heat over medium heat, stirring occasionally, until the mixture is smooth and the sugar is fully dissolved—do not boil. Remove from heat and add the bloomed gelatin, stirring until completely dissolved. Pour this hot mixture over 1 cup finely chopped white chocolate in a heatproof bowl. Let it sit for 1 minute, then stir gently until the chocolate is fully melted and the mixture is smooth and glossy. Add blue food coloring a few drops at a time, stirring until you reach a deep sapphire shade—I use about 6–8 drops of gel coloring. Stir in a pinch of edible pearl shimmer dust for that luminous, jewel-like finish. Let the glaze cool to 32–34°C (90–93°F)—this is the ideal pouring temperature. Use a digital thermometer for accuracy; this temperature range is critical for a smooth, glossy shell.
⚠️ Common Mistake to Avoid: Pouring the glaze when it’s too warm (above 35°C / 95°F) will cause it to slide off the cold domes in thin, uneven streaks. Glaze that’s too cool (below 30°C / 86°F) will set too quickly, creating a thick, lumpy finish. I always keep a thermometer clipped to my saucepan and watch it like a hawk—this precision is what separates a decent glaze from a breathtaking one.
Step 6: Glaze and Garnish
Remove the frozen domes from the molds. Unmold them directly onto a wire rack set over a baking sheet to catch drips. Working quickly, pour the prepared glaze evenly over each dome, starting from the top and letting it cascade down the sides. Use a small offset spatula to gently guide the glaze if needed, but try not to touch the surface—the glaze should self-level for a perfect finish. Each dome should be fully coated. Allow the glaze to set for 10–15 minutes at room temperature—the glaze will become firm but not hard. Gently transfer each dome to a serving plate using a thin palette knife or spatula. Garnish with fresh blueberries and white chocolate shards before serving. For the shards, simply use a vegetable peeler to shave thin curls from a block of white chocolate.
💡 Stella’s Pro Tip: For the most dramatic presentation, warm your serving plates slightly (pop them in a 150°F / 65°C oven for 3 minutes) before plating the domes. The slight warmth creates a subtle melt-pool effect at the base and releases more of the blueberry aroma as you serve. This is a plating trick I picked up from a pastry chef at a Michelin-starred restaurant in Paris—and it never fails to wow guests.
Quick Cooking Reference
| Step | Action | Duration | Key Visual Cue |
|---|---|---|---|
| 1 | Bake vanilla sponge | 18–20 mins | Toothpick clean, edges golden |
| 2 | Freeze vanilla cream centers | 1+ hours | Firm enough to handle |
| 3 | Prepare mousse (fold) | 10 mins | No white streaks, airy texture |
| 4 | Assemble and freeze domes | 4+ hours | Solid to the touch, easy to unmold |
| 5 | Make and cool mirror glaze | 15–20 mins | Thermometer reads 32–34°C (90–93°F) |
| 6 | Pour glaze and set | 10–15 mins | Glaze is firm, glossy, not sticky |
| 7 | Garnish and serve | 5 mins | Berries and white chocolate shards placed |
Serving & Presentation
These mirror glaze domes are a showpiece, so presentation matters—but it doesn’t have to be fussy. The first time I served these at a friend’s dinner party in Brooklyn, I arranged the domes on a mirrored tray (which doubled the sapphire effect) and scattered fresh blueberries around them like tiny jewels. The contrast of the deep blue glaze against a white plate creates the most dramatic effect—think of a gemstone on a bed of snow. For a more rustic approach, I sometimes set each dome on a smear of blueberry puree (just pulse a few berries with a touch of honey) and finish with a tiny sprig of mint. My favorite way, though, is a simple pool of vanilla créme anglaise or a dusting of powdered sugar for a snow-kissed look—it reminds me of the first snowfall I ever saw in Paris, dusting the rooftops of the patisseries.
If you’re serving these for a special occasion like a birthday or anniversary, here’s a little trick: place each dome on a small, chilled plate and add a single edible gold leaf flake on top. It catches the light and makes the blue glow even deeper. I learned this technique during a short stage at Pierre Hermé’s salon in Paris—sometimes the smallest detail elevates a dessert from beautiful to breathtaking. Let the domes sit at room temperature for about 5 minutes before serving to soften slightly—the mousse becomes creamier and the flavors bloom. Always present them to your guests before the first cut; the gasp is part of the experience.
| Pairing Type | Suggestions | Why It Works |
|---|---|---|
| Side Dish | Fresh mixed berries, lemon zest, mint leaves | Adds brightness and cuts the sweetness |
| Sauce / Dip | Vanilla créme anglaise, berry coulis, honey drizzle | Complements the vanilla and blueberry notes |
| Beverage | Champagne, sparkling water with lemon, Earl Grey tea | Bubbles and citrus cleanse the palate |
| Garnish | Fresh blueberries, white chocolate shards, gold leaf | Adds visual drama and texture |
Make-Ahead, Storage & Reheating
One of the best things about this Sapphire Blueberry Vanilla Prism Domes recipe is how well it works for busy schedules—I rely on it for dinner parties and holiday gatherings when I need to prep in advance. Each component can be made separately, and the assembled domes freeze beautifully, giving you total flexibility. Here’s how I manage my NYC life with this showstopper.
| Method | Container | Duration | Reheating / Finishing Tip |
|---|---|---|---|
| Refrigerator | Airtight container, single layer | Up to 3 days | Serve cold or let sit 10 mins at room temp |
| Freezer | Wrap each dome in plastic wrap, then foil | Up to 2 months | Thaw in fridge overnight before glazing |
| Make-Ahead | Freeze unglazed domes on a tray | Up to 2 weeks | Glaze and garnish day of serving for maximum shine |
For the best texture and shine, I recommend glazing the domes on the day you plan to serve them. The mirror glaze shell is at its most spectacular within the first 6 to 8 hours after glazing—it stays glossy and smooth if kept refrigerated, but avoid covering it tightly, as condensation can dull the surface. If you have leftovers, place them uncovered in the refrigerator for up to 3 days; the glaze will soften slightly but still look beautiful. For reheating—well, these are best enjoyed cold or at cool room temperature, so no reheating needed. Just let them sit out for 5 to 10 minutes before serving to take the chill off and let the mousse become wonderfully creamy again.
Variations & Easy Swaps
This blueprint is wonderfully adaptable—I’ve riffed on it in countless ways depending on the season and what’s at the farmers market. Here are three of my favorite variations, each tested in my NYC kitchen.
| Variation | Key Change | Best For | Difficulty Impact |
|---|---|---|---|
| Raspberry & Rose | Substitute raspberry puree for blueberry, add 1 tsp rose water | Valentine’s Day, romantic dinners | Same (advanced) |
| Gluten-Free Version | Use a gluten-free flour blend for the sponge | Dietary restrictions, Celiac-friendly | Same (advanced) |
| Mango & Coconut | Replace blueberry puree with mango puree, use coconut cream in mousse | Summer entertaining, tropical twist | Slightly easier (glaze yellower, easier to gauge) |
Raspberry & Rose Variation
This is probably my most-requested variation for romantic occasions. Swap the blueberry puree for an equal amount of raspberry puree (strained to remove seeds) and add 1 tsp of rose water to the mousse along with the vanilla. The raspberry’s tartness pairs beautifully with floral notes—a combination that reminds me of the rose-scented pastries I grew up with in Morocco. For the mirror glaze, use a pink-red food coloring instead of blue, and garnish with fresh raspberries and rose petals (make sure they’re edible and unsprayed). The flavor profile is more perfume-y and delicate, perfect for spring celebrations.
Gluten-Free Version
I’ve made this for friends with Celiac disease by swapping the all-purpose flour in the vanilla sponge base with a high-quality 1:1 gluten-free baking blend (like Bob’s Red Mill or King Arthur Measure for Measure). The texture is slightly more tender and delicate—so handle the sponge gently when cutting out the base pieces. The rest of the components—mousse, cream center, and mirror glaze—are naturally gluten-free, making this an easy adaptation. The sponge may brown a little faster, so start checking at 15 minutes. A touch of extra vanilla helps mask any G-free flour aftertaste.
Mango & Coconut Variation
For a tropical twist that transports me to the beaches of Essaouira, replace the blueberry puree with an equal amount of mango puree (from ripe, sweet mangoes) and swap the heavy cream in the mousse for full-fat coconut cream. The result is a luscious, dairy-free (or lactose-friendly) mousse that pairs beautifully with the white chocolate mirror glaze. Use yellow-orange food coloring for the glaze, and garnish with toasted coconut flakes and a tiny cube of fresh mango. You may not need any extra sugar—ripe mangoes are naturally very sweet—so start with half the sugar and taste before adding more.
How do you achieve a flawless mirror glaze on Sapphire Blueberry Vanilla Prism Domes?
Getting that perfect, reflective mirror glaze is all about temperature and technique. The two most critical factors are the temperature of the glaze when you pour it (aim for exactly 32–34°C / 90–93°F) and making sure your frozen domes are fully solid—at least 4 hours of freezing, ideally overnight. Use a digital thermometer for precision; eyeballing it won’t work. Also, use high-quality white chocolate with a good cocoa butter content (around 30% or higher) and stir the glaze gently to avoid incorporating air bubbles, which create dimples on the surface. A sieve can help catch any lumps. Finally, pour the glaze from a height of about 6 inches, letting it flow evenly over the dome in one steady motion—this encourages self-leveling for that flawless, glass-like finish.
Can I use frozen blueberries instead of fresh for the blueberry layer in these prism domes?
Absolutely—frozen blueberries work beautifully in this Sapphire Blueberry Vanilla Prism Domes recipe, and in many ways they’re actually more convenient and consistent year-round. Frozen blueberries are typically picked at peak ripeness and flash-frozen, locking in their flavor and antioxidants. To use them, simply thaw the berries (about 2 cups of frozen berries yields roughly 2 cups of puree after blending), then blend them into a puree and strain through a fine-mesh sieve to remove the skins and seeds, which can be tough and bitter. One small adjustment: frozen berries can vary in sweetness, so taste your puree before adding the sugar and adjust accordingly. You may need a touch more sugar if the berries are very tart.
What is the best way to store blueberry vanilla mirror glaze domes to keep them shiny?
The mirror glaze is at its most spectacular on the day it’s poured, but you can maintain that shine for up to 3 days with the right storage. The key is to avoid moisture condensation on the surface. After the glaze has set for about 15–20 minutes at room temperature, transfer the glazed domes to a baking sheet or plate and place them in the refrigerator uncovered for the first hour—this allows the glaze to firm up completely without any covering trapping moisture. After that, you can wrap them loosely in plastic wrap, but I prefer to use a large, clean cardboard box or a cake carrier with the lid slightly ajar to allow a bit of airflow. Never store them in an airtight container with a tight lid—condensation will form and cause the glaze to dull, weep, or develop spots. If you’re serving them the next day, let them sit at room temperature for 5 minutes before plating to restore the gloss.
How far in advance can I make Sapphire Blueberry Vanilla Prism Domes for a special event?
You can absolutely make these domes ahead of time, and I often recommend it for stress-free entertaining. Here’s my timeline: you can prepare all the components—the vanilla sponge, the vanilla cream centers, and the blueberry mousse—up to 2 days in advance. Assemble the domes in the molds and freeze them fully (at least 4 hours, but overnight is ideal). You can keep the frozen, unglazed domes in the freezer for up to 2 weeks if wrapped tightly in plastic wrap and foil. On the day of your event, make the mirror glaze and pour it over the frozen domes—this takes about 30 minutes total. The glazed domes can then be refrigerated for up to 6 hours before serving. The key is to glaze on the same day you serve for maximum shine and freshness. I often make the domes a full week ahead and glaze them the morning of my dinner party—it’s my secret to hosting with confidence.
What size dome molds should I use for this recipe?
I recommend using silicone dome molds with a capacity of about ½ cup (or 4 ounces / 120 ml) each. This size creates a generously proportioned individual dessert that’s perfect for plating. The diameter is typically about 2.5 to 3 inches across. If your molds are smaller or larger, adjust the assembly amounts accordingly—smaller molds will yield more servings (about 10–12), while larger molds will need more filling time and may require additional sponge base pieces. Silicone molds are ideal because they’re flexible, making unmolding the frozen domes a breeze without damaging the mousse. I buy mine at kitchen supply stores in NYC or online—they’re inexpensive and reusable. Just make sure they’re clean and completely dry before filling.
Can I make this mirror glaze dessert without a thermometer?
You can, but I strongly recommend using a digital thermometer for the mirror glaze—it’s the single most important tool for achieving that perfect glossy shell. The ideal pouring temperature range of 32–34°C (90–93°F) is very narrow, and even a few degrees off can make the difference between a smooth, reflective finish and a streaky, dull one. If you don’t have a thermometer, you can test the glaze by dipping a clean finger into it: it should feel cool—not warm—to the touch, with a consistency like thick syrup that runs smoothly off your finger. But this method is imprecise and risky, especially if this is your first time making mirror glaze. A simple digital candy thermometer costs about $10 and is a worthwhile investment for this recipe and for future pastry projects.
Why did my mirror glaze crack or bubble after pouring?
Cracks and bubbles in mirror glaze are almost always caused by temperature mismatches or air bubbles in the glaze itself. If your frozen domes are not completely solid (I recommend freezing for at least 4 hours, ideally overnight), the temperature shock can cause the glaze to contract and crack as it sets. Similarly, if the glaze is too warm when poured (above 35°C / 95°F), it will cook the surface of the frozen mousse, creating steam bubbles that erupt through the glaze and leave craters. To avoid bubbles, stir the glaze gently—never whisk vigorously—and after mixing, let it sit for a minute to allow any incorporated air to rise to the surface. You can also pass the finished glaze through a fine-mesh sieve before pouring to catch any stray bubbles or lumps. Pour from a moderate height (about 6 inches) in a steady, controlled stream to minimize bubble formation.
Can I skip the vanilla sponge base in these blueberry dome cakes?
You can skip the vanilla sponge base, but it serves an important structural and textural purpose. The sponge base gives the dome a stable bottom that makes unmolding and plating easier, and it adds a soft, cake-like layer that contrasts nicely with the creamy mousse and the glossy glaze. Without it, the dome would be entirely mousse and cream, which is still delicious but more delicate and harder to handle—it might slump slightly when you unmold it. If you want to skip the sponge, I recommend using a thin layer of crushed vanilla wafers or graham crackers mixed with a tablespoon of melted butter and pressed firmly into the bottom of the mold before freezing. This provides a similar stable base with a pleasant crunch. It’s a nice shortcut when you’re short on time.
How do I get a deep sapphire blue color for the mirror glaze?
Achieving that rich, jewel-like sapphire blue is all about the type and amount of food coloring you use. I recommend gel-based or powder-based food coloring—liquid drops are too diluted and require so many that they can affect the glaze’s consistency and flavor. Start with royal blue gel coloring and add a tiny drop of violet or black to deepen the shade into a sapphire tone. Add the color gradually while the glaze is still warm (but not hot), stirring gently until fully incorporated. The white chocolate base of the glaze naturally lightens the color, so don’t be afraid to go a shade darker than you think—the final result will be slightly softer. For extra depth, stir in a pinch of edible pearl shimmer dust or silver luster dust at the end; it gives the surface a luminous, gemstone-like quality that catches the light beautifully.
What’s the best way to unmold frozen domes without ruining them?
Unmolding frozen domes is easy if you follow a few simple steps. First, make sure the domes are fully frozen—at least 4 hours, but overnight is better. Remove the tray of molds from the freezer and let them sit at room temperature for exactly 1 to 2 minutes. This slight warmth helps the silicone release without melting the mousse. Then, gently press on the bottom of each silicone mold—the dome should pop out cleanly onto your work surface. If it sticks, wait another 30 seconds and try again. Avoid twisting or pulling forcefully, as this can tear the mousse. Use a thin, offset spatula or a knife to lift the dome if needed, but handle it gently—at this point the dome is firm but can still dent. Place the unmolded domes directly onto a wire rack set over a baking sheet for glazing. Work quickly so they stay cold enough for the mirror glaze to set properly.
Share Your Version!
I really do love seeing how this Sapphire Blueberry Vanilla Prism Domes recipe turns out in other kitchens—it’s one of those desserts that always inspires creativity. Whether you followed the recipe exactly, tried a new flavor twist, or even created your own mirror glaze color, I want to hear about it! Leave a star rating below (five stars always makes my day), and share a photo on Instagram or Pinterest and tag @leosfoods so I can cheer you on. Tell me: what’s your favorite way to garnish? I’m always looking for new ideas—maybe a drizzle of honey, a pinch of sea salt, or a layer of crushed pistachios? Drop your questions, too—nothing makes me happier than helping you become more confident in the kitchen.
From my NYC kitchen to yours — I hope this recipe brings as much warmth to your table as it does to mine. — Stella 🧡
Love This Recipe? Save It to Pinterest!
If you enjoyed this Sapphire Blueberry Vanilla Prism Domes with Mirror Glaze Shell recipe, don’t let it get lost in your browser tabs! 😄 Pin it now so you can find it again anytime — and explore hundreds more tried-and-tested recipes waiting for you on my Pinterest boards.
👉 Follow Stella on Pinterest @stellarecipeblog
📌 Pin this recipe · 🔁 Re-pin your favorites · 💬 Tag me when you make it — I love seeing your creations!
Sapphire Blueberry Vanilla Prism Domes with Mirror Glaze Shell
Exquisite dome-shaped desserts featuring layers of blueberry vanilla mousse, a creamy vanilla center, and a vanilla sponge base, all enrobed in a shimmering blue mirror glaze.
- Yield: 8 1x
Ingredients
- For the Blueberry Vanilla Mousse:
- 2 cups blueberry puree
- 1/3 cup granulated sugar
- 1 tbsp lemon juice
- 1 tsp vanilla extract
- 1 cup heavy cream
- 2 tsp powdered gelatin
- 2 tbsp cold water
- For the Vanilla Cream Center:
- 4 oz cream cheese, softened
- 1/4 cup powdered sugar
- 1 tsp vanilla extract
- 1/4 cup heavy cream
- For the Vanilla Sponge Base:
- 1 cup all-purpose flour
- 1/2 tsp baking powder
- 1/4 tsp salt
- 1/4 cup unsalted butter, softened
- 1/3 cup granulated sugar
- 1 large egg
- 1/2 tsp vanilla extract
- 1/4 cup milk
- For the Mirror Glaze Shell:
- 1 cup white chocolate, finely chopped
- 1/3 cup sweetened condensed milk
- 1/4 cup water
- 1/2 cup granulated sugar
- 2 tsp powdered gelatin
- 2 tbsp cold water
- Blue food coloring, as needed
- Edible pearl shimmer dust, as needed
- For Garnish (optional):
- Fresh blueberries
- White chocolate shards
Instructions
- 1. Preheat oven to 350°F (175°C) and line a small baking pan.
- 2. Whisk together flour, baking powder, and salt.
- 3. Beat butter and sugar until fluffy.
- 4. Add egg and vanilla extract.
- 5. Alternate adding dry ingredients and milk until smooth.
- 6. Bake for 18–20 minutes. Cool completely and cut into prism-sized base pieces.
- 7. Beat cream cheese, powdered sugar, vanilla extract, and heavy cream until smooth.
- 8. Pipe small portions onto a tray and freeze until firm.
- 9. Bloom gelatin in cold water for the mousse.
- 10. Heat blueberry puree, sugar, lemon juice, and vanilla until warm.
- 11. Stir in gelatin until dissolved and cool slightly.
- 12. Whip heavy cream to soft peaks and fold into the blueberry mixture.
- 13. Fill dome molds halfway with mousse.
- 14. Place a frozen vanilla cream center into each mold and cover with more mousse.
- 15. Add sponge base pieces and freeze until fully set, about 4 hours.
- 16. Bloom gelatin in cold water for the glaze.
- 17. Heat water, sugar, and condensed milk until smooth.
- 18. Remove from heat and stir in gelatin.
- 19. Pour over white chocolate and mix until glossy.
- 20. Add blue food coloring and pearl shimmer dust.
- 21. Cool glaze to a pourable consistency.
- 22. Unmold frozen domes and place on a wire rack.
- 23. Pour glaze evenly over each dome until fully coated.
- 24. Allow glaze to set for 10–15 minutes.
- 25. Garnish with fresh blueberries and white chocolate shards before serving.
Nutrition
- Calories: 380
- Sugar: 34 g
- Fat: 21 g
- Carbohydrates: 43 g
- Protein: 5 g
Tried This Recipe? Leave a Comment!
Did you make this recipe? I’d love to hear how it turned out! Please leave a comment and a rating below. Your feedback helps other home cooks and supports cheerychop.com!
For more delicious inspiration, follow me on Pinterest!