Golden Peach Honeycomb Cheesecake Spheres Recipe
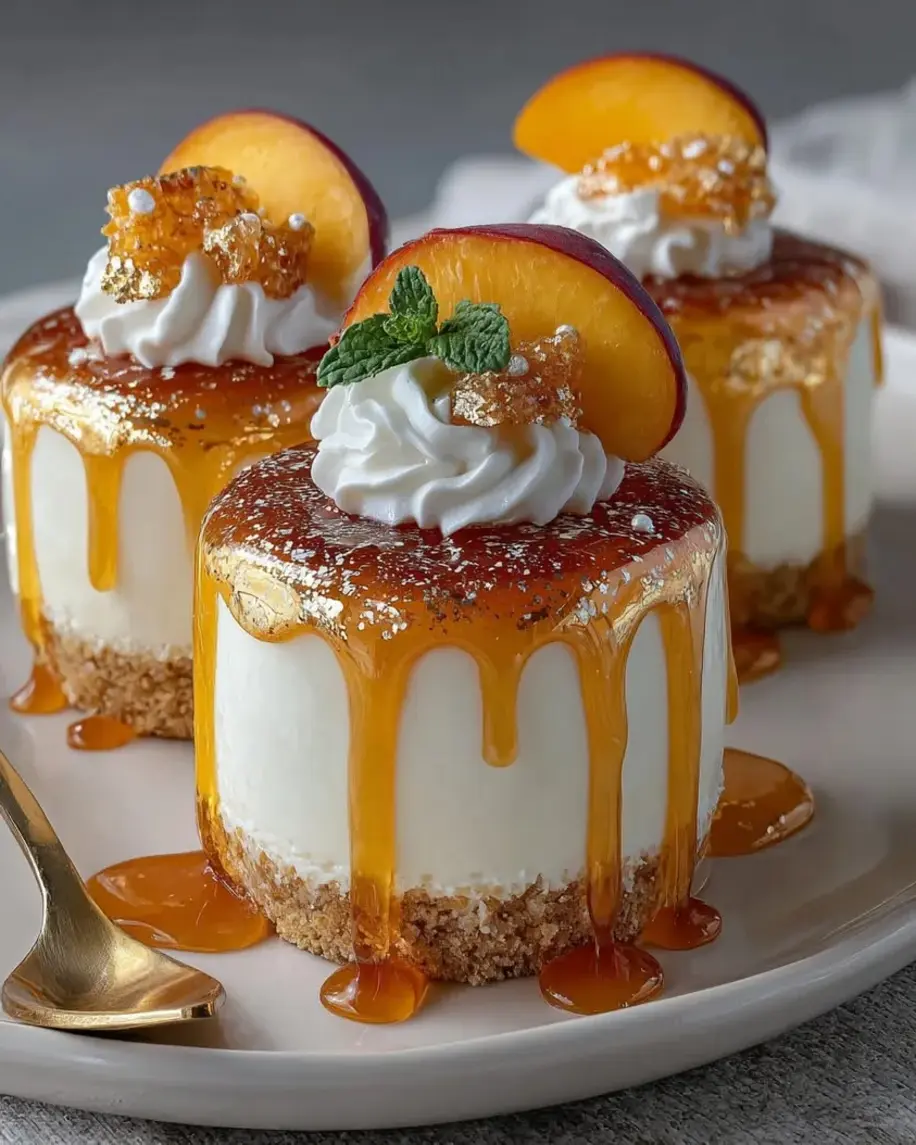
Table of Contents
Golden Peach Honeycomb Cheesecake Spheres – A Showstopper Dessert
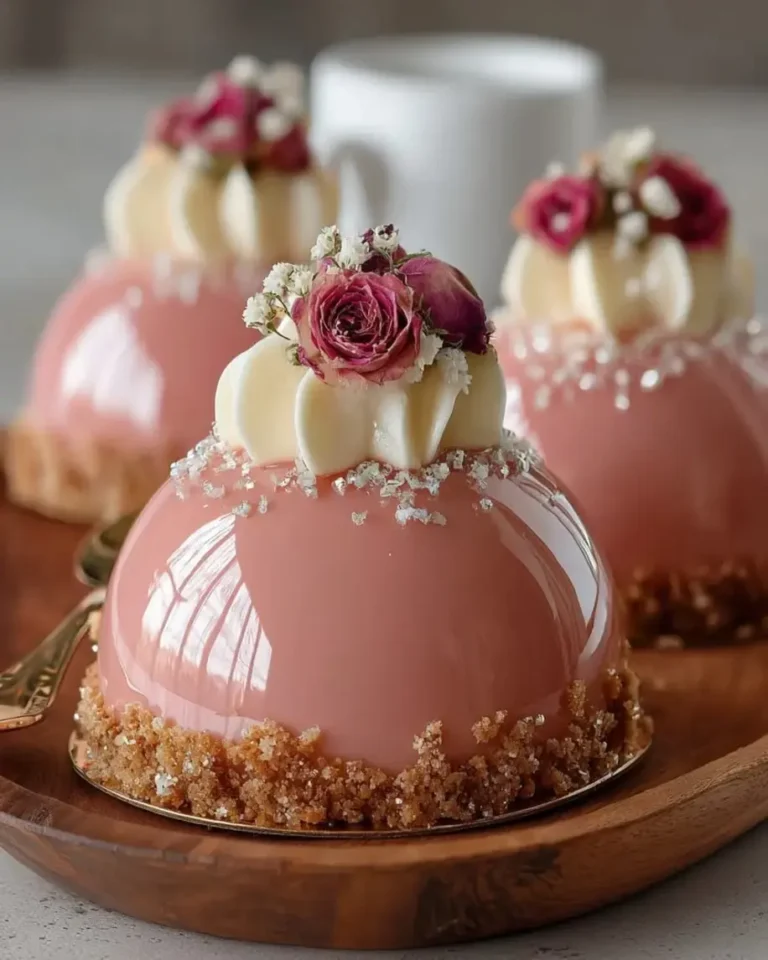
When I was a little girl in Marrakech, my mother would make peach preserves every summer—sticky, fragrant, and deeply golden. I can still hear the soft bubbling on the stove and see her stirring with a wooden spoon, her hands dusted in sugar. Decades later, after training in Paris and now cooking in my tiny NYC apartment, I still chase that memory. This peach cheesecake spheres recipe is my love letter to those afternoons. I’ve taken the creamy richness of French cheesecake mousse, layered in a honeycomb crunch that crackles with every bite, and wrapped it all in a golden mirror glaze that glows like the Moroccan sun. This is not just a dessert—it’s a celebration of texture, nostalgia, and pure indulgence.
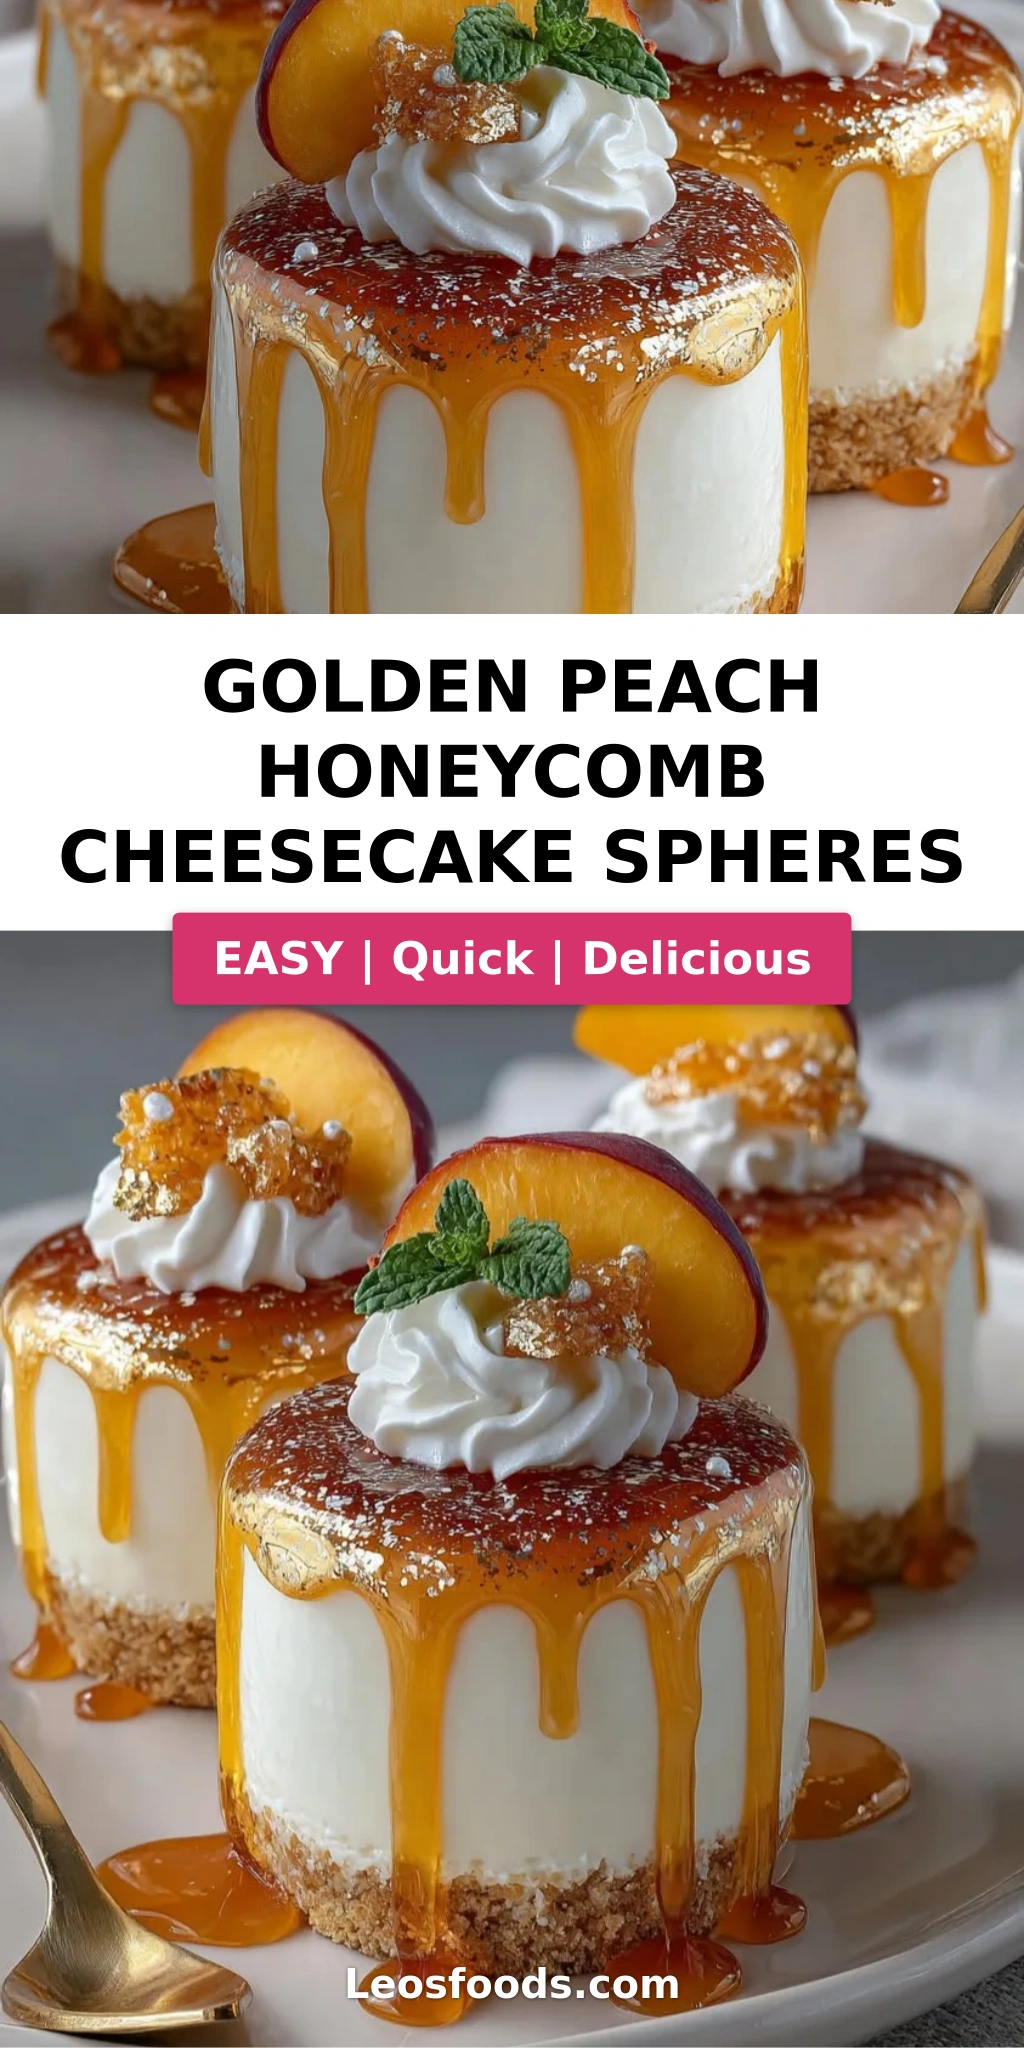
The first time I served these at a dinner party, my guests actually gasped. The spheres sit on delicate vanilla cookie bases like little jewels. When you break through that glossy golden shell, you hit the silky peach mousse, then the sweet-salty honeycomb crunch. It’s a symphony: smooth, creamy, crunchy, and luscious. The honeycomb candy brings a toasty caramel note that perfectly balances the bright peach. And that glaze—oh, that glaze—is like edible art. I brush on a touch of pearl shimmer dust for that extra “wow” factor. You’ll feel like a pastry chef, even if you’re just cooking at home.
Now, I know working with gelatin and mirror glaze can seem intimidating, but I promise it’s simpler than it looks. I’ve broken down every step with the exact visual cues I learned at Le Cordon Bleu. My version swaps fussy piping for easy silicone molds and uses a foolproof gelatin method that never, ever clumps. 💡 Stella’s Pro Tip: Bloom your gelatin in ice-cold water first, then dissolve it in warm water—this prevents lumps. And for the glaze, make sure your chocolate is finely chopped so it melts evenly. One common mistake is pouring the glaze over a thawed sphere—it must be frozen solid to get that perfect mirror finish. Trust me, once you master this, you’ll be making these for every celebration.
Why This Golden Peach Honeycomb Cheesecake Spheres Recipe Is the Best
The Flavor Secret: Most peach cheesecake recipes rely on canned syrup, but I use real peach puree—ripe, juicy peaches blitzed into a velvety purée. The natural acidity cuts through the rich cream cheese, and the honeycomb adds a deep, caramelized sweetness that reminds me of the honey-drenched pastries my grandmother made. Growing up, we’d drizzle honey over fresh figs, and that memory inspired the honeycomb layer. It’s a nod to my North African roots with a French pastry twist.
Perfected Texture: The secret to the silky mousse is whipping the cream to soft peaks and folding it gently. I learned this technique from a Parisian chef who insisted on three gentle folds—no more, no less. The honeycomb crunch stays perfectly crisp because it’s sealed inside the frozen mousse. And the golden mirror glaze sets to a glassy finish without any streaks if you use an immersion blender to eliminate bubbles. Every element is engineered for the perfect bite.
Foolproof & Fast: Yes, there are several components, but the actual hands-on time is under an hour. The freezing does the heavy lifting—no tricky baking, no water baths. You can even prep everything a day ahead. I’ve taught this recipe to absolute beginners in my NYC cooking classes, and they all succeed on the first try. The silicone mold makes shaping effortless, and the glaze pours like magic. If you can make a basic mousse and melt chocolate, you can make these stunning spheres.
Peach Cheesecake Spheres Recipe Ingredients
I always pick up my peaches at the Union Square Greenmarket in the summer, but good-quality frozen peach purée works beautifully year-round. For the honeycomb, I use store-bought honeycomb candy from the specialty aisle—it saves time and is just as crunchy. Let me walk you through every ingredient.
Ingredients List
- For the Peach Cheesecake Mousse: 1 cup peach puree (from about 2 ripe peaches or good-quality canned peach purée), 8 oz cream cheese (softened), 1/2 cup powdered sugar, 1 cup heavy cream, 1 tsp vanilla extract, 1 tbsp gelatin powder, 3 tbsp warm water
- For the Honeycomb Crunch Layer: 1/2 cup honeycomb candy (crushed), 2 tbsp honey, 1 tbsp butter, pinch of sea salt
- For the Golden Mirror Glaze: 1 cup white chocolate (finely chopped), 1/2 cup sweetened condensed milk, 1 tbsp gelatin powder, 3 tbsp warm water, gold food coloring (gel) or edible gold dust, pearl shimmer dust
- For the Cookie Base: 1 cup vanilla cookie crumbs (like Nilla wafers or shortbread), 3 tbsp melted butter, 1 tbsp granulated sugar, pinch of salt
- For Garnish (optional): peach slices, extra honeycomb pieces, white chocolate curls
Ingredient Spotlight
Peach Puree: The star of the show. Use fresh, ripe peaches when in season—blanch them briefly to remove skin, then blend. Off-season, frozen peach purée from the freezer section (unsweetened) is excellent. Avoid peach syrup; it’s too sweet and watery. If using canned peaches, drain them well and purée. The natural pectin in fresh peaches helps stabilize the mousse without extra gelatin.
Honeycomb Candy: This is the “honeycomb” in the recipe. It’s also called honeycomb toffee or cinder toffee. It has a light, airy texture that shatters when bitten. You can find it near other candy bars or make your own (baking soda + sugar + honey). Store-bought is perfectly fine. Crush it into tiny pieces—some crumbly dust, some small chunks for texture. The honey and butter mixture revives its crunch. 💡 Stella’s Pro Tip: If the honeycomb candy gets stale, a quick toast in a dry pan will re-crisp it.
White Chocolate for Glaze: Use good-quality white chocolate (at least 30% cocoa butter). Chips often contain stabilizers that cause the glaze to seize. I like Valrhona or Ghirardelli chopped from a block. The condensed milk adds sweetness and a thick, pourable consistency. Gelatin gives the glaze that signature mirror shine. Any gold food coloring works—I prefer gel because it concentrates color without thinning the glaze.
| Original Ingredient | Best Substitution | Flavor / Texture Impact |
|---|---|---|
| Peach puree | Mango puree (same quantity) | Equally tropical, slightly less tart; works beautifully |
| Honeycomb candy | Crushed brittle or toffee bits | Less airy, more crunchy; still delicious |
| Cream cheese | Mascarpone (full-fat) | Richer, less tangy; mousse will be slightly softer |
| White chocolate | High-quality candy melts (white) | Similar shine, but may be sweeter; use less condensed milk |
How to Make Golden Peach Honeycomb Cheesecake Spheres – Step-by-Step
Trust me, once you get into the rhythm, this honeycomb dessert recipe flows beautifully. I’ll guide you through each stage with the exact timing and visual clues I use in my own kitchen.
Step 1: Bloom the Gelatin
Sprinkle both portions of gelatin (1 tbsp for mousse, 1 tbsp for glaze) over separate bowls of 3 tbsp warm water each. Let stand for 5 minutes until the gelatin absorbs the water and becomes a firm, jiggly mass. This is called blooming. 💡 Stella’s Pro Tip: Always use warm water (around 110°F) – not boiling, which can kill the gelatin’s setting power. If you see lumps, gently heat the bowl over a pan of simmering water until smooth.
Step 2: Make the Peach Cheesecake Mousse
In a stand mixer or large bowl, beat the softened cream cheese and powdered sugar together until completely smooth and no lumps remain – about 2 minutes on medium speed. Add the peach puree and vanilla extract, and mix until evenly combined. In a separate bowl, whip the heavy cream to soft peaks (when you lift the whisk, the cream holds a gentle droop). Gently fold the whipped cream into the peach-cream cheese mixture in three additions. Finally, warm the bloomed gelatin (for mousse) in the microwave for 5–10 seconds until just liquid, then quickly stir it into the mousse until fully incorporated. Set aside.
⚠️ Common Mistake to Avoid: Overfolding the cream. This can deflate the mousse, making it dense instead of silky. Stop as soon as you no longer see white streaks.
Step 3: Prepare the Honeycomb Crunch
Crush the honeycomb candy into small pieces – you want a mix of fine crumbs and little chunks about the size of a pea. In a small saucepan, warm the honey and butter over low heat until the butter melts and the mixture is bubbly. Remove from heat and stir in the crushed honeycomb candy and a pinch of sea salt. The mixture will be sticky and delicious. Let it cool for a couple of minutes before spooning into the molds. 💡 Stella’s Pro Tip: If the mixture becomes too hard to spoon, re-warm it gently. It will soften again.
Step 4: Assemble the Spheres
Take your silicone sphere molds (they should be about 2.5–3 inches in diameter). Spoon about 1 tablespoon of the honeycomb crunch into the bottom of each cavity. Then fill each cavity halfway with the peach mousse. Use the back of a spoon or a small spatula to spread the mousse up the sides, leaving a hollow in the center. Freeze for 15–20 minutes until slightly firm. Then fill the remaining space with the rest of the mousse, completely covering the crunch layer. Smooth the tops. Freeze for at least 4 hours, or overnight for best results. The spheres must be frozen solid before glazing.
⚠️ Common Mistake to Avoid: Not freezing long enough. If the mousse is still soft when you unmold, it will collapse. Patience is key.
Step 5: Make the Golden Mirror Glaze
Place the finely chopped white chocolate in a heatproof bowl. In a small saucepan, warm the sweetened condensed milk over medium heat until it’s hot but not boiling. Pour the hot condensed milk over the white chocolate and let it sit for 1 minute, then stir until smooth. Bloom the glaze gelatin (1 tbsp gelatin + 3 tbsp warm water) as before, then warm it until liquid and stir into the chocolate mixture. Add gold gel food coloring a drop at a time until you achieve a rich, warm gold. Finally, stir in the pearl shimmer dust—about 1/2 teaspoon. 💡 Stella’s Pro Tip: Use an immersion blender to emulsify the glaze—this eliminates tiny bubbles that would dull the mirror finish. Strain through a fine-mesh sieve if needed.
Step 6: Glaze the Spheres
Remove the frozen spheres from the molds. Place them on a wire rack set over a baking sheet to catch drips. Pour the golden mirror glaze over each sphere, starting from the top and letting it flow down evenly. You can use a small ladle. Work quickly—the glaze sets as it cools. Once all spheres are coated, let them sit for about 5 minutes for the glaze to set slightly. The leftover glaze can be reheated gently and reused if needed.
⚠️ Common Mistake to Avoid: Glaze temperature too hot or too cold. The ideal pouring temperature is around 90°F–95°F—it should feel warm, not hot. If it’s too hot, the glaze will run off; too cold, it will be thick and won’t coat evenly.
Step 7: Prepare the Cookie Base
While the glaze sets, mix the vanilla cookie crumbs, melted butter, sugar, and salt in a bowl until the mixture resembles wet sand. Press firmly into small round bases (about 2 inches wide) on a parchment-lined tray. You can use a small ring mold or simply shape by hand. Refrigerate for 10 minutes to firm up.
Step 8: Finish the Spheres
Carefully place each glazed sphere onto a cookie base. If the glaze has set too firmly, you can dab a little melted white chocolate on the base to act as glue. Garnish with fresh peach slices, extra honeycomb pieces, and white chocolate curls. Chill for 15 minutes before serving—this allows the sphere to soften slightly, giving that perfect creamy texture.
💡 Stella’s Pro Tip: For a truly elegant look, use tweezers to place the garnishes. A few flakes of edible gold leaf take this over the top.
| Step | Action | Duration | Key Visual Cue |
|---|---|---|---|
| 1 | Bloom gelatin | 5 mins | Gelatin becomes firm, jiggly mass |
| 2 | Make mousse | 10 mins | Cream cheese smooth, no lumps; cream at soft peaks |
| 3 | Make honeycomb crunch | 5 mins | Sticky, golden, honey-butter mixture |
| 4 | Assemble & freeze spheres | 15 mins assembly + 4 hrs freeze | Spheres solid to the touch |
| 5 | Make mirror glaze | 10 mins | Smooth, pourable, glossy gold |
| 6 | Glaze spheres | 5 mins | Even, shiny, mirror-like coating |
| 7 | Make cookie bases | 10 mins | Firm, compacted crumb discs |
| 8 | Assemble & chill | 15 mins chill | Glaze set, spheres slightly softened |
Serving & Presentation
These golden peach honeycomb cheesecake spheres are made for applause. I love serving them as individual desserts at dinner parties or bridal showers. Place each sphere on a small dessert plate with a dollop of whipped cream or a drizzle of extra peach coulis. The cookie base keeps them stable, and the garnishes add height. For a touch of NYC edge, I sometimes add a tiny pinch of flaky sea salt on the glaze—it cuts the sweetness and makes the honeycomb pop.
In Morocco, we’d serve something like this with mint tea, but here in New York, I pair them with an espresso or a glass of sparkling rosé. The bright acidity of the wine balances the rich mousse. If you’re serving a crowd, arrange the spheres on a mirrored platter—the reflection doubles the golden glow. You can also set them out on a dessert buffet, but I recommend plating them individually for that “wow” moment.
| Pairing Type | Suggestions | Why It Works |
|---|---|---|
| Side Dish | Fresh berries, peach slices, mint leaves | Adds freshness and color contrast |
| Sauce / Dip | Mango coulis, vanilla bean sauce, chocolate ganache | Enhances fruitiness or adds rich chocolate layer |
| Beverage | Sparkling rosé, Prosecco, mint iced tea, espresso | Acidity cuts richness; tea adds Moroccan twist |
| Garnish | Fresh peach slices, extra honeycomb, white chocolate curls, edible gold leaf | Elevates appearance; textural contrast |
Make-Ahead, Storage & Reheating
My weekly prep routine in my tiny NYC kitchen is all about efficiency. You can absolutely make these spheres ahead. I prepare the mousse, honeycomb crunch, and cookie bases up to two days in advance and store them separately. The assembled, unglazed spheres can stay frozen for up to a month—just wrap them tightly. Glaze them the day you plan to serve for that fresh mirror shine.
| Method | Container | Duration | Reheating Tip |
|---|---|---|---|
| Refrigerator | Airtight container (glazed spheres) | Up to 2 days | Serve chilled; no reheating needed |
| Freezer | Wrap in plastic wrap, then foil | Up to 1 month (unglazed) | Thaw in fridge 2 hours, then glaze; or glaze directly from frozen |
| Make-Ahead | Component storage | Mousse & crunch: 2 days in fridge; bases: 1 week in airtight | Assemble and freeze, then glaze on day of serving |
If you’ve glazed the spheres and need to store leftovers, keep them in the fridge covered loosely with plastic wrap. The glaze may soften slightly but still looks stunning. To refresh, a quick brush of warm golden syrup can re-shine the surface. 💡 Stella’s Pro Tip: Never microwave a glazed sphere—the heat will melt the glaze into a puddle. Always serve chilled or at cool room temperature for just 5–10 minutes out of the fridge.
Variations & Easy Swaps
I love experimenting with this honeycomb crunch cheesecake base. Here are some of my favorite twists that I’ve tested for my cooking classes at the NYC Kitchen Collective.
| Variation | Key Change | Best For | Difficulty Impact |
|---|---|---|---|
| Mango & Passion Fruit | Replace peach puree with mango puree, add passion fruit pulp to mousse | Tropical-themed parties, summer | Same; passion fruit may need straining |
| Gluten-Free & Dairy-Free | Use dairy-free cream cheese (e.g., Violife), coconut cream instead of heavy cream, gluten-free cookies (like GF shortbread) | Dietary restrictions without compromising taste | Medium; coconut cream must be chilled and whipped carefully |
| Dark Chocolate & Raspberry | Replace peach with raspberry puree, use dark chocolate in the glaze (skip white chocolate), and add cocoa nibs to crunch | Chocolate lovers, Valentine’s Day | Advanced; dark chocolate glaze is trickier to keep smooth |
Mango & Passion Fruit Spheres
I came up with this variation after a trip to the Brooklyn Fair where I found the most fragrant mangoes. The mango puree is naturally sweeter than peach, so I add a tablespoon of fresh lime juice to balance. Passion fruit seeds add a lovely crunch and pop of acidity. The honeycomb layer stays the same, but I sometimes swap the honey for agave to keep it vegan-friendly. Serve with a drizzle of coconut cream—it’s like a tropical vacation on a plate.
Gluten-Free & Dairy-Free Spheres
One of my NYC students has celiac and lactose intolerance, so I developed this version. Use a high-quality dairy-free cream cheese (the kind that’s firm, not spreadable) and full-fat coconut cream chilled overnight. Whip the coconut cream to soft peaks just like heavy cream—it firms up beautifully. For the cookie base, I use crushed gluten-free vanilla cookies. The mirror glaze works with dairy-free white chocolate (many brands exist). The texture is slightly less rich but still incredibly decadent. 💡 Stella’s Pro Tip: Chill your mixing bowl and beaters for the coconut cream to get the best volume.
Dark Chocolate & Raspberry Spheres
This is my winter holiday special. I replace the peach puree with a raspberry coulis (made from frozen raspberries, sugar, and a little lemon juice). The honeycomb crunch gets a twist: I add 1 tablespoon of cocoa nibs for extra crunch and a touch of bitterness. The golden mirror glaze becomes a dark chocolate mirror glaze: swap white chocolate for dark (at least 60%) and use silver shimmer dust instead of gold. The deep red raspberry against the dark glaze is stunning. Serve with a dollop of vanilla mascarpone.
What is the best way to achieve the honeycomb texture on the peach cheesecake spheres?
The honeycomb texture comes from using crushed honeycomb candy (also called honeycomb toffee). To keep it crunchy, you need to encase it in the frozen mousse. First, warm honey and butter until bubbly, then fold in the crushed candy and a pinch of sea salt. Spoon this mixture into the silicone molds before adding the mousse. The freezing process locks in the crunch. Avoid using soft caramel or toffee—they won’t give that airy, shattering texture. If you want extra crunch, you can reserve some crushed honeycomb to sprinkle on top after glazing (just press it on gently before the glaze fully sets).
Can I use canned peaches instead of fresh for the golden peach honeycomb cheesecake spheres?
Yes, you can use canned peaches, but the texture and flavor will be different. Canned peaches are softer and often packed in syrup, which makes the puree sweeter and thinner. To compensate, drain the peaches well and blitz them into a smooth puree. You may need to reduce the powdered sugar in the mousse by a tablespoon or two because the syrup adds sweetness. Also, the mousse might be slightly looser, so add an extra 1/4 teaspoon of gelatin to help it set firmly. For the best results, I recommend using good-quality canned peach puree (unsweetened) or frozen peaches thawed and drained.
How long do I need to chill the cheesecake spheres before they are ready to serve?
After glazing and placing on the cookie bases, the spheres need a short chill of about 15 minutes in the refrigerator. This allows the mousse to soften slightly to a creamy, mousse-like consistency (it’s still quite firm from freezing, but not icy). If you skip this step, the spheres will be too frozen and hard to cut through. However, if you plan to serve them immediately after glazing, you can let them sit at room temperature for 10 minutes instead. For best texture, I always recommend the 15-minute chill—it’s the Goldilocks zone: not too frozen, not too soft.
What is the ideal serving suggestion for golden peach honeycomb cheesecake spheres at a party?
These spheres are showstoppers, so present them individually on small dessert plates. Pair each sphere with a drizzle of peach coulis or a swirl of vanilla bean crème anglaise. A small pile of fresh berries on the side adds color. For beverages, offer mimosas (made with peach nectar and prosecco) or a sparkling rosé. If you’re setting up a dessert buffet, place the spheres on a mirrored or gold-rimmed platter and garnish with edible flowers for a garden-party vibe. I also love serving them after a heavy meal—the light mousse is perfect after a rich main course. And don’t forget to warn guests to cut through the sphere in one clean motion to show off the honeycomb layer!
Can I make the golden mirror glaze without white chocolate?
White chocolate is essential for the creamy sweetness and glossy finish of the golden mirror glaze. However, you can substitute with a high-quality white confectionery coating (candy melts) that contains cocoa butter alternatives. This works well but may not be as shiny. If you need a dairy-free version, look for vegan white chocolate chips that melt smoothly. Avoid using just icing sugar and condensed milk without chocolate—the glaze will be too thin and not set properly. For the iconic mirror effect, I recommend using white chocolate as specified. The gold color comes from gel food coloring or edible gold dust, not from the chocolate itself.
Why did my golden mirror glaze crack or look dull?
There are a few reasons why mirror glaze might crack or lose its shine. First, the glaze might have been too cold when poured—it should be around 90°F–95°F. Second, the sphere was not frozen solid enough; if it’s still soft, the rapid temperature change can cause cracking. Third, the glaze may have been over-stirred or not strained, creating tiny air bubbles that dull the finish. Always use an immersion blender and strain before pouring. Another culprit is using low-quality white chocolate that doesn’t melt smoothly. Finally, make sure the gelatin is fully dissolved and not clumping. If your glaze cracks, you can gently re-warm it and pour a thin second layer over the sphere.
How do I store leftover golden peach honeycomb cheesecake spheres?
Store leftovers in an airtight container in the refrigerator for up to 2 days. The glaze may soften slightly but will still look beautiful. If you need to store them for longer, keep the unglazed frozen spheres in the freezer for up to 1 month. Glaze only the number you plan to serve. Never freeze a glazed sphere—the moisture can cause the glaze to weep and become sticky. When ready to enjoy leftovers, let them sit at room temperature for about 10 minutes to take the chill off. The cookie base may soften after a day in the fridge, so for best texture, serve within 24 hours of assembling.
Can I use a different fruit instead of peach for the mousse?
Absolutely! This recipe is very adaptable. Mango, apricot, nectarine, or even strawberry puree work beautifully as substitutes. Keep the total amount of fruit puree the same (1 cup). If the fruit is very fibrous (like strawberry), you may need to strain the puree to remove seeds. Also adjust sweetness: sweeter fruits like mango require less powdered sugar; tart fruits like raspberry may need a tablespoon more. The honeycomb layer pairs well with most stone fruits and tropical flavors. I’ve even made a pumpkin version for fall—just use pumpkin puree and add a pinch of pumpkin spice. The golden mirror glaze can be tinted to match the fruit (e.g., pink for strawberry, orange for mango).
What kind of silicone molds should I use for the spheres?
Use half-sphere or full-sphere silicone molds with a diameter of about 2.5 to 3 inches. You can find them at kitchen supply stores or online. Half-sphere molds are easier to fill and unmold—you can glue two halves together with a little melted white chocolate before glazing. If using full-sphere molds, choose ones made of rigid silicone that hold their shape. Lightly spray the molds with nonstick spray or brush with neutral oil before filling, but this is often unnecessary with silicone. For perfect spheres, avoid overfilling; the mousse will expand slightly as it freezes. I recommend silicone molds from brands like Silikomart or Norpro—they release beautifully and give a professional finish.
How can I make the honeycomb crunch layer extra crispy?
The key to an extra crispy honeycomb layer is to use fresh honeycomb candy and not over-saturate it with the honey-butter mixture. Warm the honey and butter just until combined—don’t boil it into a syrup. Fold the mixture gently into the crushed candy so some pieces stay dry. Also, make sure the mousse freezes solid before glazing; any residual heat can soften the crunch. If you want even more texture, you can add a little toasted coconut or crushed praline to the mix. Store-bought honeycomb candy often already has a slightly chewy texture; if you prefer a harder crunch, bake the crushed pieces in a 300°F oven for 3–4 minutes to dry them out before using. Let them cool completely before mixing.
Share Your Version!
I can’t wait to see how your golden peach honeycomb cheesecake spheres turn out! Did you try a fruit swap? Did the mirror glaze come out like glass? Drop a star rating and a comment below—I read every single one and love hearing your kitchen stories. Tag me on Instagram @leosfoods or use #StellasKitchen so I can see your gorgeous creations. And if you have a question about a specific substitution or technique, just ask—I’m here to help.
From my NYC kitchen to yours — I hope this recipe brings as much warmth to your table as it does to mine. — Stella 🧡
🌟 Loved this recipe? Pin it for later and follow me on Pinterest @stellarecipeblog for more showstopper desserts!
Love This Recipe? Save It to Pinterest!
If you enjoyed this Golden Peach Honeycomb Cheesecake Spheres recipe, don’t let it get lost in your browser tabs! 😄 Pin it now so you can find it again anytime — and explore hundreds more tried-and-tested recipes waiting for you on my Pinterest boards.
👉 Follow Stella on Pinterest @stellarecipeblog
📌 Pin this recipe · 🔁 Re-pin your favorites · 💬 Tag me when you make it — I love seeing your creations!
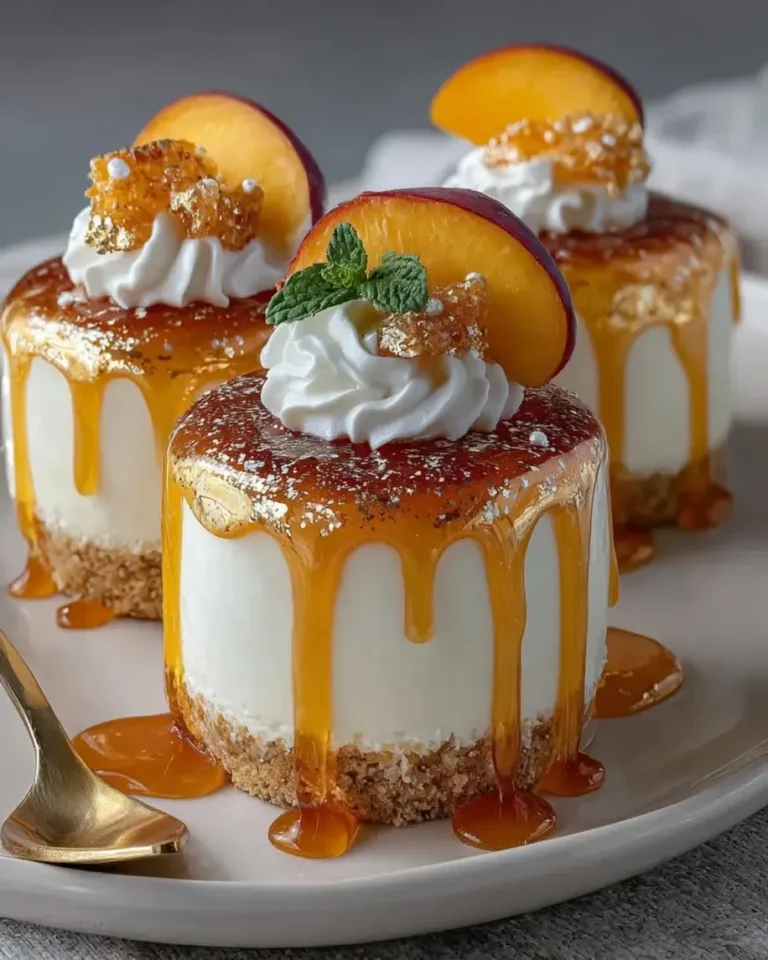
Golden Peach Honeycomb Cheesecake Spheres
Decadent peach cheesecake mousse spheres with a honeycomb crunch layer, coated in a golden mirror glaze and served on a vanilla cookie base.
- Yield: 8 1x
Ingredients
- For the Peach Cheesecake Mousse:
- 1 cup peach puree
- 8 oz cream cheese, softened
- 1/2 cup powdered sugar
- 1 cup heavy cream
- 1 tsp vanilla extract
- 1 tbsp gelatin powder
- 3 tbsp warm water
- For the Honeycomb Crunch Layer:
- 1/2 cup honeycomb candy, crushed
- 2 tbsp honey
- 1 tbsp butter
- Pinch of sea salt
- For the Golden Mirror Glaze:
- 1 cup white chocolate, finely chopped
- 1/2 cup sweetened condensed milk
- 1 tbsp gelatin powder
- 3 tbsp warm water
- Gold food coloring or edible gold dust, as needed
- Pearl shimmer dust, as needed
- For the Cookie Base:
- 1 cup vanilla cookie crumbs
- 3 tbsp melted butter
- 1 tbsp granulated sugar
- Pinch of salt
- For Garnish (optional):
- Peach slices
- Extra honeycomb pieces
- White chocolate curls
Instructions
- 1. Bloom gelatin in warm water and let stand for 5 minutes.
- 2. Beat cream cheese and powdered sugar until smooth.
- 3. Mix in peach puree and vanilla extract.
- 4. Whip heavy cream to soft peaks and fold into the peach mixture.
- 5. Stir in dissolved gelatin until fully incorporated.
- 6. Crush honeycomb candy into small crunchy pieces.
- 7. Warm honey and butter in a pan, then fold in honeycomb pieces and a pinch of salt.
- 8. Spoon a small layer of honeycomb crunch into silicone sphere molds.
- 9. Fill molds halfway with peach cheesecake mousse.
- 10. Freeze briefly until slightly set, then add remaining mousse to fully cover.
- 11. Freeze until completely firm.
- 12. Combine white chocolate, condensed milk, dissolved gelatin, gold coloring, and pearl shimmer dust until smooth and glossy.
- 13. Unmold frozen spheres and place on a wire rack.
- 14. Pour golden mirror glaze evenly over each sphere.
- 15. Mix cookie crumbs, melted butter, sugar, and salt, then press into round bases.
- 16. Place each glazed sphere onto a prepared base.
- 17. Garnish with peach slices, extra honeycomb pieces, and white chocolate curls.
- 18. Chill for 15 minutes before serving.
Nutrition
- Calories: 435
- Sugar: 33 g
- Fat: 29 g
- Carbohydrates: 40 g
- Protein: 6 g
Tried This Recipe? Leave a Comment!
Did you make this recipe? I’d love to hear how it turned out! Please leave a comment and a rating below. Your feedback helps other home cooks and supports cheerychop.com!
For more delicious inspiration, follow me on Pinterest!