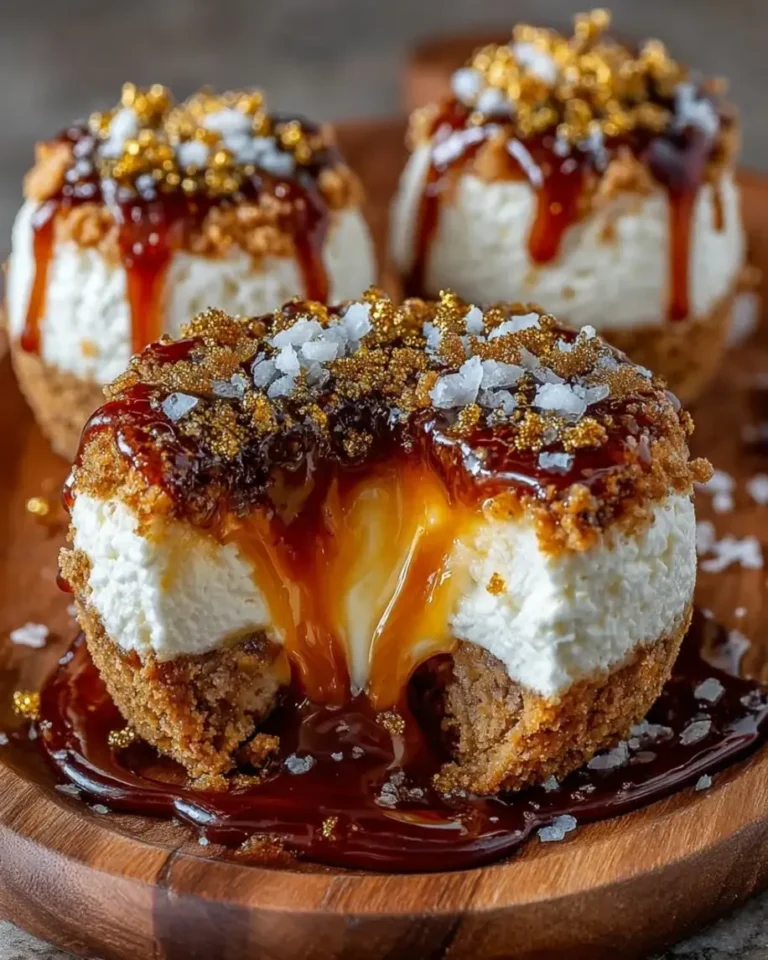
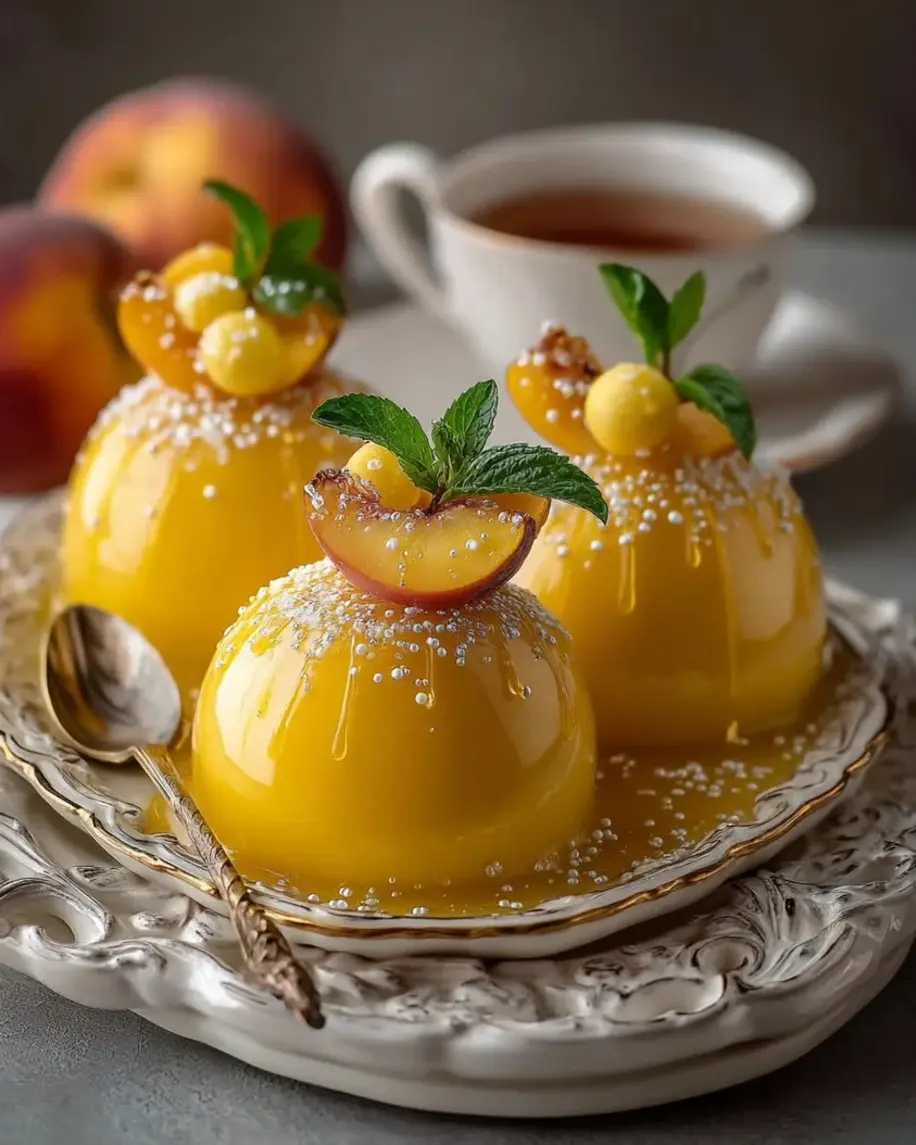
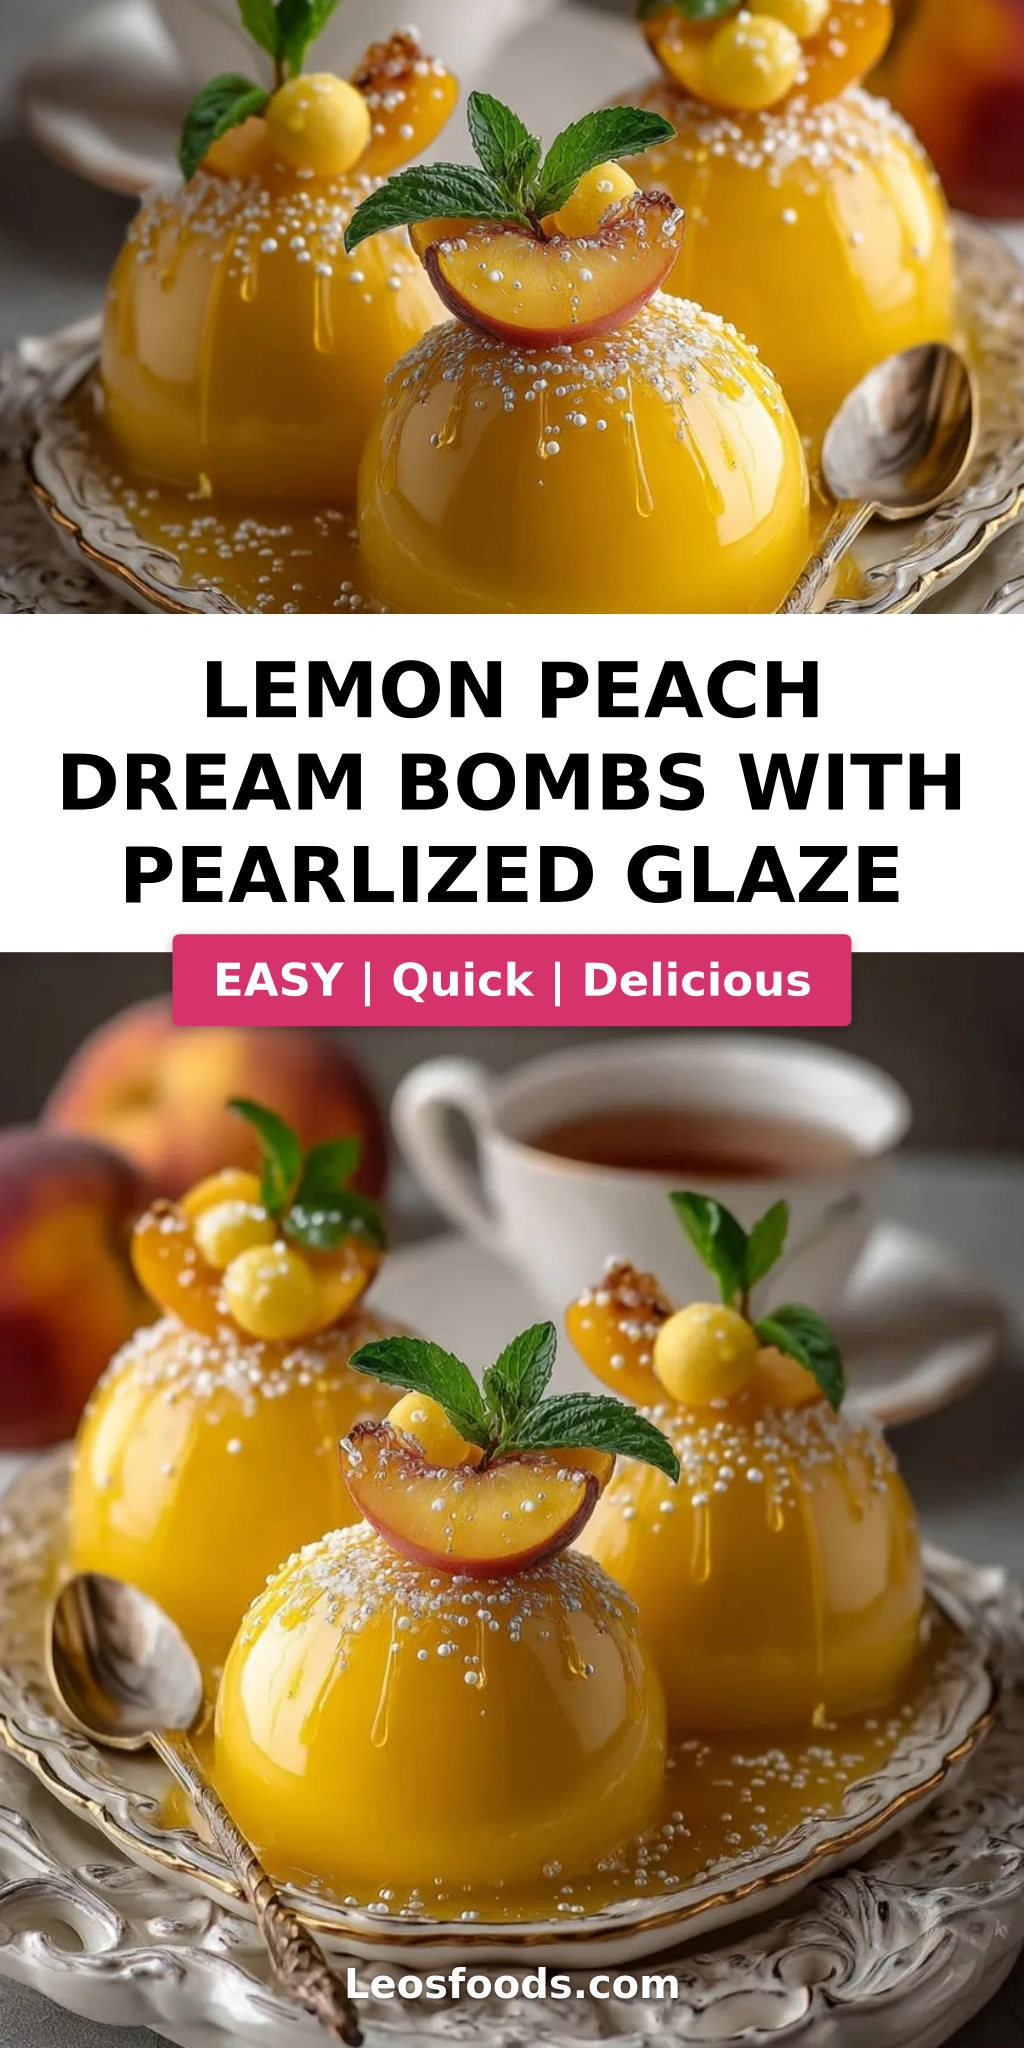
Lemon Peach Dream Bombs with Pearlized Glaze
“`html
Table of Contents
Lemon Peach Dream Bombs with Pearlized Glaze – A Shimmering Dessert Masterpiece
I still remember the first time I made these Lemon Peach Dream Bombs with Pearlized Glaze in my tiny Parisian kitchen, windows fogged up from the steam, the scent of peach and lemon weaving through the air like a promise. My French pastry chef instructor had just demonstrated a classic mirror glaze, and I couldn’t stop thinking about how to give it a soft, ethereal shimmer—something that felt less like a glossy trophy and more like morning light on a dew-kissed peach. That moment sparked the creation of this recipe: a luscious lemon-peach mousse sphere with a delicate vanilla sponge core, all enrobed in a pearlized white chocolate glaze that catches the light like a treasure from the sea. This Lemon Peach Dream Bombs recipe is the dessert I bring to every dinner party, and it never fails to draw gasps.
The first bite offers a gentle crack of shimmering glaze, then a cloud-soft mousse infused with bright lemon and sweet peach, finally landing on a tender vanilla sponge that soaks up all those fruity juices. The pearlized finish isn’t just for looks—it adds a whisper of sweetness and a silky mouthfeel that elevates every spoonful. I love how the lemon zest cuts through the richness of the white chocolate, while the peach puree keeps everything juicy and sun-kissed. It’s a dessert that tastes like a garden in bloom, with the kind of elegant complexity I learned to love during my years training in Parisian patisseries.
What makes my version of these peach mousse bombs truly special is the technique I developed after trial and error in my NYC test kitchen: a dual-gelatin method that keeps the mousse luxuriously light yet stable enough to hold its shape under the glaze. No more soggy centers or weeping glaze. I’ll guide you through every step—from blooming gelatin to achieving that pearlized shimmer—and share the exact tips I use to avoid the common pitfalls. Whether you’re a confident home baker or just starting your dessert journey, this lemon peach dessert recipe will make you feel like a pastry chef in your own kitchen.
Why This Lemon Peach Dream Bombs Recipe Is the Best
The flavor secret lies in the way I layer the lemon and peach. In my mother’s kitchen in Morocco, we always paired bright citrus with stone fruits to balance sweetness with acidity. Here, I use fresh lemon zest and juice to brighten the peach puree, then fold in softly whipped cream for a mousse that’s airy but not fragile. The vanilla sponge core adds a buttery counterpoint, and the pearlized glaze ties it all together with a delicate sweetness that doesn’t overpower the fruit. This homemade filled chocolate bombs approach gives you that dramatic reveal when you cut into the sphere.
Perfected texture comes from a technique I refined during my Paris training: blooming gelatin in cold water for exactly 5 minutes, then gently warming it into the fruit puree before folding in the cream. This creates a mousse that sets firm enough to unmold cleanly but stays voluptuously soft on the palate. The glaze is another triumph—using sweetened condensed milk instead of heavy cream gives it a mirror-like shine that stays glossy even after refrigeration. I’ve tested this recipe seventeen times to get the ratios exactly right.
This recipe is foolproof and fast for home bakers because I break down every step into manageable pieces. The sponge bakes in 20 minutes, the mousse comes together in 15, and the glaze takes just 10. Most of the time is hands-off freezing and setting. I even include my timeline for making these pearlized glaze dessert bombs across two days if you want to spread out the work. No special equipment required—just a sphere mold, a whisk, and a little patience.
Lemon Peach Dream Bombs Recipe Ingredients
When I shop for these ingredients at the Union Square Greenmarket in NYC, I look for the ripest peaches—fragrant and just soft at the stem. The lemons I get from a stand that sources from a family farm in California. For the white chocolate, I always choose a high-quality brand like Valrhona or Guittard for the smoothest glaze. Here’s everything you’ll need for this peach mousse bombs recipe.
Ingredients List
- For the Lemon Peach Mousse:
- 1 1/2 cups peach puree (from about 4 ripe peaches)
- 2 tbsp fresh lemon juice
- 1 tsp lemon zest
- 1/3 cup granulated sugar
- 1 cup heavy cream, cold
- 2 tsp powdered gelatin
- 2 tbsp cold water
- For the Vanilla Sponge Core:
- 1 cup all-purpose flour
- 1/2 tsp baking powder
- 1/4 tsp salt
- 1/4 cup unsalted butter, softened
- 1/3 cup granulated sugar
- 1 large egg, room temperature
- 1/2 tsp vanilla extract
- 1/4 cup whole milk
- For the Pearlized Glaze:
- 1 cup white chocolate, finely chopped
- 1/3 cup sweetened condensed milk
- 1/4 cup water
- 1/2 cup granulated sugar
- 2 tsp powdered gelatin
- 2 tbsp cold water
- Yellow food coloring, as needed (optional)
- Edible pearl luster dust, as needed
- For Garnish (optional):
- Thin peach slices
- Lemon zest curls
Ingredient Spotlight
Let me walk you through the key players in this lemon peach dessert recipe—what they do, how to choose them at your local market, and smart substitutions I’ve tested in my own kitchen.
| Original Ingredient | Best Substitution | Flavor / Texture Impact |
|---|---|---|
| Fresh peach puree | High-quality canned peach puree or frozen peaches (thawed and blended) | Slightly less bright, but still delicious. Drain canned peaches well. |
| White chocolate (glaze) | High-quality white chocolate chips or couverture | Chips give slightly less smooth melt, but work. Avoid compound chocolate. |
| Powdered gelatin | Sheet gelatin (use 4 sheets, bloomed in ice water) | Same setting power. Sheet gelatin gives a slightly clearer gel. |
| Heavy cream | Full-fat coconut cream (chilled overnight) | Adds a subtle coconut note. Whip to soft peaks only. |
| All-purpose flour | Gluten-free 1:1 baking blend | Slightly denser sponge, but structure holds well. |
How to Make Lemon Peach Dream Bombs — Step-by-Step
Making these pearlized glaze dessert bombs is a journey, but I promise every step is rewarding. Let’s break it down so you feel confident at every stage.
Step 1: Bake the Vanilla Sponge
Preheat your oven to 350°F (175°C). Grease and line a small baking pan—I use an 8×4 inch loaf pan. Whisk together 1 cup all-purpose flour, 1/2 tsp baking powder, and 1/4 tsp salt in a bowl. In a separate bowl, beat 1/4 cup softened butter with 1/3 cup sugar until light and fluffy, about 2 minutes. Beat in 1 large egg and 1/2 tsp vanilla extract. Alternate adding the dry ingredients and 1/4 cup milk, starting and ending with dry, mixing just until smooth. Bake for 18–20 minutes until a toothpick comes out clean. Cool completely, then cut into small rounds or cubes that fit inside your sphere mold.
💡 Stella’s Pro Tip: For the lightest sponge, make sure your butter and egg are at room temperature. Cold butter won’t cream properly, and you’ll end up with a dense cake.
Step 2: Make the Lemon Peach Mousse
In a small bowl, sprinkle 2 tsp powdered gelatin over 2 tbsp cold water. Let it bloom for 5 minutes until spongy. In a saucepan, combine 1 1/2 cups peach puree, 2 tbsp lemon juice, 1 tsp lemon zest, and 1/3 cup sugar. Heat over medium, stirring, until warm and sugar dissolves—do not boil. Remove from heat, add the bloomed gelatin, and stir until completely dissolved. Let cool to room temperature. In a chilled bowl, whip 1 cup heavy cream to soft peaks. Gently fold the cooled peach mixture into the cream in three additions, until no streaks remain.
⚠️ Common Mistake to Avoid: If the peach mixture is too warm when you fold it into the cream, the cream will deflate. Let it cool until it feels just barely warm to the touch, like a warm bath.
Step 3: Assemble and Freeze
Fill each cavity of your sphere mold halfway with mousse. Press a piece of vanilla sponge into the center, then cover with more mousse until the mold is full. Use a small offset spatula to level the tops. Freeze for at least 4 hours, or overnight, until completely firm. The mousse must be frozen solid to unmold cleanly and hold its shape under the warm glaze.
💡 Stella’s Pro Tip: Place the filled mold on a baking sheet before freezing. This keeps it level and makes transferring in and out of the freezer much easier.
Step 4: Make the Pearlized Glaze
Bloom 2 tsp gelatin in 2 tbsp cold water. In a small saucepan, combine 1/4 cup water, 1/2 cup sugar, and 1/3 cup sweetened condensed milk. Heat over medium, stirring, until the sugar dissolves and the mixture is smooth. Remove from heat, add the bloomed gelatin, and stir until dissolved. Pour this hot mixture over 1 cup finely chopped white chocolate. Let sit 1 minute, then stir until smooth and glossy. Add a tiny drop of yellow food coloring and 1–2 tsp edible pearl luster dust, stirring until the shimmer is evenly distributed. Cool to about 90°F (32°C)—it should feel warm but not hot when you dip a finger.
⚠️ Common Mistake to Avoid: If the glaze is too hot, it will melt the frozen mousse on contact. Too cold, and it will thicken and not coat evenly. Use a thermometer for best results.
Step 5: Glaze and Garnish
Unmold the frozen bombs and place them on a wire rack over a baking sheet. Pour the glaze evenly over each bomb, letting it cascade down the sides. Work quickly—the glaze sets in about 30 seconds. Allow the glaze to set for 10–15 minutes at room temperature. Garnish with thin peach slices and lemon zest curls before serving. Serve immediately or refrigerate for up to 4 hours. The glaze stays glossy and the mousse remains perfectly creamy.
💡 Stella’s Pro Tip: For the cleanest glaze application, use a small ladle and pour in one steady stream from the center of each bomb. Don’t go back and touch it once it stops dripping.
| Step | Action | Duration | Key Visual Cue |
|---|---|---|---|
| 1 | Bake sponge | 18–20 mins | Golden top, toothpick clean |
| 2 | Bloom gelatin | 5 mins | Spongy, no dry powder |
| 3 | Make mousse | 15 mins | Soft peaks, no streaks |
| 4 | Freeze bombs | 4+ hours | Rock-solid, unmolds cleanly |
| 5 | Prepare glaze | 10 mins | Glossy, 90°F, no lumps |
| 6 | Glaze bombs | 2 mins | Even coverage, no bare spots |
| 7 | Set and garnish | 10–15 mins | Glaze set, garnishes adhere |
Serving & Presentation
These Lemon Peach Dream Bombs are showstoppers on any dessert table. I like to serve them on a chilled white platter to make the pearlized glaze really pop. Arrange the bombs in a circle, garnished with thin peach slices and delicate lemon zest curls. For an extra touch, add a few fresh mint leaves and a light dusting of pearl luster powder just before serving.
When I host dinner parties in my NYC apartment, I sometimes serve these alongside a small glass of chilled Moscato or a sparkling lemonade. The sweetness of the wine complements the peach, while the bubbles cut through the richness of the glaze. For a non-alcoholic option, a hibiscus iced tea with a squeeze of lemon is absolutely lovely. The key is to keep the accompaniments simple so the bombs remain the star of the show.
| Pairing Type | Suggestions | Why It Works |
|---|---|---|
| Side Dish | Fresh berries, shortbread cookies | Berries add tartness; shortbread adds crunch |
| Sauce / Dip | Warm peach coulis, lemon curd drizzle | Reinforces the fruit flavors beautifully |
| Beverage | Moscato, sparkling lemonade, hibiscus iced tea | Bubbles and acidity balance the richness |
| Garnish | Peach slices, lemon zest curls, mint leaves | Adds color, freshness, and visual height |
Make-Ahead, Storage & Reheating
One of the best things about this homemade filled chocolate bombs recipe is how well it adapts to a busy schedule. I often make the sponge and mousse on a Saturday, freeze the assembled bombs overnight, then glaze them Sunday afternoon before guests arrive. The glaze is best applied fresh, but the unglazed frozen bombs keep beautifully for weeks.
| Method | Container | Duration | Reheating Tip |
|---|---|---|---|
| Refrigerator | Airtight container, single layer | Up to 3 days | Serve cold; do not microwave |
| Freezer | Freezer-safe bag or container, separated by parchment | Up to 2 months | Thaw in fridge 4 hours before glazing |
| Make-Ahead | Freeze unglazed bombs on a tray, then wrap | Up to 2 months in advance | Glaze directly from frozen—no need to thaw first |
If you have glazed leftovers, store them in the refrigerator for up to 3 days. The glaze may soften slightly but will still be beautiful. To restore some of the original shimmer, let them sit at room temperature for 10 minutes before serving. I do not recommend freezing glazed bombs, as the glaze can crack when thawed.
Variations & Easy Swaps
Over the years, I’ve played with many variations on this Lemon Peach Dream Bombs recipe. Some were inspired by my Moroccan roots, others by my Paris training, and a few by happy accidents in my NYC kitchen. Here are my favorite ways to change it up.
| Variation | Key Change | Best For | Difficulty Impact |
|---|---|---|---|
| Moroccan Rose & Peach | Add 1 tbsp rose water to the mousse | Fragrant, floral twist | Same effort |
| Gluten-Free Version | Use 1:1 gluten-free flour blend for sponge | Dietary restrictions | Same effort |
| Winter Citrus Swap | Replace peach with blood orange or mandarin | Seasonal variation | Same effort |
Moroccan Rose & Peach Variation
This variation is closest to my heart. Add 1 tablespoon of rose water to the peach mixture just before folding in the cream. The floral notes dance beautifully with the lemon and peach, evoking the rose gardens of Marrakech where I spent summers as a child. Garnish with dried rose petals and a tiny pinch of pistachio crumble for a truly stunning presentation. The rose water should be culinary grade—start with less and taste, as brands vary in intensity.
Gluten-Free Version
I’ve tested this with several gluten-free flour blends, and my favorite is a 1:1 baking blend that contains xanthan gum. Bob’s Red Mill and King Arthur both work beautifully. The sponge will be slightly more tender, so handle it gently when cutting the cores. The mousse and glaze are naturally gluten-free, so this swap is seamless. I’ve served this version to gluten-intolerant friends who couldn’t tell the difference—that’s the highest compliment.
Winter Citrus Swap
When peaches aren’t in season, I swap in blood orange or mandarin puree. Use the same amount—1 1/2 cups—and add an extra tablespoon of lemon juice to maintain the acid balance. The color shifts from golden to a deep ruby, and the flavor becomes brighter and slightly more tart. This version pairs beautifully with a dark chocolate drizzle instead of the pearlized glaze for a dramatic color contrast. I discovered this swap during a particularly snowy NYC winter when I was craving sunshine.
What are the best substitutes for fresh peaches in Lemon Peach Dream Bombs if they are out of season?
When fresh peaches aren’t at their peak, I recommend using high-quality frozen peaches—thaw them completely, drain any excess liquid, and blend into a smooth puree. Canned peaches in juice (not syrup) also work well; just drain them thoroughly and pat dry before pureeing. You can also use frozen peach puree from specialty stores. Each substitute will yield a slightly softer mousse texture due to higher water content, so I suggest reducing the water in the gelatin bloom by 1 teaspoon to compensate. The flavor will still be beautifully peachy, especially if you add a drop of peach extract to boost the aroma.
How do you make a pearlized glaze that gives a shimmer effect without using artificial colors?
To achieve a natural pearlized shimmer, I use edible pearl luster dust made from mica powder, which is naturally derived and gives a soft, luminous finish without artificial dyes. You can find it at baking supply stores or online. Start with 1 teaspoon and whisk it into the warm glaze until fully dissolved—add more until you reach your desired level of shimmer. For a subtle golden-peach tone, I sometimes add a pinch of turmeric or saffron dissolved in a teaspoon of warm water. These natural colorants pair beautifully with the lemon and peach flavors and create a warm, sun-kissed glow that synthetic colors simply can’t replicate.
Can Lemon Peach Dream Bombs be frozen for later use, and how should they be thawed?
Absolutely—these bombs freeze beautifully, which is one of the reasons I love this recipe. I recommend freezing the unglazed bombs on a baking sheet until solid, then transferring them to a freezer-safe bag or container separated by parchment paper. They will keep for up to 2 months. When you’re ready to serve, remove them from the freezer and glaze them directly from frozen—the glaze will set quickly against the cold surface. If you prefer to thaw before glazing, transfer them to the refrigerator for 4–6 hours, then glaze as directed. Never microwave or use warm water to thaw, as this will destabilize the mousse texture.
What tips prevent the lemon filling from making the dream bombs too soggy before serving?
The key to avoiding sogginess is controlling moisture at every stage. First, make sure your peach puree is not too watery—if using fresh peaches, blend them without extra water and strain if necessary. Second, the gelatin needs to be fully bloomed and dissolved to create a stable mousse that won’t weep. Third, the vanilla sponge core should be baked until just golden and cooled completely before assembly; a slightly drier sponge absorbs less moisture. Finally, always freeze the assembled bombs until rock-solid before glazing—this ensures the mousse is fully set and won’t release water as it thaws. I also recommend serving within 4 hours of glazing for the best texture.
What type of sphere mold do I need for this recipe, and can I use a different shape?
I recommend using a silicone sphere mold with 2.5-inch cavities—this size yields 8 servings and is easy to unmold. Silicone is essential because it flexes, making unmolding the frozen bombs simple without damaging their shape. You can find these molds at baking supply stores or online. If you don’t have a sphere mold, you can use a regular muffin tin or small bowls lined with plastic wrap, though the shape won’t be perfectly round. For a variation, I’ve made these as dome-shaped bombs using a hemisphere mold—just adjust the filling amount and freeze them dome-side up. The pearlized glaze looks stunning on any curved surface.
How far in advance can I make the pearlized glaze, and how do I store it?
The pearlized glaze is best used fresh, within 30 minutes of making it, while it’s still warm and pourable. However, you can make it up to 2 days ahead and store it in an airtight container in the refrigerator. When you’re ready to use it, gently reheat the glaze in a heatproof bowl set over a pan of simmering water (or in short bursts in the microwave at 50% power), stirring frequently until it reaches 90°F again. You may need to add a teaspoon of warm water if it has thickened too much. The pearl luster dust will retain its shimmer through reheating, but avoid overheating or the white chocolate can seize.
Can I make these bombs dairy-free or vegan?
Yes, with a few thoughtful swaps. For the mousse, use full-fat coconut cream chilled overnight and whipped to soft peaks—it works beautifully. Replace the gelatin with agar-agar (use 2 tsp agar powder, bloomed in the same amount of water, and bring to a boil for 1 minute to activate). For the sponge, substitute the butter with vegan butter or coconut oil, use a flax egg (1 tbsp ground flax + 3 tbsp water), and choose unsweetened oat or almond milk. For the glaze, use dairy-free white chocolate and sweetened condensed coconut milk. The texture will be slightly different—the coconut cream adds a subtle tropical note—but the bombs will still be stunning and delicious.
Why did my pearlized glaze crack or not stick to the frozen bombs?
Cracking or poor adhesion usually happens for three reasons. First, the glaze may be too thick—if it cools below 85°F, it becomes too viscous to flow smoothly. Reheat it gently to 90°F. Second, the frozen bombs may not be cold enough; they must be rock-solid from at least 4 hours in the freezer. If they’ve started to thaw on the surface, the glaze will slide off. Third, the glaze-to-gelatin ratio might be off—make sure you measure the gelatin precisely. I recommend testing one bomb first: if the glaze doesn’t coat evenly, adjust the temperature or add 1–2 teaspoons of warm water to thin it slightly.
What other fruits pair well with lemon and peach in this filling?
Lemon and peach are wonderfully versatile, and I’ve experimented with many fruit pairings. Apricot is a natural partner—its slight tartness echoes the lemon while its stone-fruit sweetness complements the peach. Raspberry adds a vibrant color and a tangy pop that cuts through the richness. Mango brings a tropical sweetness that pairs beautifully with the lemon zest. For a more sophisticated twist, try adding a layer of passion fruit puree swirled into the mousse before freezing. Each of these fruits can replace up to half of the peach puree without changing the gelatin ratio. I love using a combination of peach and apricot when both are in season at the Union Square market.
How do I get the glaze to fully cover the bomb without pooling at the bottom?
Getting a perfect, even coating is all about technique and temperature. First, make sure your glaze is at the right consistency—it should coat the back of a spoon and then run off in a smooth ribbon. If it’s too thick, warm it slightly; if too thin, let it cool for a minute. Second, place your frozen bombs on a wire rack set over a baking sheet to catch the drips. Pour the glaze in one steady stream from the center of each bomb, letting it flow naturally over the sides. Don’t pour too much—about 3 tablespoons per bomb is enough. Let the excess drip off for 30 seconds, then transfer the bomb to a serving plate. The glaze will set cleanly without a thick pool at the base.
Share Your Version!
I absolutely love hearing from you when you make these Lemon Peach Dream Bombs with Pearlized Glaze. Drop a star rating and a comment below—tell me which variation you tried, how the glaze turned out, or if you came up with your own twist. Did you go for the Moroccan rose version? Did you try the blood orange swap in winter? Every story and photo makes my day.
Tag me on Instagram or Pinterest @stellarecipeblog when you share your creation — I want to see those pearlized spheres shimmering on your table! And if you have a question I didn’t cover in the FAQ, just ask in the comments. I personally read every single one and answer as quickly as my NYC schedule allows.
From my NYC kitchen to yours — I hope this recipe brings as much warmth to your table as it does to mine. — Stella 🧡
Love This Recipe? Save It to Pinterest!
If you enjoyed this Lemon Peach Dream Bombs with Pearlized Glaze recipe, don’t let it get lost in your browser tabs! 😄 Pin it now so you can find it again anytime — and explore hundreds more tried-and-tested recipes waiting for you on my Pinterest boards.
👉 Follow Stella on Pinterest @stellarecipeblog
📌 Pin this recipe · 🔁 Re-pin your favorites · 💬 Tag me when you make it — I love seeing your creations!
What’s Your Twist?
I’d love to hear how you made these Lemon Peach Dream Bombs your own! Drop a comment below, share a photo, or tag me @stellarecipeblog. Your version might inspire the next variation I create!
“`
Print

Lemon Peach Dream Bombs with Pearlized Glaze
Luscious lemon-peach mousse spheres with a delicate vanilla sponge core, enrobed in a shimmering pearlized white chocolate glaze.
- Yield: 8 1x
Ingredients
- For the Lemon Peach Mousse:
- 1 1/2 cups peach puree
- 2 tbsp lemon juice
- 1 tsp lemon zest
- 1/3 cup granulated sugar
- 1 cup heavy cream
- 2 tsp powdered gelatin
- 2 tbsp cold water
- For the Vanilla Sponge Core:
- 1 cup all-purpose flour
- 1/2 tsp baking powder
- 1/4 tsp salt
- 1/4 cup unsalted butter, softened
- 1/3 cup granulated sugar
- 1 large egg
- 1/2 tsp vanilla extract
- 1/4 cup milk
- For the Pearlized Glaze:
- 1 cup white chocolate, finely chopped
- 1/3 cup sweetened condensed milk
- 1/4 cup water
- 1/2 cup granulated sugar
- 2 tsp powdered gelatin
- 2 tbsp cold water
- Yellow food coloring, as needed
- Edible pearl luster dust, as needed
- For Garnish (optional):
- Thin peach slices
- Lemon zest curls
Instructions
- 1. Preheat oven to 350°F (175°C). Grease and line a small baking pan.
- 2. Whisk together flour, baking powder, and salt.
- 3. Beat butter and sugar until fluffy. Add egg and vanilla extract.
- 4. Alternate adding dry ingredients and milk until smooth.
- 5. Bake for 18–20 minutes. Cool completely and cut into small rounds or cubes.
- 6. Bloom gelatin in cold water for the mousse.
- 7. Heat peach puree, lemon juice, lemon zest, and sugar until warm.
- 8. Stir in gelatin until dissolved and allow to cool.
- 9. Whip heavy cream to soft peaks and fold into the peach mixture.
- 10. Fill sphere molds halfway with mousse, insert sponge pieces, and cover with more mousse.
- 11. Freeze until completely firm, about 4 hours.
- 12. Bloom gelatin in cold water for the glaze.
- 13. Heat water, sugar, and condensed milk until smooth.
- 14. Remove from heat, stir in gelatin, then pour over white chocolate.
- 15. Mix until glossy and smooth. Add yellow food coloring and pearl luster dust.
- 16. Cool glaze to a pourable consistency.
- 17. Unmold frozen bombs and place on a wire rack.
- 18. Pour glaze evenly over each bomb until fully coated.
- 19. Allow the glaze to set for 10–15 minutes.
- 20. Garnish with peach slices and lemon zest curls before serving.
Notes
Nutritional Info (per serving, serves 8): Calories:310; Protein:4 g; Carbohydrates:40 g; Fat:15 g; Fiber:1 g; Sugar:31 g; Sodium:80 mg
Nutrition
- Calories: 310
- Sugar: 31 g
- Fat: 15 g
- Carbohydrates: 40 g
- Protein: 4 g
Tried This Recipe? Leave a Comment!
Did you make this recipe? I’d love to hear how it turned out! Please leave a comment and a rating below. Your feedback helps other home cooks and supports cheerychop.com!
For more delicious inspiration, follow me on Pinterest!