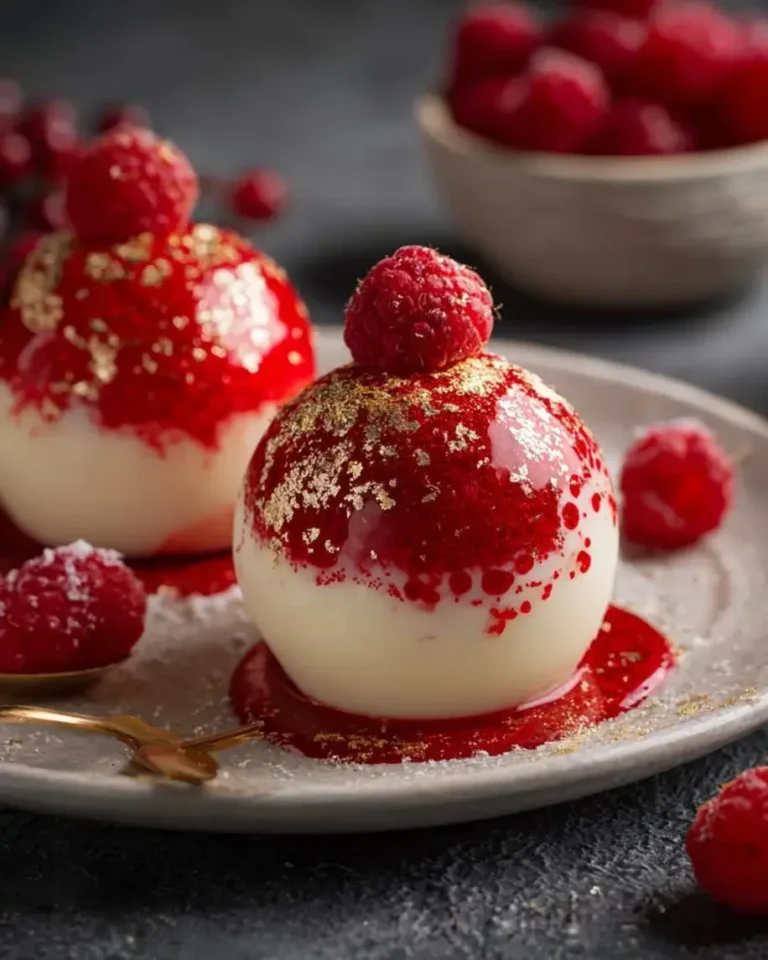
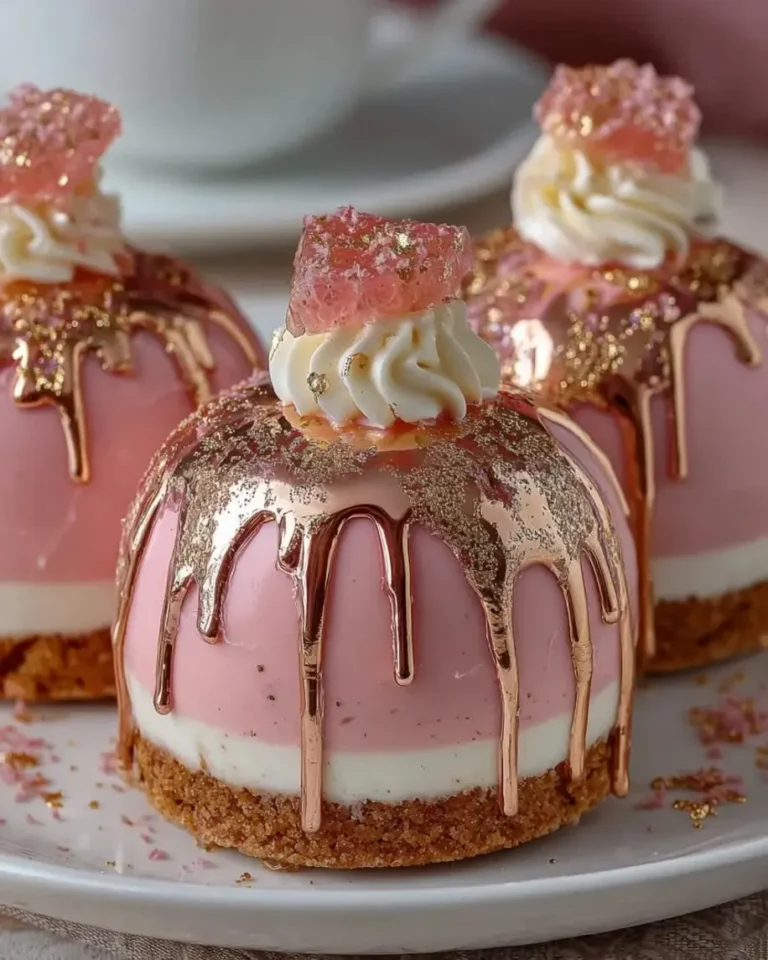
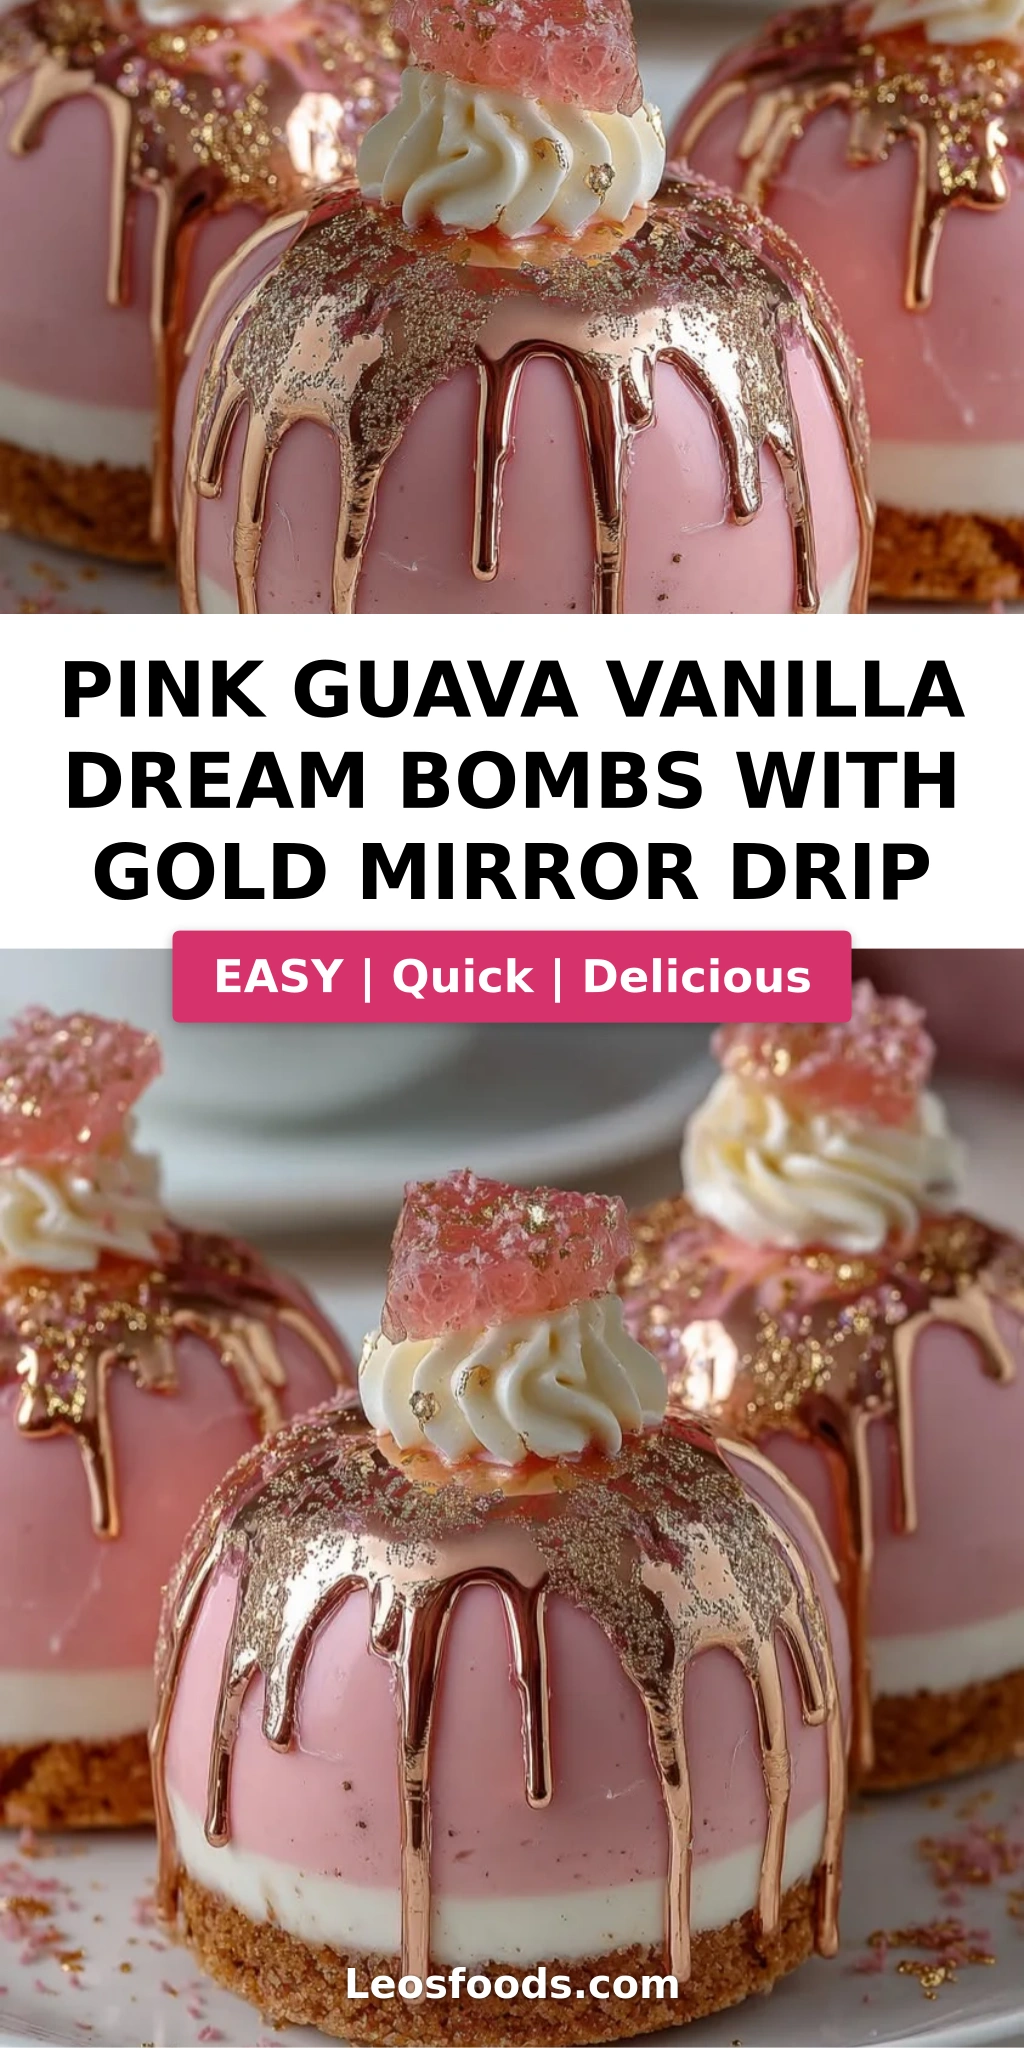
Stunning Pink Guava Vanilla Dream Bombs with Gold Drip

“`html
Table of Contents
Pink Guava Vanilla Dream Bombs with Gold Mirror Drip – A Stunning Moroccan-French Fusion Dessert
I still remember the first time I tasted a really good pink guava — it was at a bustling market in Marrakech with my mother, who always said the best desserts come from letting fruit speak for itself. These Pink Guava Vanilla Dream Bombs with Gold Mirror Drip are my love letter to that memory, filtered through years of French pastry training in Paris and my current life here in New York City. Every bite layers the floral, slightly tangy sweetness of pink guava with a lush vanilla cream center, all wrapped in a mirror-bright glaze that catches the light like morning on the Hudson.
The first time you crack through that glossy pink shell with its gold drip, you’ll hit the silky guava mousse, then the cool vanilla cream hidden inside — it’s like discovering a secret in every spoonful. I’ve dialed the sweetness just right so the guava stays bright and the vanilla feels comforting, not cloying. The cookie base adds that little crunch, grounding all those dreamy textures. It’s the kind of dessert that makes people stop mid-conversation and just look at their plate before diving in.
What makes my version special is how I fuse the guava’s natural acidity with a light, French-style mousse — no heavy shortcuts here. I’ll walk you through every step, from blooming gelatin perfectly to getting that gold mirror drip to behave (yes, I’ve had my share of drips that dripped a little too enthusiastically). One common mistake I see home bakers make is rushing the freezing step — but I’ve got a pro tip that will save you. Let’s make something stunning together.
Why This Pink Guava Vanilla Dream Bombs Recipe Is the Best
The Flavor Secret: Pink guava brings a floral, tropical brightness that most berries can’t touch. I balance it with a whisper of vanilla and a touch of cream cheese in the mousse, which gives it a subtle tang — a trick I learned from a pastry chef in Montmartre who believed cream cheese was the unsung hero of light mousses. The vanilla cream center stays pure and cool, a perfect counterpoint to the guava’s zing.
Perfected Texture: We’re building three distinct textures here — the crisp cookie base, the airy guava mousse, and the dense, velvety vanilla center. The key is getting the gelatin ratio right so the mousse holds its shape without turning rubbery. I tested this six times before landing on the exact bloom time that gives you that cloud-like bite with just enough structure to survive a mirror glaze bath.
Foolproof & Fast: Even though these look like they belong in a boutique patisserie window, the technique is totally doable at home. I’ve broken down each component into manageable steps, and the gold mirror drip is actually forgiving once you know the temperature sweet spot. Whether you’re a confident home baker or someone who’s never worked with gelatin before, I promise you can pull these off.
Pink Guava Vanilla Dream Bombs Ingredients
I source my pink guava puree from a little Latin grocery on the Upper West Side — they stock frozen puree from Colombia that tastes like sunshine. For the cream cheese, I always go with full-fat block style; the spreadable tubs have too much water and will mess with your mousse structure. Here’s exactly what you need for each component.
Ingredients List
- For the Pink Guava Mousse:
- 1 cup pink guava puree (fresh or frozen, thawed)
- 8 oz cream cheese, softened
- 1/2 cup powdered sugar
- 1 cup heavy cream
- 1 tsp vanilla extract
- 1 tbsp gelatin powder (about 1 packet)
- 3 tbsp warm water
- For the Vanilla Cream Center:
- 4 oz cream cheese, softened
- 1/4 cup powdered sugar
- 1/4 cup heavy cream
- 1 tsp vanilla extract
- For the Gold Mirror Drip:
- 1 cup white chocolate, finely chopped
- 1/2 cup sweetened condensed milk
- 1 tbsp gelatin powder
- 3 tbsp warm water
- Pink food coloring, as needed
- Gold food coloring or edible gold dust, as needed
- For the Cookie Base:
- 1 cup vanilla cookie crumbs (about 8–10 cookies)
- 3 tbsp melted butter
- 1 tbsp granulated sugar
- Pinch of salt
- For Garnish (optional):
- Guava slices
- White chocolate curls
- Edible gold flakes
Ingredient Spotlight
Pink Guava Puree: This is the star of the show. Look for frozen puree in the freezer section of Latin or specialty markets — brands like Goya or frozen pulp from Colombia work beautifully. If you can only find fresh guava, peel, seed, and blend the flesh until smooth, then strain. The puree should be vibrantly pink and smell intensely floral. One tested swap: passion fruit puree (same volume) works in a pinch, but the flavor will be more tart and less creamy.
Cream Cheese: Full-fat block cream cheese (like Philadelphia) is non-negotiable here. The block has a higher fat content and less water than the whipped or spreadable versions, which means your mousse will set properly and won’t weep. Let it come to room temperature for about 30 minutes before starting — cold cream cheese will leave lumps that no amount of beating can fix.
White Chocolate for the Glaze: Use a good-quality white chocolate with cocoa butter (not white confectionery coating). Callebaut or Ghirardelli are my go-tos. The cocoa butter ensures a glossy, fluid glaze that sets with that mirror shine. Budget white chips often contain palm oil and will give you a dull, streaky finish.
Gelatin Powder: Standard Knox gelatin works perfectly. One packet is about 1 tablespoon. Always bloom it in cool or warm water (not hot) for exactly 5 minutes — this step is crucial for a smooth, lump-free mousse and glaze. Too hot and the gelatin will seize; too cold and it won’t dissolve properly.
| Original Ingredient | Best Substitution | Flavor / Texture Impact |
|---|---|---|
| Pink Guava Puree | Passion Fruit Puree (same volume) | More tart, less floral; still tropical |
| Cream Cheese (block) | Mascarpone (same weight) | Richer, less tang; mousse slightly softer |
| White Chocolate (cocoa butter) | White candy melts (not ideal) | Duller shine, thicker glaze; use only in a pinch |
| Heavy Cream | Full-fat coconut cream (chilled) | Coconut note, dairy-free; whip to soft peaks only |
| Vanilla Cookie Crumbs | Gluten-free shortbread crumbs | Slightly crumblier; flavor very close |
How to Make Pink Guava Vanilla Dream Bombs — Step-by-Step
I know this recipe has several components, but trust me — if you break it down like I do in my NYC kitchen, each part comes together quickly. Work step by step and you’ll feel like a pastry pro by the time you’re drizzling that gold mirror drip.
Step 1: Bloom the Gelatin
In a small bowl, sprinkle 1 tablespoon of gelatin powder over 3 tablespoons of warm water (not hot — about 100°F). Let it sit undisturbed for exactly 5 minutes. It will look like a firm, jiggly mass. This is perfect. Do not stir it during blooming.
💡 Stella’s Pro Tip: Use a timer for blooming. Five minutes is the sweet spot — less and the gelatin won’t dissolve evenly, more and it can become too firm to incorporate smoothly.
Step 2: Make the Guava Mousse Base
In a large bowl, beat 8 oz softened cream cheese with 1/2 cup powdered sugar until smooth, about 2 minutes. Add 1 cup pink guava puree and 1 tsp vanilla extract, and beat until fully combined. The mixture should be a pale pink, smooth, and slightly thick.
⚠️ Common Mistake to Avoid: Don’t overbeat the cream cheese at this stage — you’ll incorporate too much air and the mousse will be foamy instead of silky. Beat just until smooth.
Step 3: Whip and Fold the Cream
In a separate chilled bowl, whip 1 cup heavy cream to soft peaks — the cream should hold a shape that droops slightly. Gently fold the whipped cream into the guava-cream cheese mixture in three additions, using a spatula. Fold until no white streaks remain, but don’t overmix.
💡 Stella’s Pro Tip: Chill your bowl and beaters for 10 minutes before whipping cream. It stabilizes the fat and gives you stiffer, more reliable peaks — especially important in a warm NYC apartment.
Step 4: Add the Gelatin
Microwave the bloomed gelatin for 5–8 seconds until it liquefies (do not boil). Stir 2 tablespoons of the mousse mixture into the warm gelatin to temper it, then pour the gelatin mixture back into the main mousse bowl. Fold quickly but gently until fully incorporated. Set aside.
⚠️ Common Mistake to Avoid: Pouring hot gelatin directly into cold mousse can create rubbery strands. Always temper the gelatin with a little mousse first.
Step 5: Make the Vanilla Cream Center
In a small bowl, beat 4 oz softened cream cheese with 1/4 cup powdered sugar, 1/4 cup heavy cream, and 1 tsp vanilla extract until smooth. Transfer the mixture to a piping bag fitted with a small round tip (or a zip-top bag with a tiny corner snipped off). Pipe small domes — about 1-inch diameter — onto a parchment-lined tray. Freeze for at least 1 hour until solid.
💡 Stella’s Pro Tip: Freeze the vanilla cream centers on a tray that fits flat in your freezer. If they’re not fully frozen, they’ll sink into the mousse instead of staying suspended in the center.
Step 6: Assemble the Bombs
Fill silicone dome molds (2.5-inch half-sphere molds work perfectly) halfway with guava mousse. Place one frozen vanilla cream center into each mold, pressing gently so it’s centered. Cover completely with remaining mousse, smoothing the top. Freeze for at least 4 hours, preferably overnight.
⚠️ Common Mistake to Avoid: Don’t overfill the molds — the mousse expands slightly as it freezes. Leave about 1/8 inch of space at the top for a clean dome shape.
Step 7: Make the Mirror Glaze
Bloom 1 tbsp gelatin in 3 tbsp warm water for 5 minutes. Finely chop 1 cup white chocolate and place in a heatproof bowl. In a small saucepan, warm 1/2 cup sweetened condensed milk over low heat until steaming (do not boil). Pour the warm condensed milk over the white chocolate, let sit 1 minute, then stir until smooth. Add the bloomed gelatin (microwaved 5 seconds) and pink food coloring. Stir gently — avoid creating bubbles.
💡 Stella’s Pro Tip: If you see bubbles in your glaze, strain it through a fine-mesh sieve before using. Bubbles are the enemy of a mirror finish!
Step 8: Glaze and Create the Gold Mirror Drip
Unmold the frozen bombs and place them on a wire rack set over a baking sheet. Pour the pink mirror glaze evenly over each bomb, letting the excess drip off. Tint about 2 tablespoons of leftover glaze with gold food coloring or edible gold dust. Drizzle the gold glaze in thin lines over the pink-domed bombs, then gently tap the rack to encourage the gold to drip down the sides.
⚠️ Common Mistake to Avoid: If the glaze is too thick, it will pile up instead of dripping. The ideal pouring consistency is like warm honey — it should coat the back of a spoon and slowly run off. If needed, warm the glaze very gently in 5-second bursts in the microwave.
Step 9: Make the Cookie Base and Assemble
Mix 1 cup vanilla cookie crumbs, 3 tbsp melted butter, 1 tbsp sugar, and a pinch of salt. Press about 2 tablespoons of the mixture into small round discs (about 2.5 inches wide) on a parchment-lined tray. Place each glazed bomb onto a cookie base. Garnish with guava slices, white chocolate curls, and edible gold flakes. Chill for 15 minutes before serving to allow the glaze to set slightly.
💡 Stella’s Pro Tip: For clean cookie bases, use a ring cutter or the bottom of a straight-sided glass to press the crumbs into perfect rounds. This gives your bombs a professional, bakery-finished look.
| Step | Action | Duration | Key Visual Cue |
|---|---|---|---|
| 1 | Bloom gelatin | 5 min | Firm, jiggly mass |
| 2 | Make guava mousse base | 5 min | Smooth, pale pink |
| 3 | Whip and fold cream | 5 min | Soft peaks, no white streaks |
| 4 | Add gelatin to mousse | 1 min | Gelatin fully incorporated |
| 5 | Make vanilla cream center | 10 min + 1 hr freeze | Firm, holds shape |
| 6 | Assemble bombs | 10 min + 4 hr freeze | Firm to the touch |
| 7 | Make mirror glaze | 10 min | Glossy, smooth, no bubbles |
| 8 | Glaze and gold drip | 10 min | Even coverage, gold drips |
| 9 | Make base and assemble | 15 min + 15 min chill | Base firm, glaze set slightly |
Serving & Presentation
These dream bombs are showstoppers at dinner parties — I’ve served them at everything from birthday celebrations to holiday tables in my Brooklyn brownstone. Place each bomb on a small dessert plate with the cookie base facing down. The gold mirror drip should catch the light, so position them under a warm lamp or near a window for that wow factor.
For a truly elegant finish, garnish each plate with a thin slice of fresh guava, a few white chocolate curls shaved with a vegetable peeler, and a tiny sprinkle of edible gold flakes. I like to add a single mint sprig for color contrast — it echoes the green notes in the guava and makes the pink pop even more. If you’re feeling extra Parisian, a dusting of powdered sugar around the rim of the plate adds a lovely bakery touch.
In my house, these are best enjoyed within 15 minutes of coming out of the fridge — the mousse should be cold but not frozen, the glaze glossy, and the cookie base still crisp. Pair them with a cup of Moroccan mint tea (my mother’s tradition) or a dry sparkling wine for a celebration. Leftovers keep, but honestly, they never last long enough for that to matter.
| Pairing Type | Suggestions | Why It Works |
|---|---|---|
| Side Dish | Fresh tropical fruit salad, Coconut sorbet | Echoes the guava and adds freshness |
| Sauce / Dip | Passion fruit coulis, Vanilla bean anglaise | Adds acidity or creamy contrast |
| Beverage | Moroccan mint tea, Dry sparkling wine, Espresso | Tea complements floral notes; wine cuts richness |
| Garnish | Guava slices, White chocolate curls, Mint sprig, Edible gold flakes | Adds color, texture, and elegance |
Make-Ahead, Storage & Reheating
I’m a huge fan of make-ahead desserts — especially when I’m hosting a dinner party after a long week of recipe testing. These Pink Guava Vanilla Dream Bombs are perfect for prepping in stages. The vanilla cream centers can be frozen up to a week in advance, and the assembled (unglazed) bombs can stay frozen for up to 2 weeks. Just wrap them tightly in plastic wrap once they’re solid.
| Method | Container | Duration | Reheating Tip |
|---|---|---|---|
| Refrigerator | Airtight container, single layer | Up to 3 days | Serve cold; no reheating needed |
| Freezer | Wrap individually in plastic, then foil | Up to 2 months | Thaw in fridge 2 hrs before glazing |
| Make-Ahead | Freeze unglazed bombs on tray, then bag | Up to 2 weeks in advance | Glaze same day you plan to serve |
For best results, glaze the bombs on the day you plan to serve them. The mirror glaze is at its glossiest within the first 6 hours — after that, it can start to dull slightly (though it will still taste amazing). If you need to transport these to a party, freeze the glazed bombs for 30 minutes to set the glaze firmly, then pack them in a single layer in a chilled cooler. Once you arrive, let them sit at room temperature for 10 minutes before serving.
One thing I’ve learned from my Parisian pastry days: never, ever microwave a fully assembled bomb to soften it. The mousse will weep and the glaze will crack. Instead, let it sit at room temperature for 15–20 minutes if it’s too frozen to eat comfortably. The ideal serving temperature is cold but not rock-hard — the mousse should feel like a firm cloud.
Variations & Easy Swaps
One of the things I love most about this recipe is how adaptable it is. Whether you’re avoiding dairy, looking for a seasonal twist, or just want to play with flavors, these bombs are a fantastic canvas. Here are three variations I’ve tested in my own kitchen — each one has been a hit with my NYC taste-testing crew.
| Variation | Key Change | Best For | Difficulty Impact |
|---|---|---|---|
| Moroccan Spice Twist | Add 1/2 tsp cinnamon + pinch of cardamom to mousse | Holiday gatherings, warm-weather appeal | No change |
| Dairy-Free / Vegan | Use coconut cream + vegan cream cheese + agar-agar | Dairy-sensitive guests, plant-based diets | Medium — agar sets differently |
| Seasonal Berry Swap | Replace guava puree with strawberry-rhubarb puree | Spring and summer entertaining | No change |
Moroccan Spice Twist
This variation is very close to my heart — it’s inspired by the spice blends my mother would make in our kitchen in Fez. Add 1/2 teaspoon of cinnamon and a pinch of ground cardamom to the guava mousse base before folding in the cream. The warmth of the spices plays beautifully with the guava’s floral notes and makes the dessert feel extra cozy for fall and winter gatherings. I also like to add a tiny pinch of cinnamon to the cookie base for a subtle warmth that ties everything together.
Dairy-Free / Vegan Version
For a dairy-free version that still feels indulgent, swap the cream cheese for a high-quality vegan cream cheese (Miyoko’s or Violife work best) and replace the heavy cream with full-fat coconut cream that’s been chilled overnight. Use agar-agar powder instead of gelatin — use 1 teaspoon agar-agar powder dissolved in 3 tablespoons water, then bring to a gentle simmer for 2 minutes before adding to the mousse. The texture will be slightly firmer and less creamy, but still very satisfying. The white chocolate in the glaze can be swapped for a dairy-free white chocolate alternative.
Seasonal Berry Swap
When pink guava isn’t in season or you want to try something different, replace the guava puree with an equal amount of strawberry-rhubarb puree (simmer 1 cup chopped strawberries + 1/2 cup chopped rhubarb with 2 tablespoons sugar until soft, then blend and strain). The resulting mousse will be pink, slightly tangy, and beautifully fruity. This version is perfect for spring bridal showers and summer picnics — I’ve brought it to many a backyard gathering in Brooklyn and it always disappears first.
What is a gold mirror drip and how do you make it for guava dessert bombs?
A gold mirror drip is a decorative glaze technique where a small amount of gold-tinted glaze is drizzled over a pink or colored mirror-glazed dessert so it runs down the sides in elegant, metallic streaks. To make it for these Pink Guava Vanilla Dream Bombs, reserve about 2 tablespoons of your finished pink mirror glaze, then stir in gold food coloring (chef-grade brands like Sugarflair or Americolor work best) or edible gold dust mixed with a drop of clear alcohol. Pour the gold glaze into a small piping bottle or a zip-top bag with a tiny corner snipped off. After you’ve poured the pink glaze over the frozen bombs, immediately drizzle the gold glaze in thin lines across the tops — the frozen surface will help the gold set quickly. Tapping the wire rack gently encourages the gold to drip naturally down the sides without pooling.
Can I use frozen pink guava instead of fresh for the filling of these dream bombs?
Absolutely — frozen pink guava is actually my preferred option for this recipe. Fresh pink guava can be hard to find in many US grocery stores, and its ripeness varies widely. Frozen pink guava puree (sold in Latin markets or online as frozen guava pulp) is picked and processed at peak ripeness, so it delivers consistent, vibrant flavor. Just thaw the puree in the refrigerator overnight, then give it a good stir before measuring. If you’re using whole frozen guava, thaw it, peel it, remove the seeds, and blend the flesh until smooth, then strain to remove any fibrous bits. Stay away from guava nectar or juice — those are too thin and sugary and will make your mousse runny instead of luscious.
How do you get a vanilla balayage or swirl effect inside a cake bomb shell?
Getting a beautiful vanilla balayage or swirl effect inside a bomb shell is all about temperature and timing. For these Pink Guava Vanilla Dream Bombs, the vanilla cream center is frozen solid before being embedded in the mousse, which naturally creates a distinct core rather than a swirl. But if you want a visible swirl pattern, try this technique: after filling the dome molds halfway with guava mousse, use a toothpick or the tip of a small knife to drizzle thin lines of the vanilla cream mixture directly onto the mousse surface. Gently swirl the toothpick in a figure-eight pattern to create ribbons of vanilla within the guava. Freeze the bombs immediately to lock in the swirl before the layers blend together. The key is working quickly and keeping both components cold — if the mousse warms up, the vanilla will sink and disappear.
What is the best way to keep the gold mirror drip from running off the sides of the bombs?
The best way to control your gold mirror drip is to nail the glaze consistency and work with properly frozen bombs. Your pink base glaze should be at the perfect pouring consistency — warm honey is the benchmark. If it’s too thin, it will run right off the bomb and pool at the bottom. If it’s too thick, it won’t drip at all. For the gold drip specifically, use a slightly thicker glaze: let the gold-tinted glaze cool for 1–2 minutes longer than the pink glaze so it’s a bit thicker when applied. Apply the gold in thin lines rather than big blobs, and if you see it running too fast, pop the glazed bomb in the freezer for 2–3 minutes to firm it up before adding more gold. Another trick is to chill the bombs on the wire rack for 5 minutes after the pink glaze sets before adding the gold drips — this gives you more control over how far the gold travels down the sides.
How long do these pink guava dream bombs need to freeze before serving?
The assembled bombs (filled molds) need to freeze for at least 4 hours before unmolding and glazing — overnight is even better. This ensures the mousse is solid enough to hold its shape when you demold it and when you pour the warm glaze over it. After glazing, the bombs need only about 15 minutes in the refrigerator to set the glaze before serving. If you’re making them ahead and freezing the unglazed bombs, they’ll keep well for up to 2 weeks; just make sure they’re tightly wrapped so they don’t absorb freezer odors. On the day of serving, glaze them directly from the freezer — the temperature shock helps the mirror glaze set with that brilliant, glossy finish. Let them sit at room temperature for 10 minutes before serving if they feel too frozen to eat comfortably.
Can I make these pink guava vanilla dream bombs ahead of time for a party?
Yes, and I actually encourage it! These Pink Guava Vanilla Dream Bombs are designed for stress-free entertaining. You can make the vanilla cream centers up to a week ahead and keep them frozen. The guava mousse can be made a day ahead (store it in the fridge, then re-whip gently before filling molds). Assemble the bombs in their molds up to 2 weeks ahead and keep them frozen, well-wrapped. On the day of your party, simply unmold, glaze, and garnish. The mirror glaze should be made and applied fresh for the best shine, but the entire glazing process takes only about 15 minutes. This make-ahead strategy is exactly what I use when I’m teaching cooking classes or hosting dinner parties here in NYC — it lets me enjoy my own party instead of being stuck in the kitchen.
What type of cream cheese works best for the mousse and vanilla center?
Always use full-fat block cream cheese (the kind that comes in a foil-wrapped block) for both the mousse and the vanilla cream center. Brands like Philadelphia or store-brand equivalents work well as long as they’re the block format — not the spreadable, whipped, or reduced-fat versions. The block cream cheese has a higher fat content (around 33%) and lower water content, which is essential for creating a stable, creamy mousse that sets properly without becoming runny or grainy. Let the cream cheese come to room temperature for about 30 minutes before using. If you’re dairy-free, Miyoko’s or Violife vegan cream cheese blocks are the closest alternatives, though the texture will be slightly less rich. Avoid Neufchâtel (often labeled as “reduced-fat cream cheese”) as it has a higher moisture content that can cause the mousse to weep.
How do I get a smooth mirror glaze without bubbles?
Bubble-free mirror glaze is all about gentle handling and the right technique. First, when you stir the white chocolate and condensed milk together, use a spatula and stir slowly — don’t whisk vigorously, which incorporates air. After the glaze is fully combined, let it sit for 2–3 minutes to allow any tiny bubbles to rise to the surface. You can then pop them with a toothpick or pass a kitchen torch quickly over the surface. If you have a fine-mesh sieve, strain the finished glaze into a clean bowl — this is the foolproof method for catching any stubborn bubbles. Another pro tip: when you pour the glaze over the frozen bombs, pour it in a steady stream from about 6 inches above the dome, starting from the center and letting it flow outward. This pushes any air away from the surface. And always make sure your bombs are completely frozen — a warm surface will create steam bubbles that ruin the mirror finish.
Can I substitute the cookie base with something gluten-free?
Absolutely — the cookie base is one of the easiest components to make gluten-free. Simply use gluten-free vanilla cookies (like gluten-free graham crackers or gluten-free shortbread cookies) for the crumbs. Process them into fine crumbs and proceed with the recipe exactly as written — the melted butter and sugar will hold the base together beautifully. If you can’t find gluten-free vanilla cookies, gluten-free digestive biscuits or even gluten-free vanilla wafers work well too. For a grain-free option, you can use crushed almonds or pecans mixed with a little melted butter and a tablespoon of coconut sugar, pressed into the same round discs. The nut-based base will have a more rustic texture but pairs wonderfully with the tropical guava flavor. Just keep in mind that nut bases are more delicate, so handle them gently when placing the glazed bombs on top.
What other fruits can I use instead of pink guava?
Several fruits can step in for pink guava if you want to experiment. Passion fruit puree is my top substitute — it’s similarly tropical and floral, though noticeably more tart. If you use passion fruit, you may want to increase the powdered sugar by 2 tablespoons to balance the acidity. Mango puree (preferably from Ataulfo or Kent mangoes) creates a luscious, creamy mousse with a sweeter, less floral profile. For a berry-forward version, strawberry puree or a strawberry-rhubarb blend works beautifully and keeps the pink color. Lychee puree is another fantastic option — it’s floral like guava but even more delicate, with a perfumed sweetness that pairs wonderfully with vanilla. Whichever fruit you choose, make sure it’s a puree (not juice) and that it’s thick enough to create a stable mousse — if the puree is very thin, reduce it on the stove by simmering until it thickens slightly before using.
Share Your Version!
I absolutely love seeing how these Pink Guava Vanilla Dream Bombs turn out in your kitchen — every home cook brings their own energy to a recipe, and that’s what makes cooking so beautiful. If you try this recipe (or one of the variations), please leave a star rating and a comment below to let me know how it went. Did the gold mirror drip behave for you? Did you try the Moroccan spice twist? I read every single comment and I love hearing your stories.
Tag me in your creations! Share a photo on Instagram or Pinterest and tag @leosfoods — I’ll feature my favorites in my Stories. And if you have a question about any step, just drop it in the comments. I’m here for you.
From my NYC kitchen to yours — I hope this recipe brings as much warmth to your table as it does to mine. — Stella 🧡
Love This Recipe? Save It to Pinterest!
If you enjoyed this Pink Guava Vanilla Dream Bombs recipe, don’t let it get lost in your browser tabs! 😄 Pin it now so you can find it again anytime — and explore hundreds more tried-and-tested recipes waiting for you on my Pinterest boards.
👉 Follow Stella on Pinterest @stellarecipeblog
📌 Pin this recipe · 🔁 Re-pin your favorites · 💬 Tag me when you make it — I love seeing your creations!
“`
Print
Pink Guava Vanilla Dream Bombs with Gold Mirror Drip
Pink guava mousse bombs with a vanilla cream center, topped with a gold mirror glaze and set on a cookie base.
- Yield: 8 1x
Ingredients
- For the Pink Guava Mousse:
- 1 cup pink guava puree
- 8 oz cream cheese, softened
- 1/2 cup powdered sugar
- 1 cup heavy cream
- 1 tsp vanilla extract
- 1 tbsp gelatin powder
- 3 tbsp warm water
- For the Vanilla Cream Center:
- 4 oz cream cheese, softened
- 1/4 cup powdered sugar
- 1/4 cup heavy cream
- 1 tsp vanilla extract
- For the Gold Mirror Drip:
- 1 cup white chocolate, finely chopped
- 1/2 cup sweetened condensed milk
- 1 tbsp gelatin powder
- 3 tbsp warm water
- Pink food coloring, as needed
- Gold food coloring or edible gold dust, as needed
- For the Cookie Base:
- 1 cup vanilla cookie crumbs
- 3 tbsp melted butter
- 1 tbsp granulated sugar
- Pinch of salt
- For Garnish (optional):
- Guava slices
- White chocolate curls
- Edible gold flakes
Instructions
- 1. Bloom gelatin in warm water and let stand for 5 minutes.
- 2. Beat cream cheese and powdered sugar until smooth.
- 3. Mix in pink guava puree and vanilla extract.
- 4. Whip heavy cream to soft peaks and fold into the guava mixture.
- 5. Stir in dissolved gelatin until fully incorporated.
- 6. In a separate bowl, beat cream cheese, powdered sugar, heavy cream, and vanilla until smooth for the vanilla cream center.
- 7. Pipe the vanilla cream into small molds and freeze until firm.
- 8. Fill silicone dome molds halfway with the guava mousse.
- 9. Place a frozen vanilla cream center into each mold.
- 10. Cover with remaining mousse and freeze until completely firm.
- 11. Combine white chocolate, condensed milk, dissolved gelatin, and pink food coloring until smooth and glossy.
- 12. Unmold the frozen bombs and place on a wire rack.
- 13. Pour the pink mirror glaze evenly over each bomb.
- 14. Tint a small portion of glaze with gold coloring and drizzle over the domes to create a gold mirror drip effect.
- 15. Mix cookie crumbs, melted butter, sugar, and salt, then press into small round bases.
- 16. Place each glazed bomb onto a prepared base.
- 17. Garnish with guava slices, white chocolate curls, and edible gold flakes.
- 18. Chill for 15 minutes before serving.
Nutrition
- Calories: 425
- Sugar: 32 g
- Fat: 29 g
- Carbohydrates: 38 g
- Protein: 6 g
Tried This Recipe? Leave a Comment!
Did you make this recipe? I’d love to hear how it turned out! Please leave a comment and a rating below. Your feedback helps other home cooks and supports cheerychop.com!
For more delicious inspiration, follow me on Pinterest!