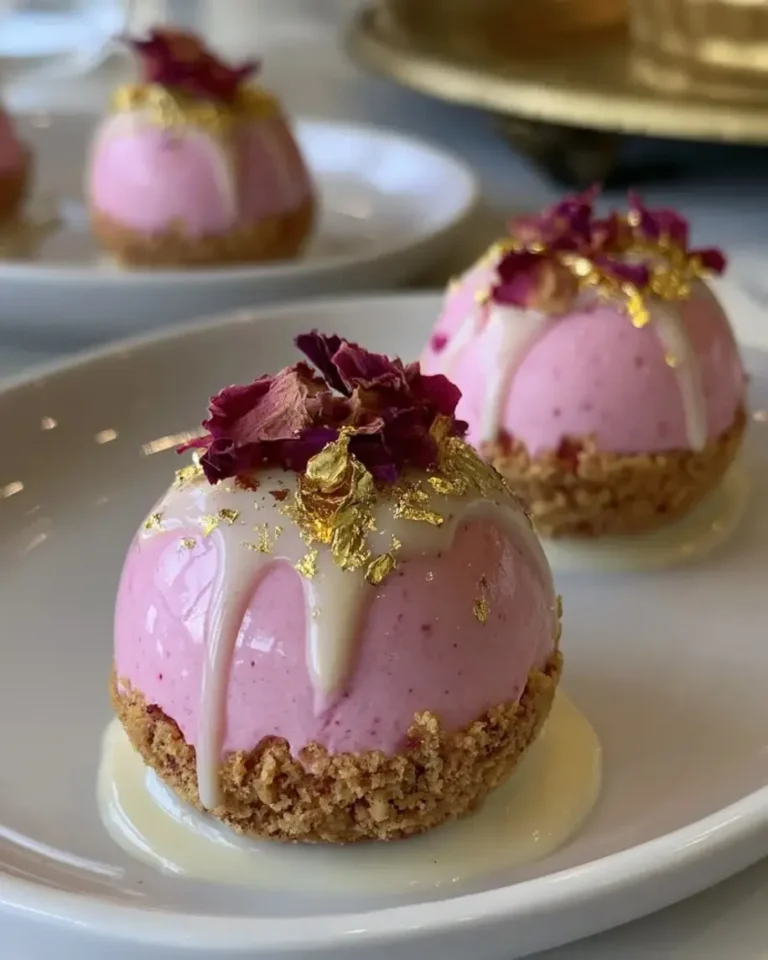
Pistachio Emerald Geode Cheesecake Bombs with Honey Core
“`html
Table of Contents
Pistachio Emerald Geode Cheesecake Bombs with Honey Core – Hidden Honey Center & Crystal Glaze
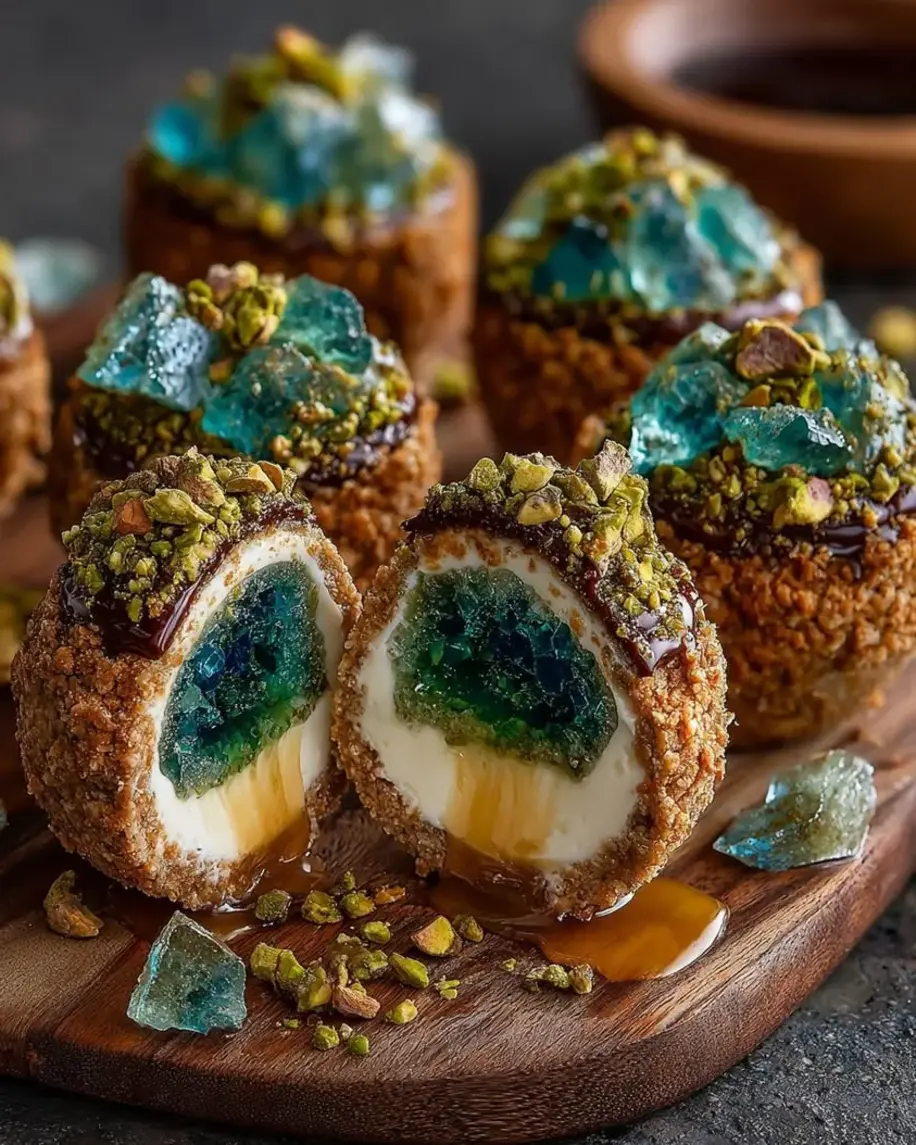
I still remember the first time I cracked open a geode as a kid in Morocco—my grandmother handed me a dull gray rock, and when I tapped it with a hammer, the inside blazed with amethyst crystals. That same thrill of hidden beauty is exactly what these Pistachio Emerald Geode Cheesecake Bombs with Honey Core are all about. Each dome is a creamy pistachio cheesecake shell hiding a liquid honey center, all cloaked in a glossy emerald crystal glaze that shatters like a gemstone when you bite in. This geode cheesecake recipe combines my French pastry training with the warm, nutty flavors of North Africa, and it’s become the signature dessert at my NYC dinner parties. The honey core cheesecake bombs technique takes patience, but I promise the wow factor is absolutely worth every minute.
Imagine cutting into a smooth green dome and watching golden honey slowly pool onto the plate, while the emerald glaze cracks like gemstone facets catching the light. The pistachio cheesecake bombs are luxuriously dense yet light—thanks to mascarpone and a touch of gelatin—with a subtle floral sweetness from the pistachio paste. The honey core adds a sunlit brightness that cuts through the richness, and the biscuit base brings a buttery cinnamon crunch. I finish each emerald geode dessert with a dusting of edible gold and white chocolate shards, because if you’re going to make a showstopper, you might as well go all out.
After years of perfecting this at my restaurant and testing it in my tiny NYC kitchen, I’ve found the exact balance that makes these work without leaking or cracking. The secret is freezing the domes solid before glazing and using a specific gelatin ratio that gives the glaze that glass-like sheen. I’ll walk you through every step, from blooming gelatin to achieving that perfect emerald geode effect, and I’ll share the one mistake most home bakers make that turns their crystals cloudy. From my mother’s tagine pot to Parisian pâtisserie classrooms, this recipe brings together everything I love about food—and now it’s yours to make.
Why This Pistachio Emerald Geode Cheesecake Bombs Recipe Is the Best
The flavor secret is in the pistachio paste—not the pre-sweetened stuff, but the pure Sicilian paste that tastes intensely of toasted nuts. My mother always said the best sweets have a savory edge, and the pinch of salt in this pistachio cheesecake bombs recipe balances the honey core perfectly. I learned that trick from a pastry chef in Paris who insisted that salt makes sweetness sing, and she was right. Plus, the mascarpone adds a velvety richness that cream cheese alone can’t achieve, giving these domes a melt-in-your-mouth texture that keeps guests asking for the recipe.
I’ve perfected the texture through dozens of test batches—too much gelatin and the cheesecake turns rubbery, too little and the bombs collapse when you unmold them. The exact 2 teaspoons of gelatin powder bloomed in cold water creates a structure that holds its shape after freezing but softens to creamy perfection at room temperature. The honey core stays liquid because I freeze the filling before adding the honey, creating a firm shell around the liquid center. This geode cheesecake recipe is foolproof if you follow the chilling times, and the emerald geode effect depends on cooling the glaze to exactly 90°F before pouring—any hotter and it runs right off, any cooler and it thickens into lumps.
This honey core cheesecake bombs recipe is designed for home cooks who want to impress without professional equipment. You only need silicone dome molds, a wire rack, and a good thermometer—no blow torches or special piping bags. I’ve tested this in my friend’s apartment with a hand mixer and it worked beautifully. The most intimidating part is the emerald glaze, but I break it down into simple steps that anyone can follow. Plus, I’ll show you how to tell when the glaze is at the perfect pouring consistency without a thermometer—just dip a spoon and count to three.
Pistachio Emerald Geode Cheesecake Bombs Ingredients
Every Saturday morning I walk to the Union Square farmers market in NYC, and the smell of fresh pistachios from the nut vendor always takes me back to the souks of Marrakech. That’s where I source the best pistachio paste—it’s expensive, but there’s no substitute for the real thing. The honey I use comes from a beekeeper in upstate New York who harvests wildflower honey with hints of lavender, and it makes the honey core taste like a secret garden. For the emerald geode effect, I use a combination of corn syrup and gelatin that creates that brilliant, gem-like shine—I learned this technique during my pastry training at Le Cordon Bleu in Paris, where we spent an entire week on mirror glazes.
Ingredients List
- For the Pistachio Cheesecake Shells:
- 12 oz cream cheese, softened
- 1/2 cup mascarpone cheese
- 1/2 cup heavy cream
- 1/3 cup granulated sugar
- 1 tsp vanilla extract
- 1/2 cup pistachio paste (pure, not sweetened syrup)
- 2 tsp gelatin powder
- 2 tbsp cold water
- Pinch of salt
- For the Honey Core:
- 1/2 cup thick honey (wildflower or orange blossom)
- 1 tbsp lemon juice
- 1/2 tsp vanilla extract
- For the Biscuit Base:
- 1 cup digestive biscuit crumbs (or graham crackers)
- 3 tbsp melted butter
- 1 tbsp sugar
- 1/2 tsp cinnamon
- For the Emerald Geode Candy Crystals:
- 1 cup granulated sugar
- 1/2 cup water
- 1/2 cup light corn syrup
- 1 tbsp gelatin powder
- 3 tbsp cold water
- Green food coloring (emerald shade, gel-based preferred)
- 1 tsp vanilla extract
- 1 tbsp coconut oil
- For Garnish (optional):
- 2 tbsp crushed pistachios
- 1 tbsp edible gold dust
- White chocolate shards
Ingredient Spotlight
Pistachio Paste: This is the soul of your pistachio cheesecake bombs. Look for 100% pure pistachio paste in the baking aisle or online—it should list only pistachios as the ingredient. The Sicilian variety is deep green and intensely nutty, but California-grown works well too. Avoid pistachio syrup or sweetened spreads—they’ll throw off the sugar balance and make the filling too runny. If you can’t find paste, grind 1 cup of shelled pistachios in a food processor with 1 tablespoon of neutral oil until smooth.
Honey: For the honey core cheesecake bombs, use a thick, high-quality honey that won’t run too quickly. Wildflower honey adds floral notes, while orange blossom honey complements the pistachio beautifully. Avoid cheap supermarket honey that’s been cut with corn syrup—it will leak through the cheesecake layer. The lemon juice and vanilla in the core help stabilize the honey and prevent crystallization.
Gelatin: Both the cheesecake and the emerald glaze depend on gelatin for structure. Use powdered gelatin (not sheets) for consistent results—Knox brand is reliable. Bloom it in cold water for exactly 5 minutes, never hot water or it will clump. If you need a vegetarian version, agar-agar works but the texture will be firmer and less creamy.
Green Food Coloring: For the emerald geode effect, gel-based food coloring is essential—liquid drops won’t give you that deep, jewel-like saturation. I use Wilton’s “Leaf Green” mixed with a tiny drop of “Royal Blue” to get that true emerald shade. Start with a few drops and add more until the glaze looks like a precious stone.
| Original Ingredient | Best Substitution | Flavor / Texture Impact |
|---|---|---|
| Pistachio Paste | Homemade ground pistachios + oil | Slightly grittier, less intense green |
| Mascarpone | Full-fat cream cheese + 1 tbsp heavy cream | Less tangy, slightly denser |
| Digestive Biscuits | Graham crackers or shortbread | Sweeter base, less malty flavor |
| Light Corn Syrup | Glucose syrup or honey (for glaze only) | Honey changes color to amber, less clear |
How to Make Pistachio Emerald Geode Cheesecake Bombs — Step-by-Step
Don’t let the long ingredient list intimidate you—this geode cheesecake recipe comes together in manageable stages, and most of the time is hands-off freezing. I’ve organized the steps so you can work efficiently, and I’ll share the exact visual cues you need to look for at each stage. Let’s create some edible gemstones together!
Step 1: Prepare the Biscuit Base
In a medium bowl, combine 1 cup digestive biscuit crumbs, 3 tablespoons melted butter, 1 tablespoon sugar, and 1/2 teaspoon cinnamon. Mix with a fork until the crumbs are evenly moistened and clump together when pressed. Divide the mixture evenly among 6 silicone dome molds (about 2 tablespoons each) and press firmly into an even layer on the bottom. Use the back of a spoon or a small shot glass to compact it well—this prevents the base from crumbling when you unmold the bombs later.
💡 Stella’s Pro Tip: For a cleaner release, spray the silicone molds lightly with non-stick spray before adding the biscuit base. This is especially important if your molds have intricate ridges—the bombs will pop out like a dream!
Step 2: Make the Pistachio Cheesecake Filling
In a small bowl, sprinkle 2 teaspoons gelatin powder over 2 tablespoons cold water. Let it bloom for 5 minutes—it will look like a firm, jiggly disk. In a large mixing bowl, beat 12 oz softened cream cheese, 1/2 cup mascarpone, 1/2 cup heavy cream, 1/3 cup granulated sugar, 1 teaspoon vanilla extract, 1/2 cup pistachio paste, and a pinch of salt. Use an electric mixer on medium speed until smooth and fluffy, about 2 minutes—scrape the bowl halfway through. Warm about 1/4 cup of this mixture in a small saucepan over low heat (or microwave for 10 seconds), then whisk in the bloomed gelatin until completely dissolved. Fold this gelatin mixture back into the full cheesecake batter, mixing gently until uniform.
⚠️ Common Mistake to Avoid: If you add the gelatin directly to the cold mixture without warming a portion first, it will seize into rubbery strings and ruin the texture of your pistachio cheesecake bombs. Always temper the gelatin into a small warm portion first!
Step 3: Assemble the Bombs with Honey Core
Fill each dome mold halfway with the pistachio cheesecake mixture—about 2 heaping tablespoons per dome. In a small bowl, stir together 1/2 cup thick honey, 1 tablespoon lemon juice, and 1/2 teaspoon vanilla extract. Spoon about 1 teaspoon of this honey mixture into the center of each mold, directly on top of the cheesecake layer. Be careful not to let the honey touch the edges of the mold—it needs to be fully surrounded by cheesecake to prevent leaking. Cover the honey with the remaining cheesecake mixture, dividing evenly among the 6 molds. Smooth the tops with a small offset spatula or the back of a spoon, making sure the honey is completely sealed inside.
💡 Stella’s Pro Tip: To test if the honey is properly sealed, gently tap the mold on the counter. If you see honey seeping to the surface, spoon a little more cheesecake mixture on top and smooth again. This prevents those heartbreaking leaks during the glaze step!
Step 4: Freeze and Set
Place the filled molds on a baking sheet and freeze for at least 4 hours, preferably overnight. The bombs must be completely solid before glazing—if they’re even slightly soft, the warm glaze will melt them and create a mess. While they freeze, you can prepare the emerald geode glaze. This is a great make-ahead step; I often freeze the bombs a week in advance and glaze them the day I plan to serve.
⚠️ Common Mistake to Avoid: Don’t rush the freezing time. If you try to unmold after only 2 hours, the bombs will collapse and the honey core will spill out. Patience is the secret to perfect honey core cheesecake bombs!
Step 5: Create the Emerald Geode Glaze
In a small bowl, bloom 1 tablespoon gelatin powder in 3 tablespoons cold water for 5 minutes. In a saucepan, combine 1 cup granulated sugar, 1/2 cup water, and 1/2 cup light corn syrup. Heat over medium heat, stirring gently, until the sugar dissolves completely—about 3 minutes. Bring to a simmer and cook until the mixture reaches 235°F on a candy thermometer (soft ball stage). Remove from heat immediately. Whisk in the bloomed gelatin until fully melted, then add 1 teaspoon vanilla extract, 1 tablespoon coconut oil, and enough green gel food coloring to achieve a deep emerald shade—start with 8 drops and adjust. Stir gently to avoid creating bubbles. Let the glaze cool to 90°F—about 15-20 minutes at room temperature—stirring occasionally.
💡 Stella’s Pro Tip: If you don’t have a candy thermometer, test the glaze by dipping a metal spoon—the glaze should coat the spoon in a thin, even layer and drip slowly. If it runs off like water, it’s too hot; if it thickens into clumps, gently reheat it to 90°F. This emerald geode effect is all about the right temperature!
Step 6: Glaze and Decorate
Remove the frozen bombs from the molds—they should pop out easily. Place each dome on a wire rack set over a baking sheet to catch drips. Working quickly, pour the cooled emerald glaze over each dome, starting from the top and letting it flow down the sides. Use a small offset spatula to spread any bare spots, but try not to touch the glaze too much or it will lose its shine. Let the excess drip off for about 30 seconds, then carefully transfer each glazed bomb to a serving plate using a thin spatula. Before the glaze sets completely (within 2 minutes), sprinkle with crushed pistachios, edible gold dust, and press white chocolate shards into the sides to resemble geode crystals.
⚠️ Common Mistake to Avoid: If the glaze sets before you add the decorations, they won’t stick. Work in batches—glaze 2-3 bombs at a time, decorate immediately, then move to the next batch. This ensures every emerald geode dessert looks stunning!
| Step | Action | Duration | Key Visual Cue |
|---|---|---|---|
| 1 | Prepare biscuit base | 5 mins | Crumbs clump when pressed |
| 2 | Make cheesecake filling | 10 mins | Smooth, fluffy, pale green |
| 3 | Assemble with honey core | 5 mins | Honey fully covered by filling |
| 4 | Freeze | 4+ hours | Rock solid, no give when pressed |
| 5 | Make emerald glaze | 15 mins + cooling | Glaze coats spoon, drips slowly |
| 6 | Glaze and decorate | 5 mins per batch | Glossy, emerald, decorations stick |
Serving & Presentation
These pistachio emerald geode cheesecake bombs are designed to be the centerpiece of any gathering. I love serving them on a slate board with a few extra white chocolate shards scattered around to mimic a geode display. When you cut into one, the honey core should slowly pool onto the plate—this is why I recommend letting the bombs sit at room temperature for exactly 10 minutes before serving. Any longer and the glaze might start to soften and lose its glass-like finish.
For a truly stunning presentation, arrange the bombs on a mirror or a bed of edible glitter—the reflection makes the emerald glaze look even more luminous. I sometimes add a tiny sprig of mint or edible violas for a pop of contrasting color. In my NYC apartment, I serve these with a side of lightly whipped cream infused with orange blossom water (a tip from my Moroccan mother) and a cup of strong mint tea. The combination of creamy, crunchy, honey-sweet, and floral is pure magic.
| Pairing Type | Suggestions | Why It Works |
|---|---|---|
| Side Dish | Fresh berries, citrus segments | Bright acidity cuts through richness |
| Sauce / Dip | Whipped cream, crème fraîche | Adds tangy contrast to sweet honey |
| Beverage | Mint tea, espresso, dessert wine | Herbal notes complement pistachio |
| Garnish | Edible gold, rose petals, mint | Enhances emerald geode visual |
Make-Ahead, Storage & Reheating
My busy NYC schedule means I’m always looking for ways to prep desserts ahead, and these honey core cheesecake bombs are perfect for that. You can freeze the unglazed bombs for up to 2 weeks, then glaze them the morning of your dinner party. The glaze itself can be made 2 days ahead and stored in the fridge—just reheat gently to 90°F before using. I’ve tested this timing dozens of times, and it’s the secret to stress-free entertaining.
| Method | Container | Duration | Reheating Tip |
|---|---|---|---|
| Refrigerator | Airtight container, single layer | 3 days | Let sit 10 mins at room temp before serving |
| Freezer | Freezer-safe bag, frozen dome side up | 2 weeks | Thaw in fridge 2 hours, then glaze |
| Make-Ahead | Glaze stored separately in jar | 2 days in advance | Reheat glaze to 90°F before pouring |
To reheat leftover bombs (if you somehow have any!), place them on a plate and microwave on 50% power for 15 seconds—just enough to soften the cheesecake without melting the glaze. The honey core will warm up and become wonderfully runny. For the best experience, though, I recommend serving these within 24 hours of glazing, when the crystal finish is at its shiniest and the pistachio cheesecake bombs taste freshest.
Variations & Easy Swaps
One of the things I love most about this geode cheesecake recipe is how adaptable it is. Whether you’re avoiding dairy, want to switch up the flavors, or just need to use what’s in your pantry, there’s a version here for you. I’ve tested all of these variations in my own kitchen, so you can swap with confidence.
| Variation | Key Change | Best For | Difficulty Impact |
|---|---|---|---|
| Dairy-Free | Use vegan cream cheese + coconut cream | Lactose-intolerant guests | Medium (adds 1 extra step) |
| Rose & Raspberry | Add rose water to filling, raspberry coulis core | Romantic occasions | Same as original |
| Saffron & Almond | Almond paste instead of pistachio, saffron honey | Mediterranean flavor lovers | Same as original |
Dairy-Free / Vegan Option
For a dairy-free version of these pistachio cheesecake bombs, substitute the cream cheese with a high-quality vegan cream cheese (I like Miyoko’s), use full-fat coconut cream instead of mascarpone and heavy cream, and replace the butter in the biscuit base with melted coconut oil. The gelatin can be replaced with 1 teaspoon agar-agar powder—bloom it in water and heat to 185°F before adding to the filling. The texture will be slightly firmer, but the honey core (use agave for vegan) still creates that beautiful molten center. This variation is perfect for dairy-sensitive guests and tastes just as luxurious as the original.
Rose & Raspberry Twist
Inspired by the rose gardens of Marrakech, this variation replaces the honey core with a raspberry coulis and adds 1 teaspoon of rose water to the pistachio cheesecake filling. The floral notes of rose pair beautifully with pistachio, and the tart raspberry cuts through the sweetness. For the emerald geode effect, add a tiny drop of purple food coloring to the green glaze to create a deeper, more mysterious jewel tone. I serve these at bridal showers and they always get rave reviews—the combination of pink and green is stunning.
Saffron & Almond Mediterranean
This version honors my North African roots by swapping pistachio paste for almond paste and infusing the honey core with a pinch of saffron threads. Warm 2 tablespoons of the honey with a pinch of saffron for 5 minutes before mixing with the lemon juice and vanilla—the saffron turns the honey a gorgeous amber gold. The biscuit base gets a pinch of cardamom instead of cinnamon, and I garnish with chopped almonds and a dusting of turmeric for an extra golden glow. This variation is slightly less sweet and more aromatic, perfect for those who love complex, layered flavors.
How do you create an emerald geode effect on a pistachio cheesecake bomb?
The emerald geode effect is achieved by pouring a glossy, gelatin-based mirror glaze over the frozen cheesecake domes. The key is to bloom gelatin in cold water, then dissolve it into a hot sugar syrup cooked to 235°F. Adding green gel food coloring creates that deep emerald hue, while a small amount of coconut oil gives the glaze its brilliant shine. The glaze must be cooled to exactly 90°F before pouring—this temperature allows it to coat the dome evenly without running off or clumping. As the glaze drips and sets, it forms natural crystal-like patterns that resemble a geode’s interior. For extra geode texture, press white chocolate shards into the sides while the glaze is still tacky, and dust with edible gold for that gemstone sparkle.
What is the best way to make a honey core inside a cheesecake bomb without leaking?
The key to a leak-free honey core is freezing the cheesecake bombs solid before adding the glaze, and more importantly, ensuring the honey is completely sealed inside the cheesecake layer. Start by filling each dome mold halfway with the pistachio cheesecake mixture, then spoon the honey mixture (thick honey mixed with lemon juice and vanilla) into the center—make sure it doesn’t touch the edges of the mold. Cover the honey with the remaining cheesecake mixture, smoothing the top to create an even seal. I recommend tapping the mold gently on the counter to check for any honey seeping to the surface—if you see any, add a little more cheesecake mixture and smooth again. Freeze for at least 4 hours, and the frozen cheesecake shell will hold the honey securely when you unmold and glaze.
Can I substitute pistachios with another nut for this pistachio cheesecake recipe?
Yes, you can absolutely substitute with other nuts, though the flavor and color will change. Almond paste is the best substitute—use it in the same quantity as pistachio paste (1/2 cup). The filling will be paler and have a sweeter, more marzipan-like flavor. For a hazelnut version, grind toasted hazelnuts with a little oil to make a paste, or use store-bought hazelnut spread (though it will be sweeter). If you use walnut or pecan paste, the flavor will be more earthy and less sweet, so you may want to add an extra tablespoon of sugar. Note that the emerald geode effect relies on green food coloring anyway, so the color of your nut paste won’t affect the final visual—you’ll still get that stunning crystal finish.
How long do you need to chill pistachio geode cheesecake bombs before serving?
After glazing, the bombs should be chilled for at least 2 hours in the refrigerator to allow the glaze to fully set and the cheesecake to soften to the perfect creamy texture. If you serve them straight from the freezer, the glaze will be too hard and the cheesecake will be icy. For the best texture, I recommend removing the bombs from the fridge about 10 minutes before serving—this softens the pistachio cheesecake slightly and allows the honey core to become liquid and flow when you cut into it. The total chilling time from start to finish includes 4 hours of freezing before glazing, plus 2 hours of refrigeration after glazing, so plan accordingly. You can make these a day ahead and keep them in the fridge, which actually improves the texture.
Why did my emerald geode glaze turn cloudy instead of shiny?
A cloudy glaze usually happens for one of three reasons. First, the gelatin may not have bloomed properly—make sure you sprinkle the gelatin over cold water and let it sit for exactly 5 minutes until it becomes a solid, jiggly disk. Second, the sugar mixture may not have reached the correct temperature (235°F). Undercooked syrup won’t set properly and will look dull; use a candy thermometer for accuracy. Third, and most commonly, the food coloring can cause cloudiness if you use liquid drops instead of gel-based coloring. Liquid coloring contains water that can seize the sugar syrup. Always use gel-based food coloring for mirror glazes. If your glaze is already cloudy, you can try reheating it gently to 90°F and adding a teaspoon of coconut oil, then whisking vigorously—this sometimes restores the shine.
Can I make these pistachio cheesecake bombs without gelatin?
Yes, you can substitute gelatin with agar-agar for a vegetarian version, though the texture will be slightly different. For the cheesecake filling, use 1 teaspoon of agar-agar powder bloomed in 2 tablespoons water, then brought to a boil (agar needs to reach 185°F to activate, unlike gelatin). The texture will be firmer and slightly less creamy, but still delicious. For the emerald glaze, use 2 teaspoons of agar-agar instead of 1 tablespoon gelatin, and boil the glaze mixture for 2 minutes to activate the agar. Note that agar-agar sets at room temperature and doesn’t melt as easily in the mouth, so the glaze will have a firmer bite. I recommend using gelatin for the best texture in this recipe, but agar works in a pinch.
How do I store leftover geode cheesecake bombs?
Store leftover pistachio emerald geode cheesecake bombs in an airtight container in the refrigerator for up to 3 days. Place them in a single layer, not touching each other, to prevent the glaze from sticking and getting damaged. If you need to stack them, use a layer of parchment paper between each bomb. The glaze will stay shiny for about 24 hours, then may start to dull slightly—that’s normal and doesn’t affect the taste. For longer storage, freeze the unglazed bombs for up to 2 weeks, then glaze them fresh when you’re ready to serve. I don’t recommend freezing already-glazed bombs, as the glaze can crack and become grainy when thawed. When serving leftover bombs, let them sit at room temperature for 10 minutes to soften the cheesecake and warm the honey core.
Can I use a different flavor for the geode glaze instead of emerald green?
Absolutely! The emerald geode effect works with any color. For a ruby geode, use red food coloring and add a teaspoon of raspberry extract to the glaze. For a sapphire geode, use blue food coloring and a hint of vanilla or almond extract. For an amethyst geode, mix purple and blue gel colors and add a drop of rose water. The base glaze recipe stays the same—just swap the food coloring and flavoring. Keep in mind that lighter colors (like pink or yellow) may require more food coloring to achieve a vibrant gemstone look, and the glaze will be slightly translucent, which can look beautiful with the white chocolate shards showing through. I’ve made a rainbow of geodes for different holidays, and each one is a showstopper.
Why did my biscuits base crumble when I unmolded the bombs?
A crumbly biscuit base usually means the mixture wasn’t compacted firmly enough, or there wasn’t enough butter to bind the crumbs. When pressing the biscuit mixture into the silicone molds, use firm pressure with a small glass or the back of a spoon—you want the base to feel dense and compact, not loose. If the mixture seems dry and doesn’t clump when pressed between your fingers, add another tablespoon of melted butter. Also make sure your biscuits are finely ground (pulse in a food processor until they resemble sand) and that the butter is fully melted and evenly distributed. Another common issue is unmolding too quickly—wait until the bombs are fully frozen (4+ hours) and then gently push up from the bottom of the silicone mold. If the base still crumbles, try chilling the molds for 10 minutes before pressing the crumbs—this helps the butter set faster.
Can I make these honey core cheesecake bombs in a different shape?
Yes, you can use any silicone mold shape, though the geode effect works best with dome or hemisphere molds. I’ve made these as mini cheesecake bites using half-sphere silicone candy molds (about 2 inches wide) for party platters—just reduce the filling and honey amounts by half. You can also use rectangular silicone loaf pans to create a geode cheesecake slab that you slice into bars, though you’ll need to adjust the glaze to cover the larger surface. For a fun twist, use egg-shaped molds for an Easter version—just be careful with the honey core placement to keep it centered. Whatever shape you choose, make sure the silicone is flexible and food-grade, and always freeze the bombs solid before glazing. The geode effect adapts beautifully to different forms!
Share Your Version!
Now it’s your turn to create these stunning Pistachio Emerald Geode Cheesecake Bombs with Honey Core! I’d love to see how they turn out—whether your geode crystals are perfectly glossy or have a beautiful unique pattern all their own. Drop a comment below with your star rating and let me know if you tried any of the variations. The honey core is always the most exciting part to reveal, so tag me in your photos when you crack that first dome open!
If you have a question about a specific step or ingredient substitution that I didn’t cover, just ask in the comments—I read every single one and answer within 24 hours. Your feedback helps me create better recipes and helps other readers troubleshoot too. From my NYC kitchen to yours—I hope this recipe brings as much warmth to your table as it does to mine. — Stella 🧡
Love This Recipe? Save It to Pinterest!
If you enjoyed this Pistachio Emerald Geode Cheesecake Bombs with Honey Core recipe, don’t let it get lost in your browser tabs! 😄 Pin it now so you can find it again anytime — and explore hundreds more tried-and-tested recipes waiting for you on my Pinterest boards.
👉 Follow Stella on Pinterest @stellarecipeblog
📌 Pin this recipe · 🔁 Re-pin your favorites · 💬 Tag me when you make it — I love seeing your creations!
“`
Print

Pistachio Emerald Geode Cheesecake Bombs with Honey Core
Pistachio Emerald Geode Cheesecake Bombs with Honey Core
- Yield: 6 1x
Ingredients
- For the Pistachio Cheesecake Shells:
- 12 oz cream cheese, softened
- 1/2 cup mascarpone cheese
- 1/2 cup heavy cream
- 1/3 cup granulated sugar
- 1 tsp vanilla extract
- 1/2 cup pistachio paste
- 2 tsp gelatin powder
- 2 tbsp cold water
- Pinch of salt
- For the Honey Core:
- 1/2 cup thick honey
- 1 tbsp lemon juice
- 1/2 tsp vanilla extract
- For the Biscuit Base:
- 1 cup digestive biscuit crumbs
- 3 tbsp melted butter
- 1 tbsp sugar
- 1/2 tsp cinnamon
- For the Emerald Geode Candy Crystals:
- 1 cup granulated sugar
- 1/2 cup water
- 1/2 cup light corn syrup
- 1 tbsp gelatin powder
- 3 tbsp cold water
- Green food coloring (emerald shade)
- 1 tsp vanilla extract
- 1 tbsp coconut oil
- For Garnish (optional):
- 2 tbsp crushed pistachios
- 1 tbsp edible gold dust
- White chocolate shards
Instructions
- Bloom gelatin in cold water for 5 minutes.
- Mix biscuit crumbs, melted butter, sugar, and cinnamon until combined. Press into silicone dome molds to form the base layer.
- Whip cream cheese, mascarpone, heavy cream, sugar, vanilla extract, pistachio paste, and salt until smooth and fluffy.
- Warm a small portion of the mixture and dissolve the bloomed gelatin, then fold it back into the full cheesecake mixture.
- Fill molds halfway with cheesecake mixture.
- Spoon a small amount of honey mixed with lemon juice and vanilla into the center to create the hidden core. Cover with remaining cheesecake mixture and smooth tops.
- Freeze for at least 4 hours until fully set.
- For the geode glaze, bloom gelatin in cold water for 5 minutes.
- Heat sugar, water, and corn syrup until fully dissolved and clear. Remove from heat and stir in gelatin, vanilla extract, coconut oil, and green food coloring until glossy emerald.
- Allow glaze to cool until thick but pourable.
- Unmold frozen domes and place on a wire rack. Pour emerald glaze over each dome to create a crystal geode finish.
- Let excess drip off, then transfer to serving plates.
- Finish with crushed pistachios, edible gold dust, and white chocolate shards.
Nutrition
- Calories: 465
- Sugar: 33g
- Fat: 32g
- Carbohydrates: 40g
- Protein: 7g
Tried This Recipe? Leave a Comment!
Did you make this recipe? I’d love to hear how it turned out! Please leave a comment and a rating below. Your feedback helps other home cooks and supports cheerychop.com!
For more delicious inspiration, follow me on Pinterest!