Perfect Mirror Glaze Strawberry Cheesecake Domes
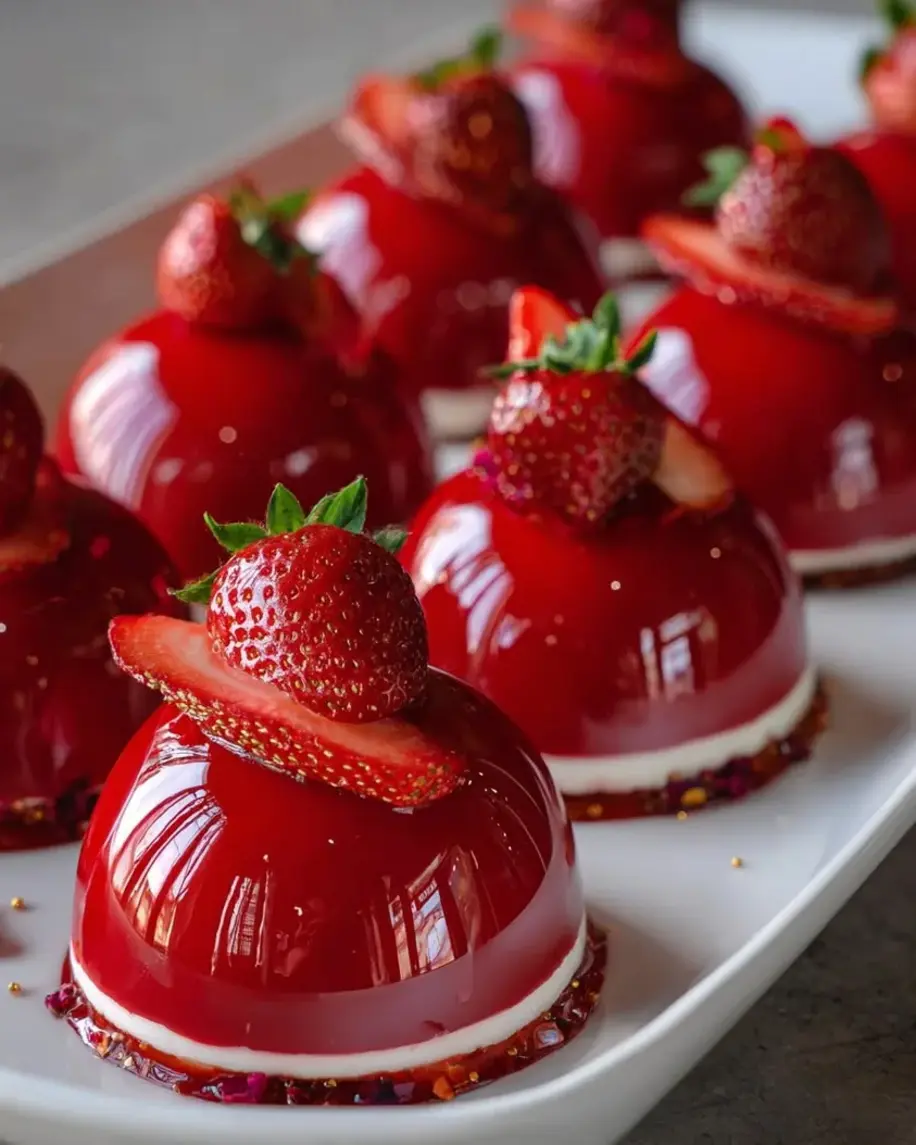
Table of Contents
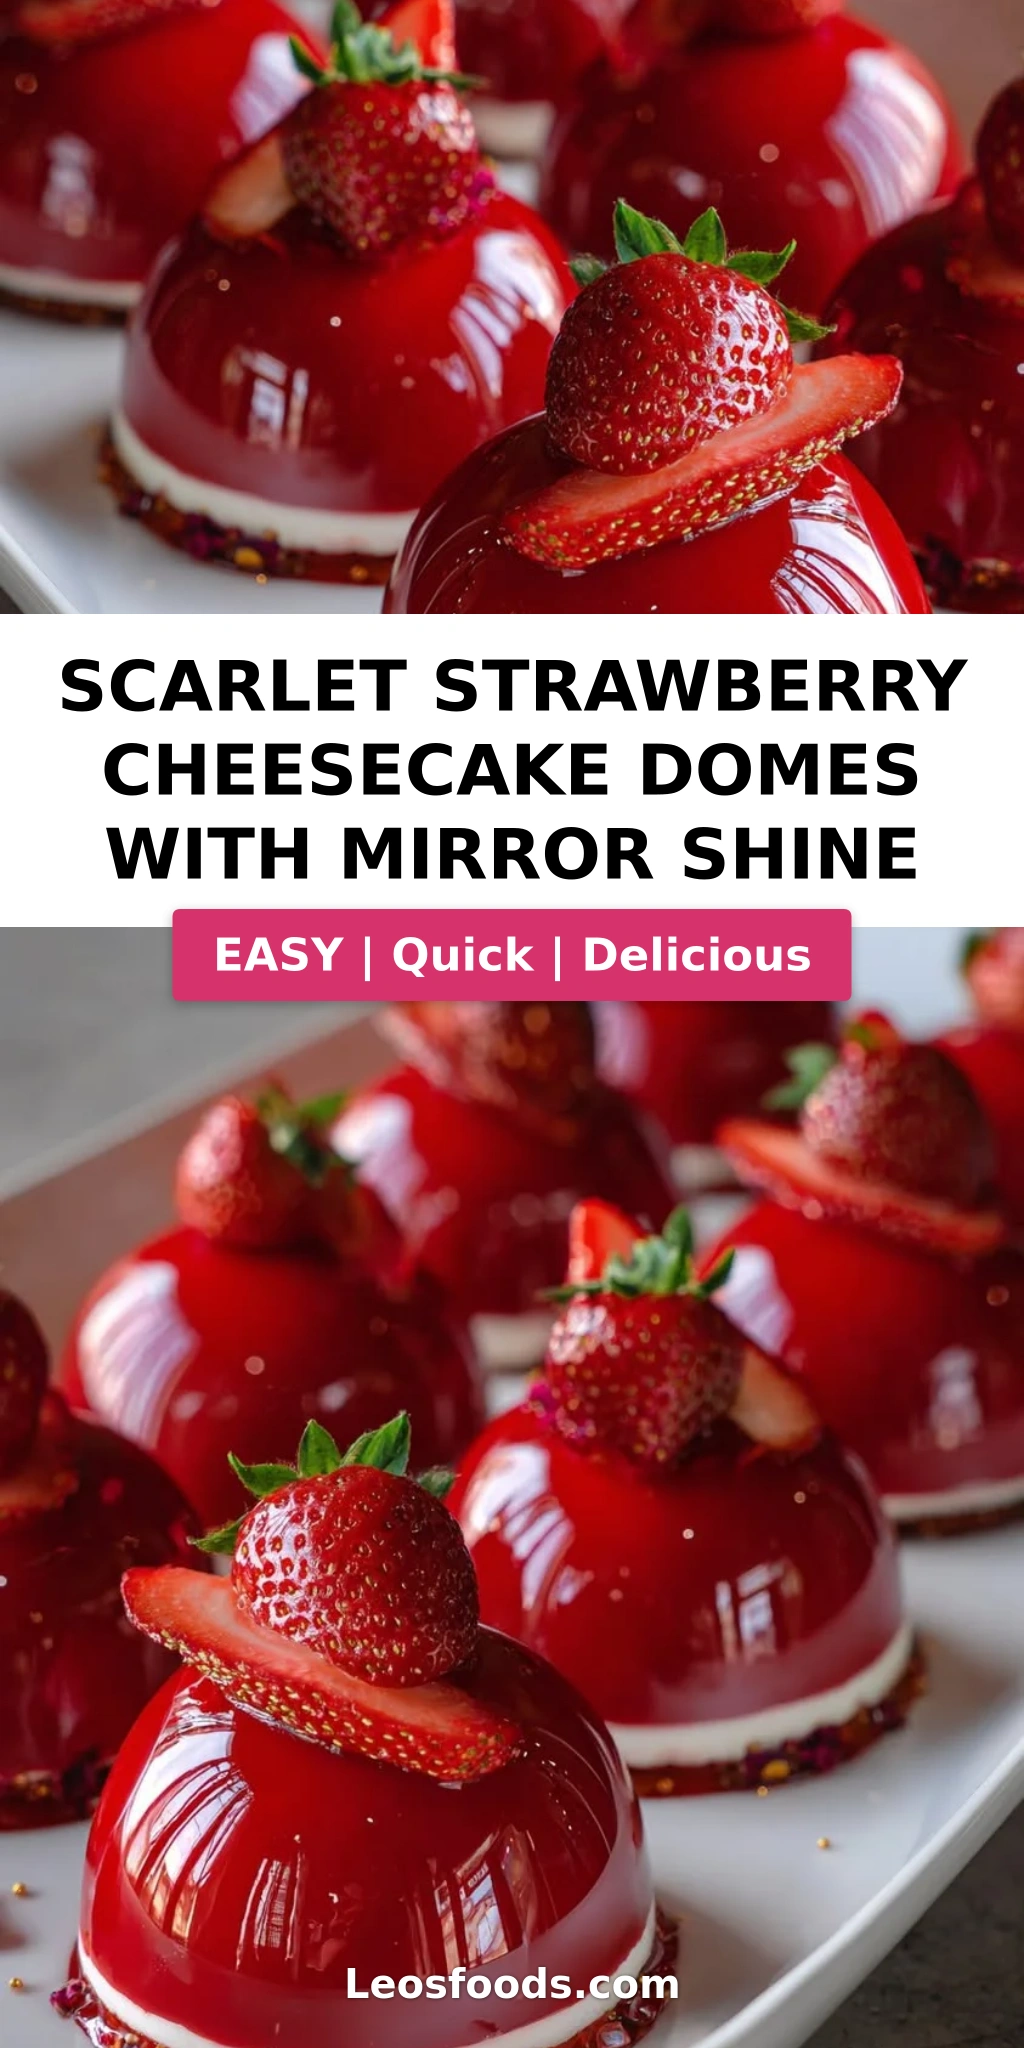
Scarlet Strawberry Cheesecake Domes with Mirror Shine – Achieving the Perfect Mirror Glaze Cheesecake Recipe at Home
I still remember the first time I tasted a mirror-glazed dessert — it was at a patisserie in the 7th arrondissement of Paris, during my years training at Le Cordon Bleu. That gleaming, jewel-toned surface seemed almost too beautiful to eat. But here in my New York City kitchen, I’ve learned that achieving that same scarlet strawberry cheesecake domes magic is entirely possible at home. My version combines the creamy richness of a classic strawberry cheesecake domes filling with a show-stopping mirror shine cheesecake glaze that reflects light like a polished gem. The secret lies in temperature control and a few key techniques I’m excited to share with you today.
Imagine cutting into a glossy scarlet dome and discovering a velvety strawberry cheesecake interior with a delicate graham cracker base beneath. The first bite is cool and silky, with bright strawberry notes balanced by the richness of cream cheese. The mirror glaze adds a subtle sweetness and a stunning finish that feels like edible art. My mother’s kitchen in Morocco taught me the beauty of patience in cooking — and this strawberry dessert domes recipe asks for that same gentle precision. The result is a dessert that looks like it belongs in a high-end pastry case but tastes like something you’d share with loved ones around your own table.
What makes these scarlet strawberry cheesecake domes truly special is the combination of fresh strawberry puree, a perfectly set cheesecake filling, and a mirror shine that I’ve perfected through countless tests in my own kitchen. The edible pearl shimmer powder adds that extra glow that makes the domes catch the light beautifully. I’ll walk you through every step, from blooming gelatin to achieving the ideal glaze consistency, and I’ll point out the one mistake most home bakers make with mirror glaze so you can skip straight to success. Let’s make something unforgettable together.
Why This Scarlet Strawberry Cheesecake Domes Recipe Is the Best
The Flavor Secret: Unlike many mirror glaze cheesecake recipes that rely on artificial flavoring, my version uses real strawberry puree blended into the cheesecake base. I pick up cartons of juicy, ripe strawberries from the Union Square Greenmarket when they’re in season — their natural sweetness and acidity cut through the richness of the cream cheese perfectly. A whisper of vanilla extract rounds out the flavor profile in a way that feels both familiar and elegant. This isn’t just a pretty face; every dome delivers a deeply satisfying strawberry experience.
Perfected Texture: The magic of these strawberry cheesecake domes lies in the balance between a light, airy filling and a stable, sliceable structure. by folding whipped cream into the cream cheese and strawberry mixture, you get a mousse-like texture that feels luxurious on the tongue. The gelatin provides just enough structure to hold the dome shape while keeping the interior creamy rather than dense. My Paris training taught me that texture is as important as flavor — and this recipe nails both.
Foolproof & Fast: I’ve designed this strawberry dessert domes recipe to be approachable even if you’ve never worked with mirror glaze before. The steps are clearly broken down, and I’ve included visual cues at every stage so you know exactly what to look for. The mirror shine cheesecake glaze itself uses a simplified method that reduces the risk of cracking or dullness. Whether you’re a confident home baker or someone trying a domed dessert for the first time, these instructions will guide you to a gorgeous result.
Scarlet Strawberry Cheesecake Domes Ingredients
Whenever I shop for these ingredients, I think about the journeys they’ve made — the strawberries from a local farm, the cream cheese from a dairy upstate, the white chocolate I discovered at a specialty shop in SoHo. Each component plays a vital role in creating these strawberry cheesecake domes, and choosing quality ingredients makes a real difference in the final flavor and shine.
Ingredients List
For the Cheesecake Domes:
- 8 oz (225 g) cream cheese, softened
- 1/2 cup granulated sugar
- 1 tsp vanilla extract
- 2 cups fresh strawberries, hulled and blended into puree
- 1 cup heavy whipping cream
- 2 tsp unflavored gelatin
- 3 tbsp cold water
For the Biscuit Base:
- 1 cup graham cracker crumbs
- 3 tbsp unsalted butter, melted
- 1 tbsp granulated sugar
For the Scarlet Mirror Glaze:
- 1 cup white chocolate, finely chopped
- 1/2 cup sweetened condensed milk
- 1/3 cup water
- 3/4 cup granulated sugar
- 1 tbsp unflavored gelatin
- 1/4 cup cold water
- Red gel food coloring, as needed
- 1 tsp edible pearl shimmer powder
For Garnish (optional):
- Fresh strawberry slices
- Dried rose petals
Ingredient Spotlight
Cream Cheese: This is the backbone of your strawberry cheesecake domes. Look for full-fat block cream cheese (not the spreadable kind in a tub) for the best texture and stability. Philadelphia is my go-to brand. The fat content ensures a rich, creamy filling that sets properly. If you need a substitute, mascarpone works beautifully but will yield a slightly softer dome — reduce the sugar by a tablespoon since mascarpone is less tangy.
White Chocolate: For the mirror shine cheesecake glaze, the quality of your white chocolate matters enormously. Choose a couverture or high-quality white chocolate with at least 30% cocoa butter — this ensures a smooth, glossy melt. Chips often contain stabilizers that can make the glaze grainy. I recommend Valrhona or Guittard. If you can’t find white chocolate, you can use high-quality white chocolate baking bars from the grocery store baking aisle.
Gelatin: Both the cheesecake filling and the mirror glaze rely on gelatin for structure and shine. Use unflavored powdered gelatin (like Knox) — it’s reliable and widely available. Bloom it in cold water for exactly 5 minutes before heating. For a vegetarian version, agar-agar can be substituted in the filling but the mirror glaze requires gelatin for that signature high-gloss finish.
Strawberries: Fresh, ripe strawberries give these strawberry dessert domes their vibrant flavor. If you’re using frozen strawberries for convenience, thaw them completely and drain the excess liquid before blending — too much water can throw off the texture of the cheesecake filling. The natural pectin in fresh strawberries also helps the filling set more firmly.
| Original Ingredient | Best Substitution | Flavor / Texture Impact |
|---|---|---|
| Cream cheese | Mascarpone | Slightly softer, less tangy, richer |
| White chocolate | High-quality white baking bar | Same shine, slightly different sweetness |
| Gelatin (filling) | Agar-agar (1 tsp + 2 tbsp water) | Firmer set, vegetarian-friendly, slightly less creamy |
| Heavy whipping cream | Full-fat coconut cream (chilled) | Dairy-free, slight coconut flavor, lighter texture |
| Graham crackers | Gluten-free graham crackers or crushed shortbread | Similar crunch, gluten-free option or buttery flavor |
How to Make Scarlet Strawberry Cheesecake Domes — Step-by-Step
I’ll guide you through every stage of creating these strawberry cheesecake domes, from the biscuit base to the final glistening finish. Work through each step with confidence — I’ve included pro tips and common mistakes to help you avoid any pitfalls.
Step 1: Make the Biscuit Base
In a small bowl, combine 1 cup graham cracker crumbs, 3 tablespoons melted unsalted butter, and 1 tablespoon granulated sugar. Stir with a fork until the mixture resembles wet sand and holds together when pressed. Spoon a small amount into each silicone dome mold and press firmly into an even layer using your fingers or the back of a small spoon. Place the molds in the refrigerator to chill while you prepare the filling.
💡 Stella’s Pro Tip: For a neater, more uniform base, use the bottom of a shot glass or a mini tart tamper to press the crumbs flat. This ensures every dome has a stable, even foundation that won’t crumble when unmolded.
Step 2: Prepare the Strawberry Cheesecake Filling
In a small bowl, sprinkle 2 teaspoons of unflavored gelatin over 3 tablespoons of cold water. Let it sit for 5 minutes to bloom. Meanwhile, in a large bowl, beat 8 ounces of softened cream cheese with 1/2 cup sugar and 1 teaspoon vanilla extract until smooth. Blend in 2 cups of strawberry puree until fully incorporated. Gently warm the bloomed gelatin in the microwave for 10-15 seconds until it becomes liquid, then stir it into the cream cheese mixture. In a separate bowl, whip 1 cup of heavy cream to soft peaks — when you lift the whisk, the cream should form a gentle curl that flops over slightly. Fold the whipped cream into the strawberry-cream cheese mixture until no streaks remain. The batter should be light, airy, and a pale pink color.
⚠️ Common Mistake to Avoid: Over-whipping the cream to stiff peaks can make the filling grainy and prone to separating. Stop at soft peaks — the cream should still be smooth and pillowy. When folding, use a gentle figure-eight motion to keep the air bubbles intact.
Step 3: Assemble and Freeze the Domes
Remove the chilled molds from the refrigerator. Spoon or pipe the strawberry cheesecake filling over the biscuit base, filling each mold to the top. Tap the molds gently on the counter to remove any air bubbles. Use an offset spatula to scrape off any excess filling, creating a flat surface. Place the filled molds in the freezer for at least 4 hours, or overnight, until the domes are completely solid. This step is crucial — the domes must be fully frozen before glazing.
💡 Stella’s Pro Tip: For the smoothest glaze application, freeze the domes for a full 24 hours if you have the time. The colder and more solid the domes, the faster the warm glaze will set, creating that perfect, even mirror shine.
Step 4: Make the Scarlet Mirror Glaze
Bloom 1 tablespoon of gelatin in 1/4 cup cold water for 5 minutes. In a small saucepan, combine 1/3 cup water and 3/4 cup sugar. Heat over medium heat, stirring until the sugar dissolves completely, then bring to a gentle simmer. Remove from heat and stir in 1/2 cup sweetened condensed milk and the bloomed gelatin until smooth. Pour this hot liquid over 1 cup of finely chopped white chocolate in a heatproof bowl. Let it sit for 1 minute, then stir gently until the chocolate is fully melted and the mixture is glossy. Add red gel food coloring a few drops at a time until you achieve a deep scarlet hue. Whisk in 1 teaspoon of edible pearl shimmer powder. Allow the glaze to cool to about 90-95°F — it should be slightly thickened but still pourable, like warm honey.
⚠️ Common Mistake to Avoid: Glaze that is too hot will melt the frozen domes and run off completely, leaving a thin, patchy coating. If the glaze is too cool, it will set in thick, uneven clumps. Use an instant-read thermometer for accuracy, or test the consistency by dripping a small amount onto a chilled plate — it should spread slightly and then stop.
Step 5: Glaze and Garnish the Domes
Remove the frozen domes from the molds and place them on a wire rack set over a baking sheet (to catch drips). Working quickly, pour the mirror glaze evenly over each dome, starting from the center and allowing it to flow down the sides. Let the excess drip off for a few seconds. If needed, use a small spoon to gently guide the glaze over any bare spots. Before the glaze sets, add garnishes — a thin slice of fresh strawberry and a sprinkle of dried rose petals. Transfer the glazed domes to a parchment-lined tray and refrigerate for at least 20 minutes to allow the glaze to fully set before serving.
💡 Stella’s Pro Tip: Hold each dome by its base with your fingertips to avoid touching the frozen surface where the glaze will go. The less you handle the dome, the cleaner the final finish. If you see your fingerprints on the dome, a quick pass with the glaze will usually cover them — just pour generously.
| Step | Action | Duration | Key Visual Cue |
|---|---|---|---|
| 1 | Make biscuit base | 10 mins | Mixture holds together when pressed |
| 2 | Prepare filling | 15 mins | Cream forms soft peaks; batter is pale pink and airy |
| 3 | Freeze domes | 4+ hrs | Domes are solid to the touch |
| 4 | Make mirror glaze | 20 mins | Glaze is glossy, smooth, and flows like warm honey |
| 5 | Glaze and garnish | 10 mins | Glaze coats evenly; domes are brilliant red with a mirror shine |
Serving & Presentation
These scarlet strawberry cheesecake domes are at their absolute best when served chilled, straight from the refrigerator, about 20-30 minutes after glazing. The contrast between the cool, creamy filling and the glossy, slightly firm glaze is pure magic. I love to plate each dome on a simple white dessert plate — the bright scarlet color pops beautifully against a neutral background. For an extra touch, drizzle a few drops of leftover strawberry puree around the plate and dot with tiny fresh mint leaves.
In my NYC kitchen, I often serve these domes after a dinner party — they make guests feel like they’re at a high-end restaurant. The dried rose petals add a subtle floral note that nods to my Moroccan roots, while the fresh strawberry slices keep the dessert grounded and bright. If you’re serving these for a special occasion like Valentine’s Day or a birthday brunch, a light dusting of edible gold leaf takes the presentation over the top.
💡 Stella’s Pro Tip: For clean, professional-looking servings, use a warm, dry knife to cut through the dome. Dip the blade in hot water, wipe it dry, and then slice — this prevents the glaze from cracking or sticking.
| Pairing Type | Suggestions | Why It Works |
|---|---|---|
| Beverage | Espresso, rosé, Moroccan mint tea | Acidity and tannins cut through the creamy sweetness |
| Side | Fresh mixed berries, shortbread cookies | Adds texture and a burst of fresh fruit flavor |
| Sauce | Raspberry coulis, dark chocolate drizzle | Elevates the color contrast and adds depth |
| Garnish | Fresh mint, edible gold leaf, crystallized rose petals | Adds elegance and a professional finishing touch |
Make-Ahead, Storage & Reheating
As a busy home cook in New York City, I rely on make-ahead desserts that don’t sacrifice quality. These strawberry cheesecake domes are perfect for prepping in advance — in fact, they almost require it. The domes can be frozen for up to a month before glazing, which makes them ideal for dinner parties and holiday gatherings. I’ll often make two batches at once: one to serve and one to keep in the freezer for unexpected guests.
| Method | Container | Duration | Reheating Tip |
|---|---|---|---|
| Refrigerator (glazed) | Airtight container, single layer | Up to 3 days | Serve cold — do not reheat |
| Freezer (unglazed) | Wrap each dome in plastic, then foil | Up to 1 month | Glaze directly from frozen — no thawing needed |
| Freezer (glazed) | Flash-freeze on tray, then wrap individually | Up to 2 weeks | Thaw in fridge 2 hours before serving |
| Make-Ahead | Freeze filling in molds up to 1 month | Glaze up to 1 day before serving | Glaze domes straight from freezer for best shine |
A word of caution from my own kitchen: once glazed, these domes are best enjoyed within 24 hours. The mirror shine can dull slightly in the refrigerator over time, and condensation may form on the surface if they’re sealed too tightly. For the best presentation, glaze the domes in the morning for an evening event, or even just an hour before serving. The leftover mirror glaze can be stored in the refrigerator for up to a week and gently reheated to 95°F for another batch.
Variations & Easy Swaps
One of the things I love most about this strawberry dessert domes recipe is how adaptable it is. Over the years, I’ve tested countless variations in my NYC kitchen — some inspired by my Moroccan heritage, others by ingredients I find at the Union Square farmers market. Here are three of my favorite ways to change things up while keeping that gorgeous mirror shine.
| Variation | Key Change | Best For | Difficulty Impact |
|---|---|---|---|
| Raspberry Rose Domes | Replace strawberry puree with raspberry + 1 tsp rose water | Elegant dinner parties, Valentine’s Day | Same difficulty |
| Gluten-Free Version | Use gluten-free graham crackers | Gluten-sensitive guests | Easier (same method) |
| Dairy-Free Domes | Use vegan cream cheese + coconut cream | Dairy-free / vegan guests | Slightly harder (texture varies) |
Raspberry Rose Domes
This variation is very close to my heart — it reminds me of the rose-scented desserts my mother would make during spring celebrations in Morocco. Simply substitute the strawberry puree with an equal amount of raspberry puree (fresh or frozen, strained to remove seeds) and add 1 teaspoon of rose water to the cheesecake filling. The raspberry pairs beautifully with the white chocolate mirror glaze, and the rose adds a delicate floral note that feels incredibly sophisticated. For the glaze, use a deep pink or magenta gel food coloring to match the raspberry theme.
Gluten-Free Version
Making these strawberry cheesecake domes gluten-free is as simple as swapping the graham cracker crumbs. Look for gluten-free graham crackers at your local grocery store — brands like Schar or Kinnikinnick work beautifully. If you can’t find them, crushed gluten-free shortbread cookies or even crushed gluten-free pretzels (for a sweet-salty twist) make excellent substitutes. The texture and crunch will be nearly identical to the original, and your gluten-sensitive guests will thank you.
Dairy-Free Domes
For a dairy-free version, I recommend using a high-quality vegan cream cheese (Miyoko’s or Violife are my favorites) and substituting the heavy cream with full-fat coconut cream that has been chilled and whipped. The texture will be slightly less dense but still creamy and luscious. Note that the mirror glaze traditionally relies on white chocolate and condensed milk, which are dairy-based — for a fully dairy-free version, you can try a coconut milk-based white chocolate alternative, though the shine may be slightly less dramatic. This variation is perfect for anyone avoiding dairy without sacrificing the spectacle of a mirror shine cheesecake recipe.
Frequently Asked Questions
What is the best way to achieve a smooth mirror glaze for strawberry cheesecake domes?
The key to a flawless mirror shine is temperature precision. Your glaze should be between 90-95°F when you pour it — warm enough to flow smoothly over the frozen dome but cool enough to set quickly without melting the surface. Use an instant-read thermometer for accuracy. Also, make sure your white chocolate is finely chopped so it melts evenly. Blend the glaze with an immersion blender if you see any tiny air bubbles, and always strain it through a fine-mesh sieve before pouring. Finally, work quickly: pour the glaze in one confident motion from the center of the dome, letting gravity and the even flow create that perfect glossy coat.
Can I use frozen strawberries for the scarlet mirror shine on these cheesecake domes?
Yes, frozen strawberries can work, but there’s an important step you shouldn’t skip. Thaw the strawberries completely in a colander set over a bowl to catch the liquid. The frozen berries release more water than fresh ones, and too much liquid can make your cheesecake filling watery and prevent it from setting properly. After thawing, gently press the berries to remove excess moisture before blending them into a puree. You may need to reduce the puree slightly on the stove to concentrate the flavor if the berries seem especially watery. The color and flavor will still be vibrant, making your strawberry dessert domes just as beautiful.
How far in advance can I make strawberry cheesecake domes before serving?
You have excellent planning instincts! The unglazed domes can be frozen for up to one month — just wrap each one tightly in plastic wrap and then foil to prevent freezer burn. The mirror glaze can be made up to a week in advance and stored in the refrigerator in an airtight container. When you’re ready to serve, reheat the glaze gently to 95°F, give it a good stir (or use an immersion blender), and pour it over the frozen domes. Once glazed, the domes are best served within 12-24 hours for the most brilliant shine. This make-ahead strategy is exactly what I use when hosting dinner parties in my NYC apartment.
What can I substitute for gelatin in the mirror glaze for a vegetarian version?
This is a common challenge, and I’ll be honest with you: the mirror glaze’s signature shine is difficult to replicate without gelatin. Agar-agar is the best vegetarian substitute, but it behaves differently. You’ll need to use about 1 teaspoon of agar-agar powder bloomed in 2 tablespoons of water, then simmered for 2-3 minutes until fully dissolved before adding to the glaze. The set will be firmer and the shine may be slightly less glass-like. For the cheesecake filling, agar-agar works more reliably — use it in the same proportion as gelatin. If you’re open to it, a gelatin-based glaze truly delivers the most spectacular mirror shine cheesecake result.
Why did my mirror glaze crack or not set properly?
Cracked or unset glaze usually comes down to one of three issues. First, temperature: if the glaze is too hot when poured, it will melt the frozen dome and slide off or form a thin, uneven layer. If it’s too cool, it will set in clumps or crack as it settles. Second, the gelatin: make sure your gelatin is fully bloomed and dissolved — undissolved gelatin particles can create weak spots that crack. Third, the domes themselves: if the domes aren’t frozen solid enough (less than 4 hours), the warm glaze will cause them to soften and slump, cracking the glaze as they shift. Freeze your domes for a full 24 hours for the most reliable results with this mirror shine cheesecake recipe.
Can I use a different fruit instead of strawberries for this recipe?
Absolutely! This strawberry cheesecake domes recipe is wonderfully versatile. Mango puree creates a tropical golden dome, raspberry puree yields a deep magenta finish, and passion fruit adds a tangy, sophisticated twist. The key is to use fruit purees that are thick and not too watery — if your fruit is very juicy, simmer the puree for 5-10 minutes to concentrate it before adding to the cheesecake batter. For the mirror glaze, adjust the food coloring to match your fruit choice. Each variation brings its own personality while maintaining that stunning mirror shine that makes these domes so special.
How do I get the mirror glaze to be perfectly red and shiny?
For that brilliant scarlet color, use gel food coloring rather than liquid — gel is more concentrated and won’t thin out your glaze. Start with a few drops and add gradually until you reach the desired shade. The edible pearl shimmer powder is the secret to the mirror effect: it reflects light and gives the glaze that deep, luminous quality. Make sure to whisk it in thoroughly so there are no streaks. Also, the temperature of the glaze at pouring time affects the shine — a glaze that’s at exactly 92°F will flow into a smooth, glass-like surface. Finally, a quick pass with a kitchen torch after pouring can pop any surface bubbles and enhance the mirror finish.
Do I need special silicone dome molds for this recipe?
Yes, silicone dome molds are essential for achieving the classic dome shape. They’re widely available online or at baking supply stores — look for half-sphere molds that are about 2.5 to 3 inches in diameter for individual servings. The flexibility of silicone makes it easy to release the frozen domes without damaging them. If you don’t have dome molds, you can use a muffin tin lined with plastic wrap (pressing the wrap into each cup), but the shape will be less rounded. For a truly professional-looking strawberry dessert domes presentation, investing in silicone dome molds is absolutely worth it — I use mine constantly in my NYC kitchen.
Can I make this recipe without a thermometer?
You can, but I strongly recommend using one for the mirror glaze — temperature precision is what separates a good mirror shine from a spectacular one. If you don’t have a thermometer, test the glaze by dipping a clean finger into it: it should feel warm but not hot, like warm bath water (around body temperature). Another test is to drizzle a small amount onto a chilled plate from the refrigerator — the glaze should spread slightly and then stop moving within 10 seconds. If it runs too fast, it’s too hot; if it barely moves, it’s too cool. These visual cues work, but a simple instant-read thermometer removes all the guesswork from this mirror shine cheesecake recipe.
How do I store leftover mirror glaze?
Leftover mirror glaze can be stored in an airtight container in the refrigerator for up to one week. When you’re ready to use it again, bring it to room temperature by letting it sit on the counter for about 30 minutes, then gently reheat it in the microwave at 50% power in 10-second bursts, stirring between each, until it reaches 90-95°F. If the glaze seems too thick after reheating, whisk in a teaspoon of warm water at a time until it flows like warm honey. A quick blend with an immersion blender will restore its smooth, glossy texture. This is perfect for making extra glaze to practice your technique or to have on hand for impromptu dessert emergencies — I always keep some in my fridge.
Share Your Version!
I would absolutely love to see how your scarlet strawberry cheesecake domes turn out! Drop a star rating and a comment below to let me know how it went — did the mirror shine come out as glossy as you hoped? What variation did you try? Your feedback helps other home bakers feel confident trying this recipe, and I read every single comment. If you made a substitution or discovered a tip of your own, please share it with our community.
Snap a photo of your domes and tag me on Instagram or Pinterest @leosfoods — I feature my favorite reader creations in stories and on my blog. And if you have a question about any step in this strawberry cheesecake domes recipe, just ask in the comments. I’m here to help you get that perfect mirror shine every time. From my NYC kitchen to yours — I hope this recipe brings as much warmth to your table as it does to mine. — Stella 🧡
Love This Recipe? Save It to Pinterest!
If you enjoyed this Scarlet Strawberry Cheesecake Domes with Mirror Shine recipe, don’t let it get lost in your browser tabs! 😄 Pin it now so you can find it again anytime — and explore hundreds more tried-and-tested recipes waiting for you on my Pinterest boards.
👉 Follow Stella on Pinterest @stellarecipeblog
📌 Pin this recipe · 🔁 Re-pin your favorites · 💬 Tag me when you make it — I love seeing your creations!
🎯 Ready to impress? 👩🍳
Pin this recipe, share it with a friend who loves dessert, or drop a comment below to tell me your favorite mirror glaze tip. Let’s keep making beautiful food together!
⬇️ Scroll down to leave a star rating and review — I can’t wait to hear about your domes!

Scarlet Strawberry Cheesecake Domes with Mirror Shine
- Yield: 8 1x
Ingredients
- For the Cheesecake Domes:
- 8 oz (225 g) cream cheese, softened
- 1/2 cup granulated sugar
- 1 tsp vanilla extract
- 2 cups fresh strawberries, hulled and blended into puree
- 1 cup heavy whipping cream
- 2 tsp unflavored gelatin
- 3 tbsp cold water
- For the Biscuit Base:
- 1 cup graham cracker crumbs
- 3 tbsp unsalted butter, melted
- 1 tbsp granulated sugar
- For the Scarlet Mirror Glaze:
- 1 cup white chocolate, finely chopped
- 1/2 cup sweetened condensed milk
- 1/3 cup water
- 3/4 cup granulated sugar
- 1 tbsp unflavored gelatin
- 1/4 cup cold water
- Red gel food coloring, as needed
- 1 tsp edible pearl shimmer powder
- For Garnish (optional):
- Fresh strawberry slices
- Dried rose petals
Instructions
- 1. Combine graham cracker crumbs, melted butter, and sugar in a bowl.
- 2. Press into silicone dome molds to form a thin base layer and chill.
- 3. Bloom gelatin in cold water for 5 minutes.
- 4. Blend cream cheese, sugar, vanilla extract, and strawberry puree until smooth.
- 5. Melt bloomed gelatin and mix into the strawberry cheesecake mixture.
- 6. Whip heavy cream to soft peaks and fold into the mixture until light and airy.
- 7. Fill molds over the biscuit base and freeze for at least 4 hours until fully set.
- 8. Bloom gelatin for the glaze in cold water and set aside.
- 9. Heat water and sugar until fully dissolved, then remove from heat.
- 10. Stir in condensed milk and bloomed gelatin until smooth.
- 11. Pour over white chocolate and blend until glossy and fully combined.
- 12. Add red gel food coloring and pearl shimmer powder to achieve a scarlet mirror finish.
- 13. Cool glaze until slightly thick but still pourable.
- 14. Remove frozen domes and place on a wire rack.
- 15. Pour mirror glaze evenly over each dome.
- 16. Garnish with strawberry slices and dried rose petals.
- 17. Refrigerate for 20 minutes before serving.
Nutrition
- Calories: 390
- Sugar: 28 g
- Fat: 27 g
- Carbohydrates: 33 g
- Protein: 6 g
Tried This Recipe? Leave a Comment!
Did you make this recipe? I’d love to hear how it turned out! Please leave a comment and a rating below. Your feedback helps other home cooks and supports cheerychop.com!
For more delicious inspiration, follow me on Pinterest!