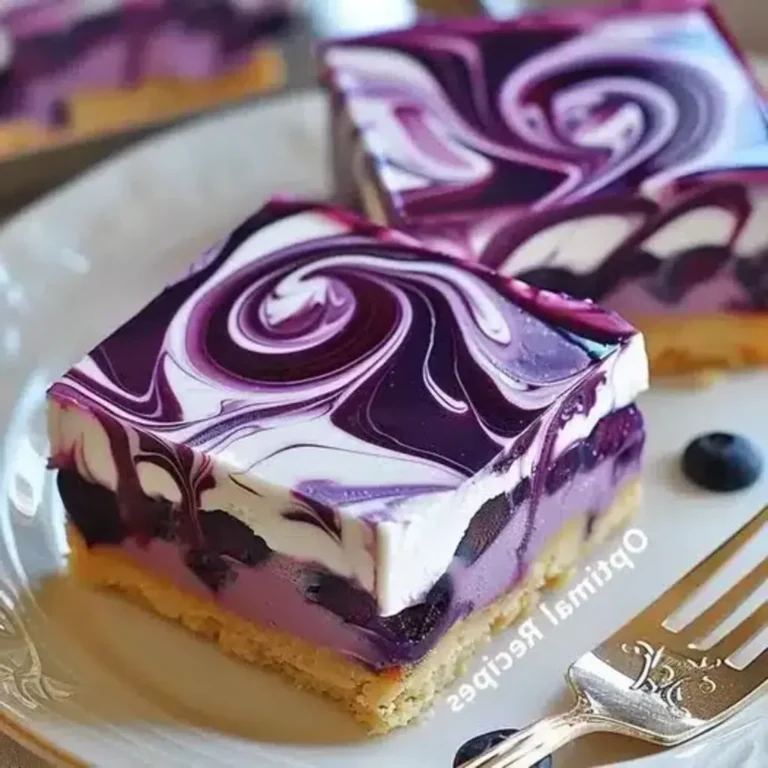
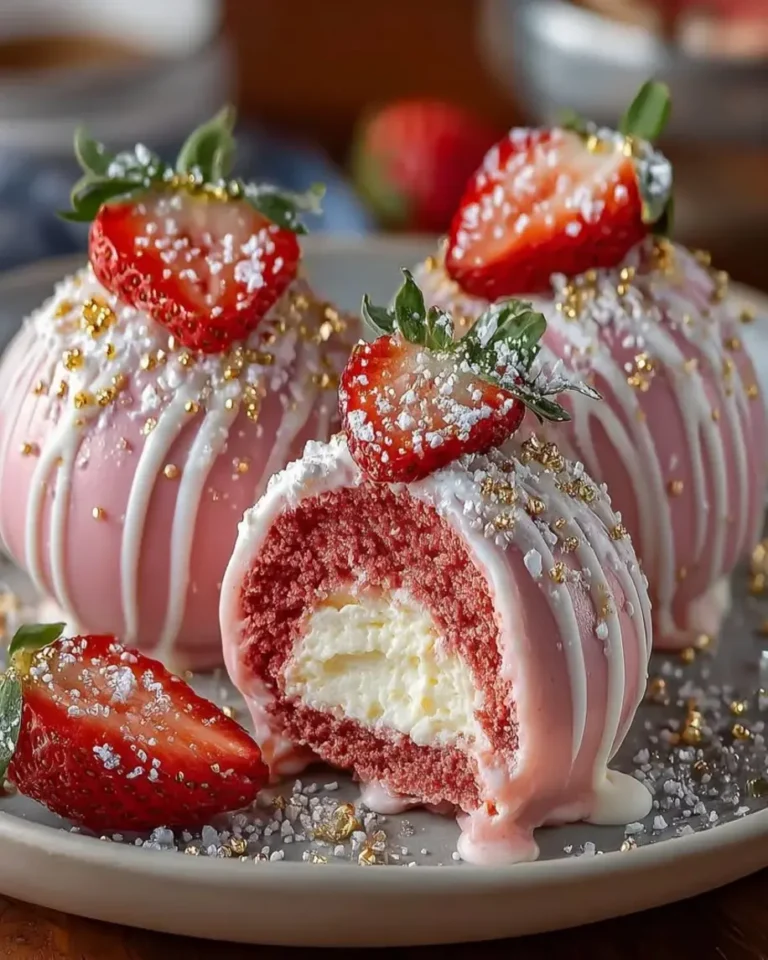
Strawberry Lemon Velvet Bombs with Crystal Mirror Finish

Table of Contents
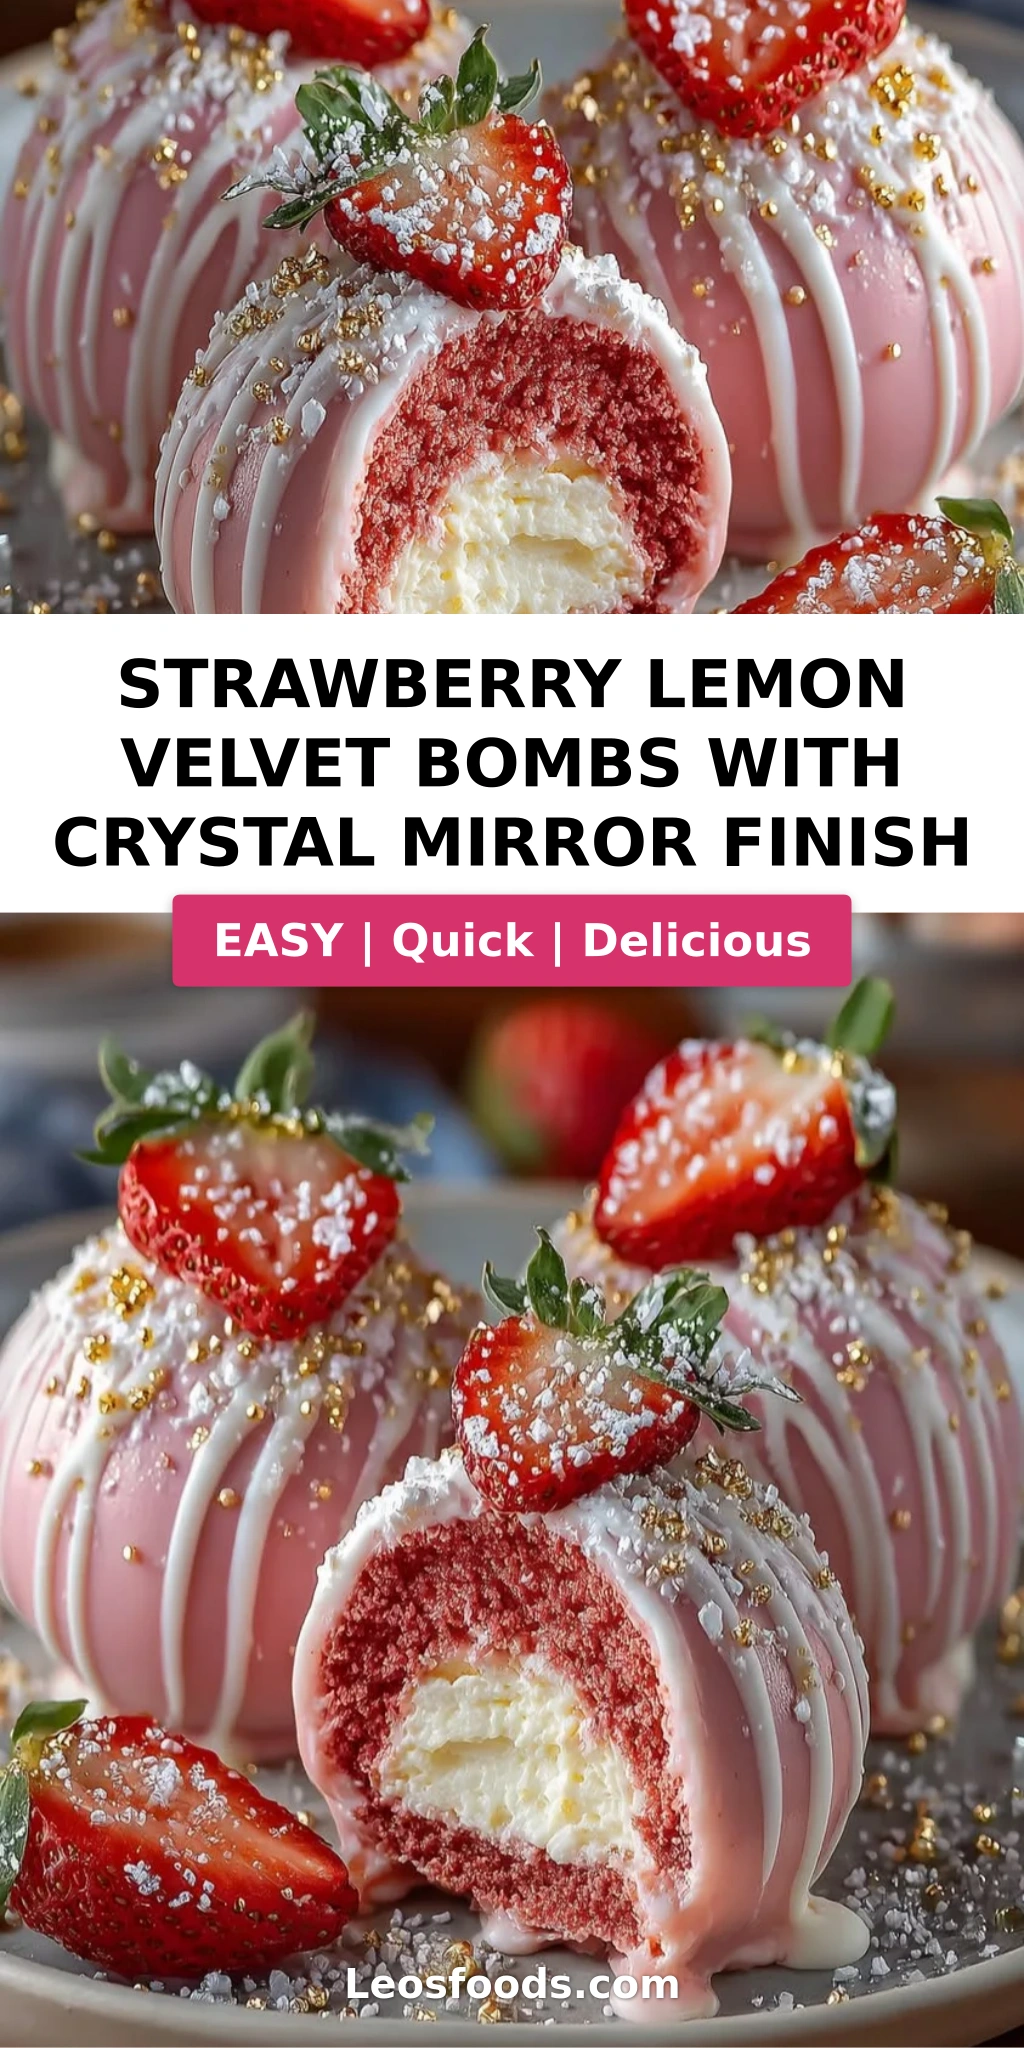
Strawberry Lemon Velvet Bombs with Crystal Mirror Finish – A Showstopping Dessert
When I first moved from my mother’s kitchen in Marrakech to train at Le Cordon Bleu in Paris, I never imagined I’d one day be standing in my own NYC kitchen, pouring a shimmering crystal mirror glaze over a frozen strawberry lemon velvet bomb. But here I am — and this recipe for Strawberry Lemon Velvet Bombs with Crystal Mirror Finish is everything I love about dessert: bright, bold, and beautiful. The combination of a creamy strawberry lemon velvet shell with a hidden lemon cream center, all encased in a glossy mirror finish, is the kind of dessert that stops dinner party conversation cold. And I promise, you can absolutely do this at home.
Let me paint you a picture: the first bite cracks through that glassy, jewel-toned mirror glaze to reveal a luscious, mousse-like strawberry lemon velvet that melts on your tongue. Then you hit the center — a silky, tangy lemon cream that cuts right through the sweetness. The aroma is pure summer: ripe strawberries, fresh lemon zest, and a whisper of vanilla. The texture is a study in contrasts — a firm, glossy shell, an airy yet rich velvet, and a creamy heart. It’s a dessert that feels like a tiny piece of edible art, inspired by the pastry cases of Paris but made with the bold, sunny flavors I grew up with in Morocco.
I’ve tested this recipe more times than I can count to make sure it’s achievable for home cooks who want to try something spectacular. The secret? It’s all about temperature — ensuring your bombs are fully frozen before that mirror glaze goes on is the single most important step. In this post, I’ll walk you through every detail, from blooming gelatin to achieving that flawless, shiny finish. I’ll also share one common mistake that can turn your mirror glaze cloudy — and how to avoid it. So grab your silicone dome molds and let’s make some magic.
Why This Strawberry Lemon Velvet Bombs Recipe Is the Best
The Flavor Secret. Most strawberry lemon desserts lean too sweet or too tart — they miss that perfect middle ground. I learned balance in my mother’s kitchen in Morocco, where we’d use fresh lemon juice and zest to brighten fruit-based sweets. Here, I combine strawberry puree with cream cheese and a touch of heavy cream to create a velvet that’s rich but not heavy, while the lemon center delivers a punch of citrus that makes every bite sing. The clear edible shimmer dust in the mirror finish adds a subtle, sparkling elegance without any artificial taste.
Perfected Texture. Achieving that cloud-like velvet texture requires a gentle hand. I use the French technique of folding whipped cream into the cream cheese mixture — not stirring, which would deflate all that air. The gelatin in the strawberry base provides just enough structure to hold the dome shape, while the lemon cream center stays luscious and soft. The mirror finish, made with white chocolate and condensed milk, sets to a delicate, crackable shell that shatters beautifully when you cut into it.
Foolproof & Fast (for what it is). Yes, this recipe has several steps — but I’ve broken them down into clear, manageable stages. The active prep time is about 45 minutes; the rest is freezer time. And the mirror glaze is actually one of the easiest parts once you get the hang of it. I’ve included my exact temperatures and visual cues so you know exactly what to look for at every stage. Whether you’re a confident home baker or someone trying their first mirror glaze, I promise you can pull this off.
Strawberry Lemon Velvet Bombs with Crystal Mirror Finish Ingredients
Every time I walk through the Union Square Greenmarket in NYC and see those first pints of local strawberries arrive, I know it’s time to make these velvet bombs. There’s something about the way the bright citrus notes from the lemon play off the sweet, sun-ripe berries that reminds me of the fruit markets in Casablanca. For this recipe, source the best strawberries you can find — it makes a real difference. Here’s everything you’ll need.
Ingredients List
- For the Strawberry Lemon Velvet Bombs:
- 1 cup fresh strawberries, pureed
- 8 oz cream cheese, softened
- 1 cup heavy cream
- 1/3 cup powdered sugar
- 2 tbsp fresh lemon juice
- 1 tbsp lemon zest
- 1 tsp vanilla extract
- 2 tsp unflavored gelatin
- 2 tbsp cold water
- For the Lemon Cream Center:
- 1/2 cup lemon curd
- 2 tbsp cream cheese, softened
- 1 tbsp heavy cream
- For the Crystal Mirror Finish:
- 1 cup white chocolate, finely chopped
- 1/2 cup sweetened condensed milk
- 2 tsp unflavored gelatin
- 2 tbsp cold water
- 1/4 cup warm water
- 1 tsp clear edible shimmer dust
- For Garnish (optional):
- Fresh strawberry slices
- Thin lemon zest curls
Ingredient Spotlight
Fresh Strawberries. The star of the velvet shell. Look for berries that are deep red, fragrant, and fully ripe — that’s where the sweetness and color come from. Frozen strawberries can work in a pinch, but thaw them completely and drain any excess liquid before pureeing, or the mixture will be too thin. One pint yields about 1 cup of puree.
Cream Cheese. This gives the velvet its luscious body and a slight tang that balances the sweetness. Use full-fat, brick-style cream cheese (not the spreadable kind in a tub) for the firmest texture. Let it come to room temperature before mixing — cold cream cheese will leave lumps you can’t get rid of.
White Chocolate. The foundation of the crystal mirror finish. Use a high-quality white chocolate bar (like Callebaut or Ghirardelli) — not white chocolate chips, which often contain stabilizers that prevent smooth melting. Finely chop the chocolate so it melts evenly when you pour the hot gelatin mixture over it.
Clear Edible Shimmer Dust. This is the magic ingredient that gives the mirror finish its sparkling, jewel-like effect. Look for “clear” or “pearl” shimmer dust at a baking supply store or online. It’s flavorless and dissolves completely into the glaze. A little goes a long way — 1 teaspoon is perfect for this batch.
| Original Ingredient | Best Substitution | Flavor / Texture Impact |
|---|---|---|
| Fresh strawberries | Frozen strawberries (thawed & drained) | Slightly less vibrant color; texture may be slightly thinner |
| Cream cheese (full-fat) | Mascarpone | Richer, even creamier; less tang |
| White chocolate (chopped bar) | White chocolate couverture | Smoother, glossier mirror finish |
| Clear edible shimmer dust | Pearl luster dust (edible) | Similar sparkle; may have a slightly warmer sheen |
| Lemon curd (for center) | Lemon curd + 1 tsp lemon zest | More intense lemon flavor |
How to Make Strawberry Lemon Velvet Bombs — Step-by-Step
I’ve organized these steps so you can work through them without stress. The key is to give yourself enough freezer time — at least 5 hours — so the bombs are completely solid before you pour the mirror glaze. Trust me, that patience pays off.
Step 1: Bloom the Gelatin
In a small bowl, combine 2 teaspoons of unflavored gelatin with 2 tablespoons of cold water. Stir gently and let it sit for 5 minutes until the gelatin absorbs the water and becomes a firm, jiggly mass. This is called blooming, and it’s essential for ensuring the gelatin dissolves evenly later.
💡 Stella’s Pro Tip: Always use cold water for blooming — hot water will make the gelatin clump and won’t give you that smooth texture you need for the velvet base.
Step 2: Make the Strawberry Velvet Base
In a large bowl, beat 8 oz of softened cream cheese with 1/3 cup powdered sugar, 2 tablespoons fresh lemon juice, 1 tablespoon lemon zest, and 1 teaspoon vanilla extract until smooth and fluffy — about 2 minutes with a hand mixer. In a separate small saucepan or microwave-safe bowl, gently warm the bloomed gelatin until it’s liquid (about 10 seconds in the microwave), then stir it into 1 cup of strawberry puree. Mix that strawberry-gelatin mixture into the cream cheese mixture until fully combined.
⚠️ Common Mistake to Avoid: Don’t add the gelatin directly to the cream cheese mixture without mixing it with the strawberry puree first. The gelatin needs the acidity and liquid of the puree to distribute evenly.
Step 3: Whip and Fold the Cream
In a chilled bowl, whip 1 cup of heavy cream to soft peaks — when you lift the whisk, the cream should hold a soft, droopy peak that doesn’t collapse. Gently fold the whipped cream into the strawberry-cream cheese mixture using a rubber spatula. Fold in a J-shape motion, rotating the bowl, until no white streaks remain.
💡 Stella’s Pro Tip: For the lightest velvet texture, fold by hand — don’t use the mixer for this step. Over-mixing will deflate the cream and make the bombs dense instead of airy.
Step 4: Make the Lemon Cream Center
In a small bowl, stir together 1/2 cup lemon curd, 2 tablespoons softened cream cheese, and 1 tablespoon heavy cream until smooth and uniform. The mixture should be thick but spoonable. Set aside at room temperature while you prepare the molds.
⚠️ Common Mistake to Avoid: Don’t use cold cream cheese for the center — it won’t blend smoothly with the lemon curd and you’ll end up with tiny lumps.
Step 5: Fill the Molds
Spoon the strawberry velvet mixture into silicone dome molds, filling each one about halfway. Use a small spoon or your finger to create a slight well in the center of each. Drop a spoonful (about 1 tablespoon) of the lemon cream center into the well, then cover with more strawberry velvet mixture until the mold is full. Smooth the tops with an offset spatula so they’re flush with the rim of the mold.
💡 Stella’s Pro Tip: Silicone dome molds are non-negotiable here — they release the frozen bombs cleanly and give you that perfect half-sphere shape. I get mine at a NYC baking supply shop or online. Spray them very lightly with neutral oil if you’re worried about sticking, though good silicone usually releases easily.
Step 6: Freeze Solid
Place the filled molds on a baking sheet and transfer to the freezer. Freeze for at least 5 hours, or overnight. The bombs must be completely frozen — like ice cubes — before you unmold them and add the mirror glaze. If they’re still soft in the center, the glaze will warm them and cause cracking.
⚠️ Common Mistake to Avoid: Rushing the freezer time is the #1 reason mirror glazes fail. If you can press your finger into the top and leave an indent, they’re not ready. Wait the full 5 hours.
Step 7: Make the Crystal Mirror Glaze
Bloom another 2 teaspoons of gelatin in 2 tablespoons of cold water for 5 minutes. In a small saucepan, combine 1/2 cup sweetened condensed milk and 1/4 cup warm water. Heat over medium-low, stirring constantly, until just simmering — don’t boil. Remove from heat and stir in the bloomed gelatin until completely dissolved. Pour this hot mixture over 1 cup of finely chopped white chocolate in a heatproof bowl. Let sit for 1 minute, then stir slowly in one direction until the chocolate is fully melted and the mixture is smooth and glossy. Stir in 1 teaspoon of clear edible shimmer dust until evenly distributed. Let the glaze cool to about 90°F — it should feel warm but not hot to the touch.
💡 Stella’s Pro Tip: Test the glaze consistency by dipping a spoon — it should coat the back of the spoon and drip off in a smooth, continuous sheet. If it’s too thick, add warm water 1 teaspoon at a time. If it’s too thin, let it cool a bit more to thicken.
Step 8: Unmold and Glaze
Remove the frozen bombs from the freezer. Gently flex the silicone molds to release each bomb — they should pop out easily. Place the frozen bombs on a wire rack set over a baking sheet (to catch drips). Pour the crystal mirror glaze over each bomb, starting at the top and letting it flow evenly down the sides. Work quickly, as the glaze will thicken as it cools on the frozen surface.
⚠️ Common Mistake to Avoid: Don’t pour the glaze over room-temperature bombs! The contrast between the frozen bomb and the warm glaze is what creates that perfect, smooth, glossy finish. If the bomb is too warm, the glaze will slide off or form a dull, matte surface.
Step 9: Garnish and Serve
Immediately after glazing, garnish with fresh strawberry slices and thin lemon zest curls while the glaze is still tacky — they’ll stick as it sets. Transfer the glazed bombs to a serving plate or individual dessert dishes. Serve immediately while still chilled, or refrigerate for up to 2 hours before serving. The mirror glaze will remain shiny and smooth.
💡 Stella’s Pro Tip: If you’re garnishing with lemon zest curls, use a citrus zester or a channel knife to create thin, elegant spirals. A vegetable peeler also works — just cut thin strips and curl them around your finger.
| Step | Action | Duration | Key Visual Cue |
|---|---|---|---|
| 1 | Bloom gelatin for velvet base | 5 mins | Gelatin becomes firm, jiggly mass |
| 2 | Make strawberry velvet base | 5 mins | Smooth, pink, no lumps |
| 3 | Whip cream & fold | 5 mins | Soft peaks, uniform color |
| 4 | Make lemon cream center | 3 mins | Smooth, thick, pale yellow |
| 5 | Fill molds with layers | 15 mins | Molds filled, tops smooth |
| 6 | Freeze | 5+ hours | Rock solid, no give when pressed |
| 7 | Make mirror glaze | 15 mins | Glossy, smooth, coats spoon |
| 8 | Unmold & pour glaze | 10 mins | Even coating, shiny finish |
| 9 | Garnish & serve | 5 mins | Glaze set, garnishes attached |
Serving & Presentation
These Strawberry Lemon Velvet Bombs are meant to be the centerpiece of any dessert table. I love serving them on a simple white platter — the glossy, jewel-toned mirror finish pops beautifully against a neutral background. Place each bomb on a small dessert plate with a few fresh strawberry slices and a delicate curl of lemon zest on the side. For an extra touch of elegance, drizzle a little extra lemon curd around the base of each bomb or dust the plate with a pinch of freeze-dried strawberry powder.
When I serve these at my NYC dinner parties, I always get asked “How did you make that shiny shell?” The mirror finish is a conversation starter, and the surprise lemon cream center delights everyone. Pair these bombs with a light dessert wine like a Moscato d’Asti or a sparkling lemonade for a non-alcoholic option. In the summer, I sometimes serve them alongside a small scoop of vanilla bean ice cream or a dollop of lightly sweetened crème fraîche to balance the sweetness.
For a truly Moroccan-French fusion presentation, arrange the bombs on a tray with fresh mint sprigs and a dusting of powdered sugar — it’s how my mother would have served a special dessert at our family table, but with the polished finish I learned in Paris.
| Pairing Type | Suggestions | Why It Works |
|---|---|---|
| Side Dessert | Vanilla bean ice cream, coconut sorbet, fresh berries | Creamy or fruity accents complement the velvet texture |
| Sauce / Dip | Extra lemon curd, raspberry coulis, caramel sauce | Adds brightness or richness to each bite |
| Beverage | Moscato d’Asti, sparkling lemonade, iced herbal tea | Light bubbles or citrus notes cut through the richness |
| Garnish | Fresh mint, edible flowers, powdered sugar, strawberry slices | Adds color, freshness, and visual appeal |
Make-Ahead, Storage & Reheating
One of the best things about this recipe is how well it fits into a busy schedule. I often make the velvet bombs and freeze them unglazed on a Sunday, then apply the mirror finish the day I plan to serve them. Here’s how to store everything to keep that crystal mirror finish looking perfect.
| Method | Container | Duration | Reheating Tip |
|---|---|---|---|
| Refrigerator (glazed) | Airtight container, single layer | Up to 2 days | Serve chilled directly from fridge |
| Freezer (unglazed) | Airtight container, layered with parchment | Up to 1 month | Glaze directly from frozen — do not thaw first |
| Make-Ahead (unglazed) | Silicone molds, covered with plastic wrap | Up to 5 days in advance | Unmold, glaze, and serve on the day |
When storing glazed bombs in the refrigerator, place them in a single layer in an airtight container lined with paper towels to absorb any condensation. Avoid stacking them, as the mirror finish can stick to the lid or other bombs. If you’re making the bombs ahead unglazed, keep them in the silicone molds in the freezer, then unmold and glaze straight from the freezer — no thawing needed. The mirror glaze should be applied while the bombs are fully frozen for that perfect glossy set.
As for reheating — these are meant to be served chilled, so no reheating required! If your bombs have been in the fridge for a while and seem a bit firm, let them sit at room temperature for 5–10 minutes before serving to take the chill off. The velvet will soften slightly while the mirror finish stays beautifully firm.
Variations & Easy Swaps
Once you’ve mastered the base recipe, there’s a whole world of flavor variations to explore. I’ve tested all of these in my NYC kitchen, and each one brings something unique to the table. Here are my favorites.
| Variation | Key Change | Best For | Difficulty Impact |
|---|---|---|---|
| Raspberry Rose Velvet | Replace strawberry with raspberry puree, add 1 tsp rose water | Romantic occasions, Valentine’s Day | Same — easy swap |
| Dairy-Free Velvet Bombs | Use dairy-free cream cheese, coconut cream, and dairy-free white chocolate | Lactose-intolerant, vegan-option | Slightly harder — texture may differ |
| Mango Passion Fruit | Replace strawberry with mango puree, lemon with passion fruit juice | Tropical-themed parties, summer | Same — easy swap |
Raspberry Rose Velvet
This variation is inspired by the rose-scented pastries I fell in love with at Parisian patisseries. Simply substitute 1 cup of raspberry puree (strained to remove seeds) for the strawberry puree, and add 1 teaspoon of rose water to the cream cheese mixture. The floral notes of rose pair beautifully with the tart raspberry and the lemon cream center. Garnish with fresh raspberries and a few edible rose petals for an extra romantic presentation.
Dairy-Free Velvet Bombs
For a dairy-free version, use a plant-based cream cheese (like Kite Hill or Miyoko’s) and full-fat coconut cream in place of the heavy cream. The texture will be slightly less airy but still deliciously creamy. For the mirror finish, look for a dairy-free white chocolate — Pascha makes a great one. The gelatin keeps the structure intact, so the bombs hold their shape well. I’ve served this version to dairy-free friends at my NYC dinner parties and they were thrilled.
Mango Passion Fruit
This tropical twist is a nod to the vibrant fruit markets I visited during a trip to Morocco’s coast. Swap the strawberry puree for 1 cup of mango puree (from ripe, fresh mangoes) and replace the lemon juice and zest in the velvet base with passion fruit juice (about 3 tablespoons). The lemon cream center stays the same — the citrus notes marry beautifully with the mango. Garnish with thin slices of fresh mango and a sprinkle of toasted coconut flakes.
What is a crystal mirror finish and how do you achieve it for strawberry lemon velvet bombs?
A crystal mirror finish is a glossy, reflective glaze made from white chocolate, sweetened condensed milk, and gelatin, often enhanced with edible shimmer dust for a sparkling effect. To achieve it for these strawberry lemon velvet bombs, you bloom gelatin in cold water, then heat it with condensed milk and warm water. You pour this hot mixture over finely chopped white chocolate and stir until smooth and glossy. The key is to let the glaze cool to about 90°F before pouring it over fully frozen bombs — the temperature contrast creates that perfect glassy, crackable shell. The shimmer dust adds a subtle, jewel-like sparkle that makes the finish truly “crystal.”
Can I use fresh strawberries instead of freeze-dried in strawberry lemon velvet bombs?
Absolutely — this recipe actually calls for fresh strawberries, not freeze-dried. You’ll puree 1 cup of fresh, ripe strawberries to use in the velvet base. I recommend buying berries that are deep red and fragrant for the best color and flavor. If fresh strawberries aren’t in season, you can use frozen strawberries that have been thawed and drained well — just make sure to discard any excess liquid, or the mixture may become too thin. Freeze-dried strawberries would not work well here because they lack the moisture needed to create the creamy velvet texture.
How long do strawberry lemon velvet bombs need to set before serving?
The velvet bombs need to freeze for at least 5 hours — or overnight — before you unmold them and apply the crystal mirror finish. This ensures they’re completely solid, which is essential for the glaze to set properly. After glazing, you can serve them immediately while still chilled, or refrigerate them for up to 2 hours before serving. If you’re making them ahead, you can freeze the unglazed bombs for up to a month, then apply the glaze and serve on the same day. Just remember: always pour the mirror glaze over frozen bombs, never thawed ones.
What is the best way to store strawberry lemon velvet bombs with a mirror glaze?
Once glazed, store strawberry lemon velvet bombs in an airtight container in the refrigerator for up to 2 days. Place them in a single layer lined with paper towels to absorb any condensation — moisture can dull the mirror finish. Avoid stacking them, as the glaze may stick. If you haven’t glazed them yet, keep the unglazed bombs frozen in their silicone molds, then unmold and glaze straight from the freezer. This method keeps them fresh for up to a month. Never freeze bombs after they’ve been glazed, as the condensation upon thawing will ruin the shiny finish.
Can I make strawberry lemon velvet bombs without gelatin?
Gelatin is crucial for two parts of this recipe: it gives the strawberry velvet base enough structure to hold its dome shape, and it’s essential for the crystal mirror finish to set properly. If you need a vegetarian alternative, you can try using agar-agar powder, but the texture and setting behavior will be different. For the velvet base, use 2 teaspoons of agar-agar powder dissolved in 2 tablespoons of water, then bring to a boil and simmer for 2 minutes before mixing into the strawberry puree. For the mirror glaze, the agar-agar will create a firmer, less flexible set, so the finish may be slightly less glossy.
Why did my mirror glaze turn cloudy or dull?
A cloudy or dull mirror glaze is usually caused by one of three things. First, the bombs may not have been frozen solid enough — if they’re even slightly soft, the glaze will warm them and lose its shine. Second, the glaze may have been too hot or too cold when poured; it should be around 90°F, warm but not hot. Third, condensation can form if you store glazed bombs in a humid environment or cover them too tightly before the glaze is fully set. To fix a dull glaze, you can try warming a very thin layer of fresh glaze and pouring it over the bomb again, though this is tricky. Best to get it right the first time by keeping everything cold and the glaze at the right temperature.
Can I use lemon juice from a bottle instead of fresh lemons?
I strongly recommend using fresh lemons for this recipe — both the juice and the zest. Bottled lemon juice often contains preservatives and lacks the bright, clean acidity of fresh-squeezed juice. The zest is especially important because it contains the fragrant citrus oils that give the velvet and the lemon cream center their vibrant flavor. If you’re in a pinch, bottled juice will technically work, but you’ll lose that fresh, sunshiny taste that makes these bombs so special. One medium lemon yields about 2 tablespoons of juice and 1 tablespoon of zest — perfect for this recipe.
What type of white chocolate works best for the mirror finish?
For the best crystal mirror finish, use a high-quality white chocolate bar that you chop yourself — look for brands like Callebaut, Ghirardelli, or Valrhona. Avoid white chocolate chips, which often contain stabilizers and emulsifiers that can make the glaze grainy or prevent it from melting smoothly. The chocolate should contain cocoa butter (not vegetable oils) for the glossiest, most fluid glaze. Finely chop the chocolate so it melts evenly when you pour the hot gelatin-condensed milk mixture over it. If you’re dairy-free, look for a premium dairy-free white chocolate bar — Pascha makes a good one that melts beautifully.
Can I use a different fruit instead of strawberry for the velvet base?
Absolutely — this velvet base is very adaptable. You can substitute the strawberry puree with an equal amount of pureed raspberry, mango, peach, or even blackberry. Keep in mind that the sugar content of different fruits varies, so you may need to adjust the powdered sugar slightly. For very tart fruits like raspberry, you might want to add an extra tablespoon of sugar. The lemon in the recipe pairs well with most fruits, but for a tropical variation like mango, you could swap the lemon juice for lime juice. The technique remains exactly the same — just replace the strawberry puree with your fruit of choice.
How do I get the mirror glaze to stick evenly to the frozen bomb?
Getting an even coating comes down to three things: the temperature of the glaze, the temperature of the bomb, and your pouring technique. First, make sure the bomb is fully frozen — like an ice cube. Second, the glaze should be around 90°F, warm but not hot. Test it by dipping a spoon: it should coat the back and drip in a smooth sheet. Third, pour the glaze in a steady stream over the top center of the bomb, letting it flow naturally down the sides. Don’t try to spread it with a spoon — let gravity do the work. If the glaze pools at the bottom, it’s too thick; if it runs off completely, it’s too thin. A trial run on a test bomb helps you dial it in.
Share Your Version!
I absolutely love hearing how these Strawberry Lemon Velvet Bombs with Crystal Mirror Finish turn out in your kitchen! Did the mirror glaze come out perfectly glossy? Did you try one of the variations — or invent your own? Leave a star rating and a comment below — your feedback helps other readers know what works, and it truly makes my day to see your results. If you’re on Instagram or Pinterest, snap a photo and tag @leosfoods so I can cheer you on and share your creation with our community.
And here’s a question for you: which flavor combination are you most excited to try for the filling — the classic lemon cream, or something bolder like mango-passion fruit or raspberry-rose? Drop your answer in the comments — I read every single one and I’d love to know what you’re dreaming up!
From my NYC kitchen to yours — I hope this recipe brings as much warmth to your table as it does to mine. — Stella 🧡
Love This Recipe? Save It to Pinterest!
If you enjoyed this Strawberry Lemon Velvet Bombs with Crystal Mirror Finish recipe, don’t let it get lost in your browser tabs! 😄 Pin it now so you can find it again anytime — and explore hundreds more tried-and-tested recipes waiting for you on my Pinterest boards.
👉 Follow Stella on Pinterest @stellarecipeblog
📌 Pin this recipe · 🔁 Re-pin your favorites · 💬 Tag me when you make it — I love seeing your creations!
Strawberry Lemon Velvet Bombs with Crystal Mirror Finish
A decadent dessert featuring a creamy strawberry lemon velvet shell with a luscious lemon cream center, all coated in a glossy crystal mirror finish.
- Yield: 8 1x
Ingredients
- For the Strawberry Lemon Velvet Bombs:
- 1 cup fresh strawberries, pureed
- 8 oz cream cheese, softened
- 1 cup heavy cream
- 1/3 cup powdered sugar
- 2 tbsp fresh lemon juice
- 1 tbsp lemon zest
- 1 tsp vanilla extract
- 2 tsp unflavored gelatin
- 2 tbsp cold water
- For the Lemon Cream Center:
- 1/2 cup lemon curd
- 2 tbsp cream cheese, softened
- 1 tbsp heavy cream
- For the Crystal Mirror Finish:
- 1 cup white chocolate, finely chopped
- 1/2 cup sweetened condensed milk
- 2 tsp unflavored gelatin
- 2 tbsp cold water
- 1/4 cup warm water
- 1 tsp clear edible shimmer dust
- For Garnish (optional):
- Fresh strawberry slices
- Thin lemon zest curls
Instructions
- Mix gelatin and cold water in a small bowl and let bloom for 5 minutes.
- Beat cream cheese, powdered sugar, lemon juice, lemon zest, and vanilla until smooth.
- Melt the bloomed gelatin and stir into the strawberry puree.
- Mix the strawberry puree into the cream cheese mixture until combined.
- Whip heavy cream to soft peaks and gently fold into the mixture.
- Stir together lemon curd, cream cheese, and heavy cream until smooth.
- Fill silicone dome molds halfway with the strawberry mixture.
- Add a spoonful of lemon cream center to each mold.
- Cover with the remaining strawberry mixture and smooth the tops.
- Freeze for at least 5 hours or until completely firm.
- Bloom gelatin for the mirror finish.
- Heat condensed milk and warm water, then stir in gelatin until dissolved.
- Pour over white chocolate and mix until smooth and glossy.
- Stir in clear edible shimmer dust and let cool slightly.
- Unmold the frozen bombs and place on a wire rack.
- Pour the crystal mirror finish evenly over each bomb.
- Garnish with strawberry slices and lemon zest curls.
- Serve chilled.
Notes
Ensure the bombs are fully frozen before applying the mirror finish for best results. The shimmer dust gives a sparkling effect.
Nutrition
- Calories: 340
- Sugar: 27 g
- Fat: 23 g
- Carbohydrates: 31 g
- Protein: 4 g
Tried This Recipe? Leave a Comment!
Did you make this recipe? I’d love to hear how it turned out! Please leave a comment and a rating below. Your feedback helps other home cooks and supports cheerychop.com!
For more delicious inspiration, follow me on Pinterest!